
This is it. This is the projector we have all been eagerly waiting for, a projector around which a kind of myth has been built, and not without reason. When Valerion has already given us the Pro 2, which in my view is one of the best projector in the mid-range category, how much higher can the bar possibly be raised with the MAX?
Expectations were high, the wait for its release was long, and my curiosity when it finally arrived in my hands was even greater. Ladies and gentlemen, relax, sit back comfortably, grab the drink of your choice, and allow me to guide you into the fascinating world of Valerion. This is not just another review, it is an in-depth look at Valerion’s vision for home projection and how the MAX redefines everything we thought we knew up to now. Enjoy the ride.
Design & Build Quality – Meet the MAX
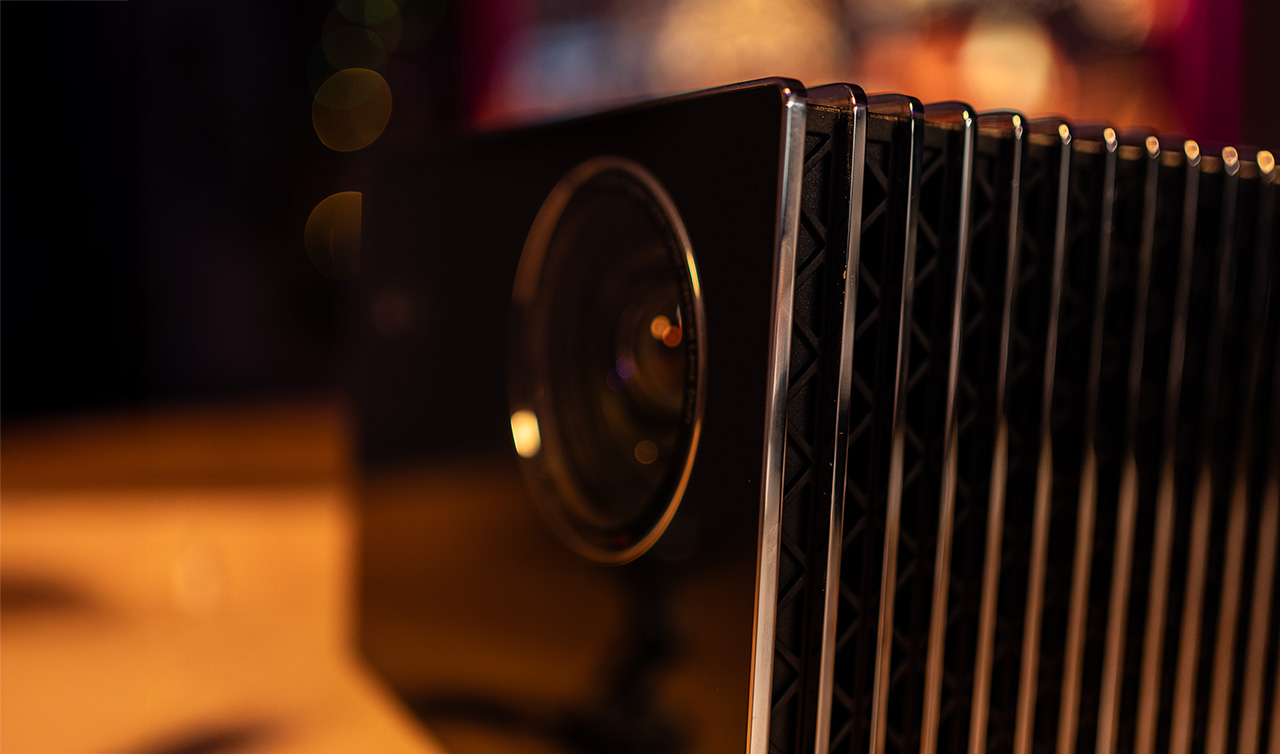
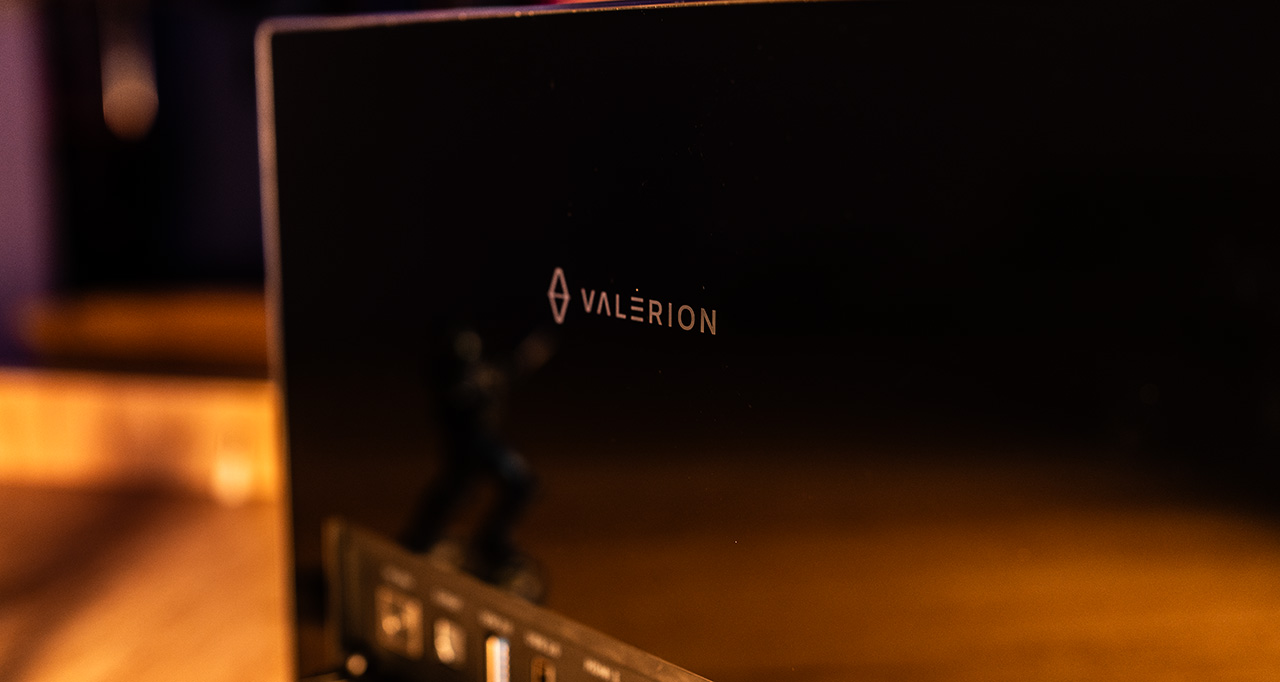
The MAX is stunning, period. Even if you have nothing to do with projectors and simply spot it in a store window, its symmetrical design, with the 14 beautiful metal slats and the volcanic glass black lacquer surfaces, immediately draws your attention.
A true jewel for any living room and any home. It might even be the only projector that won’t trigger a single complaint if your wife unexpectedly comes back from a business trip and finds it set up in the living room, while you’re watching football with your feet on the table, drinking beers with your friends, and pizzas scattered everywhere.
When it comes to the MAX, I’m sure. For the rest, I wouldn’t bet on it.
See for yourself.
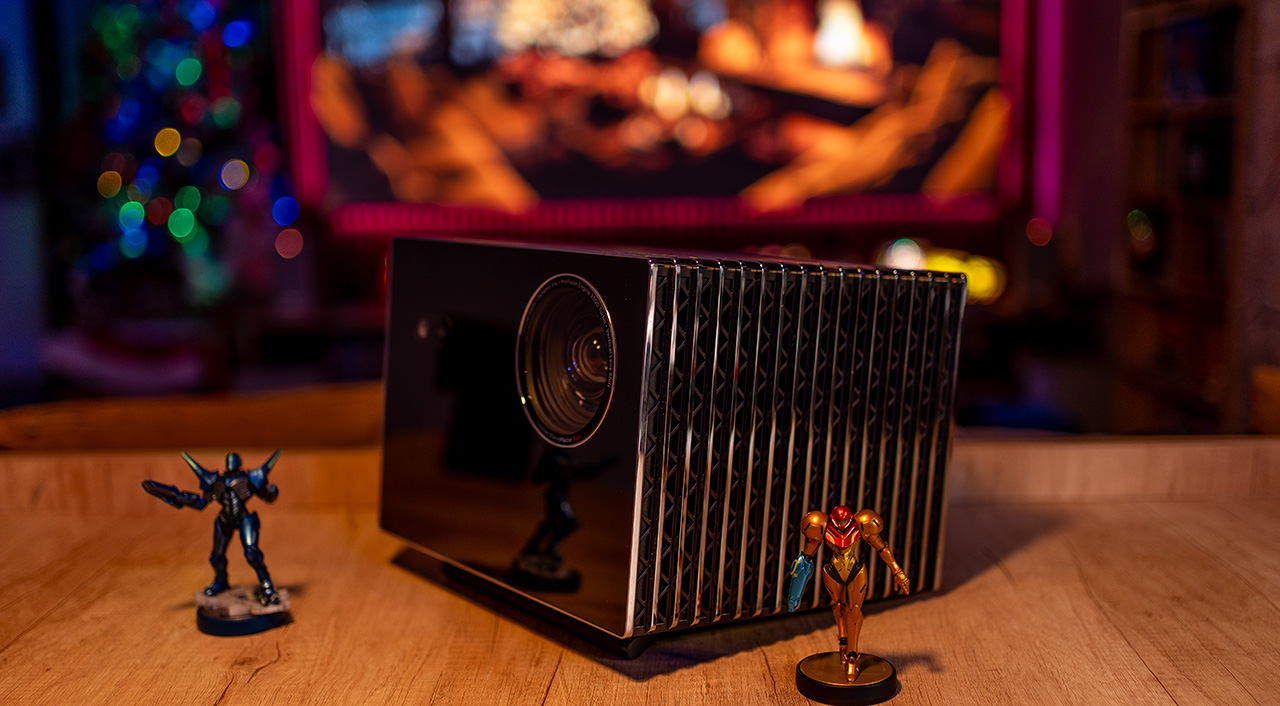
The build quality is simply outstanding. It is heavy, and the moment you hold it in your hands, you immediately realize that this is a solid, premium construction.
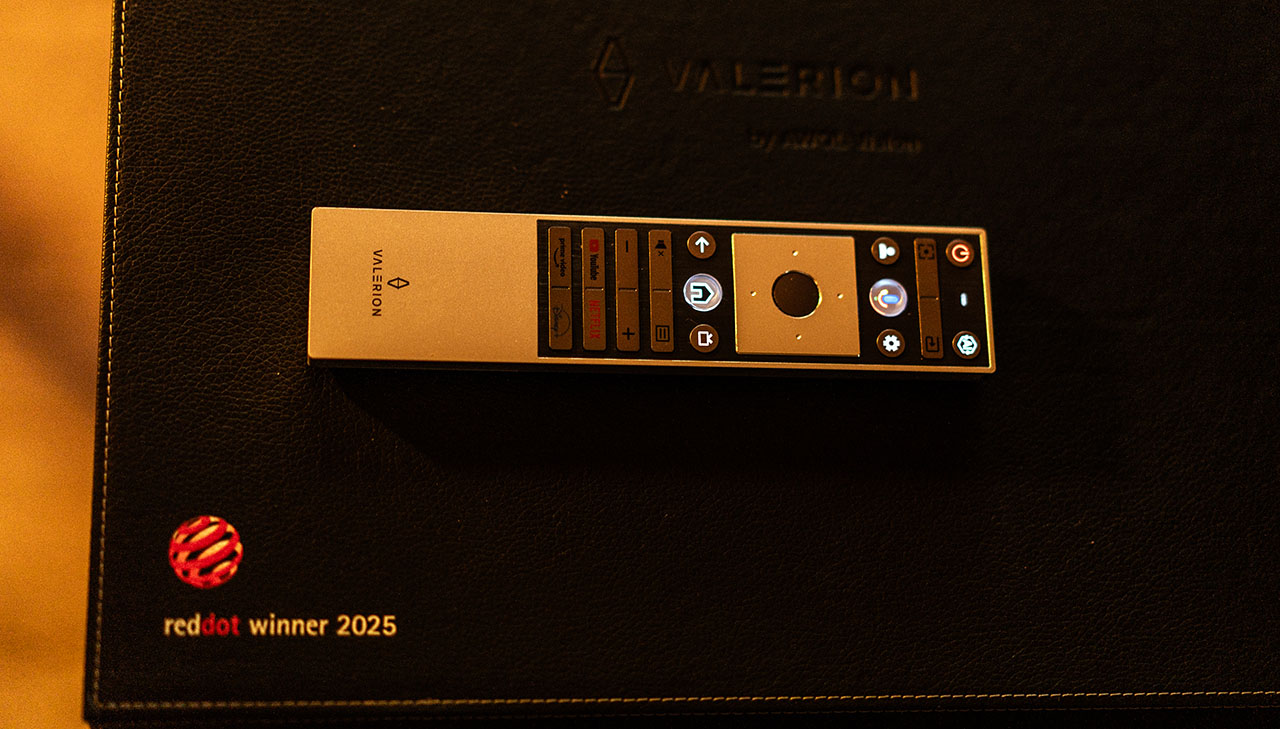
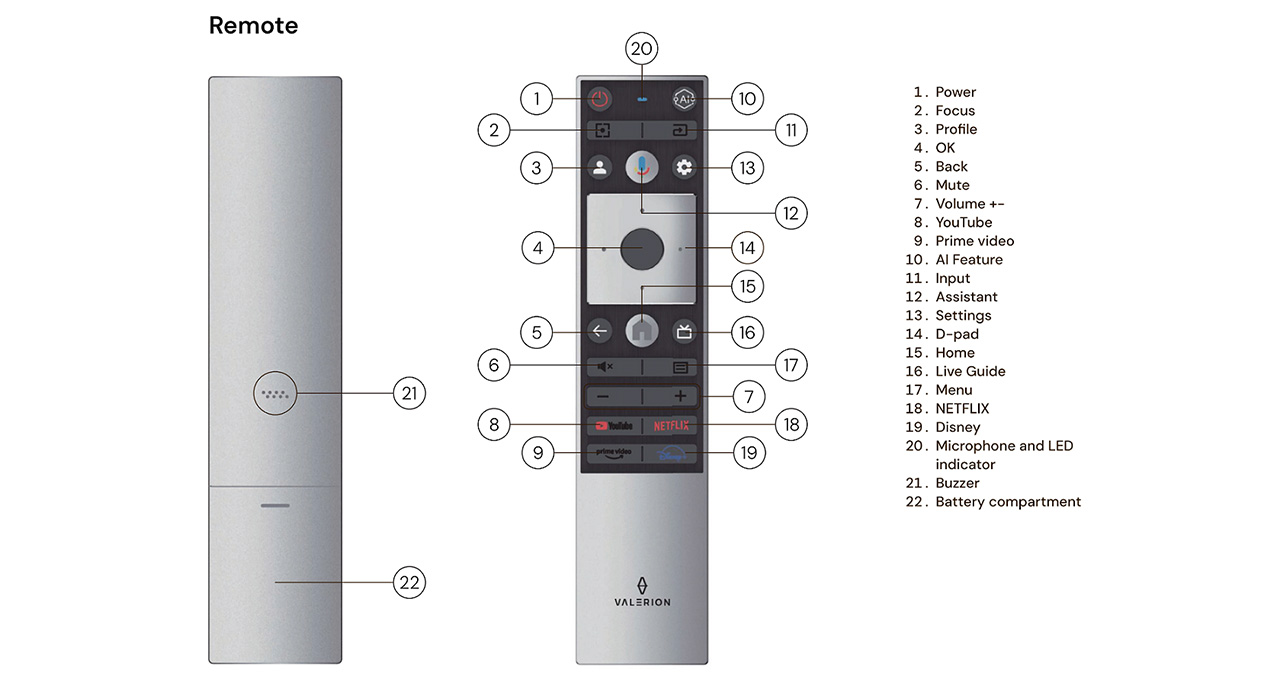
The remote control is the familiar high-quality remote found across all Valerion models. It is backlit, feels very premium, and offers excellent tactile feedback when pressing the buttons.
Technology, Features & Specifications
The MAX is a 4K DLP projector with 3,500 ISO lumens of brightness and 5,000:1 native on/off contrast, reaching up to 50,000:1 dynamic contrast (with iris+EBL). The feature set of the MAX is truly impressive, covering almost everything a modern movie enthusiast could ask for from a contemporary projector, and why not, even a gamer.
Its weight is half a kilogram higher than the Pro 2, at 7.5 kg, while the dimensions are identical except for the length. The Pro 2 measures 260 × 186 × 216 mm (10.2 × 7.3 × 8.5 inches), whereas the MAX measures 260 × 186 × 234 mm (10.2 × 7.3 × 9.2 inches).
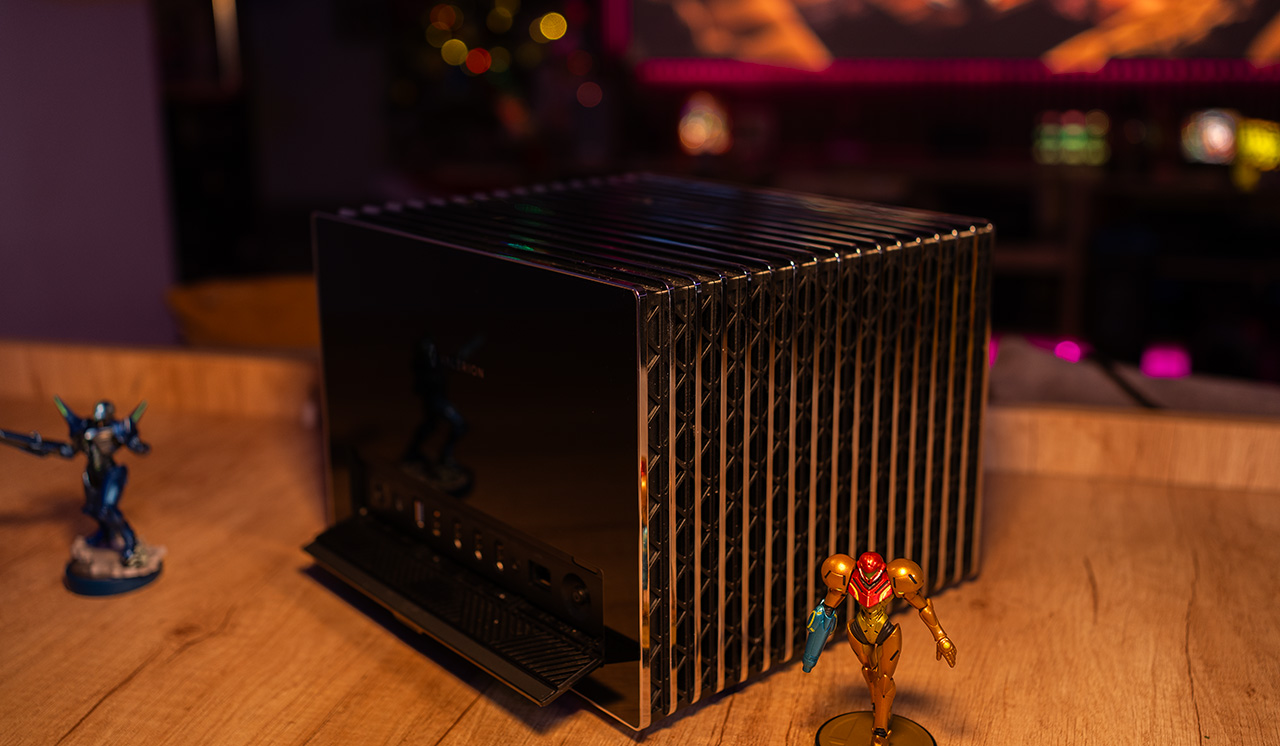
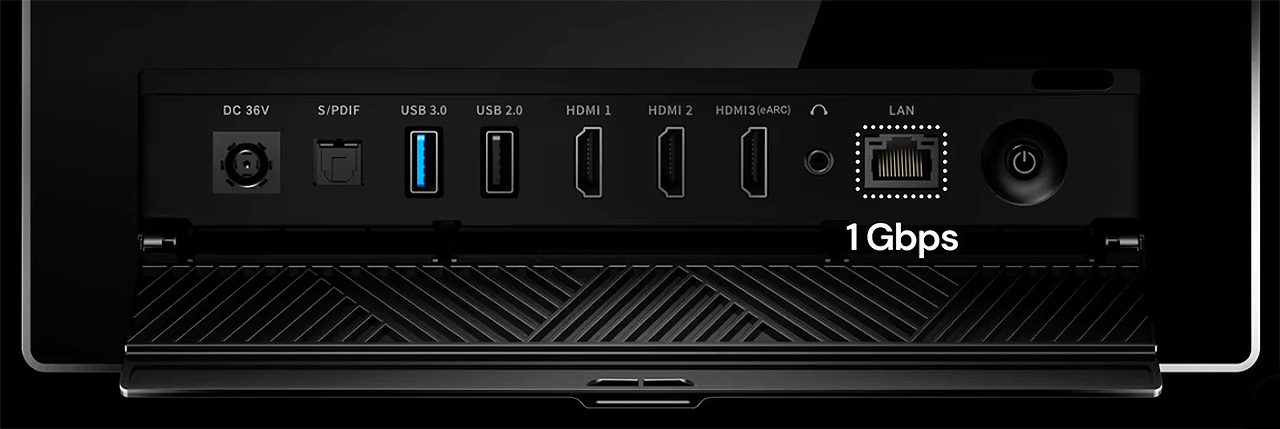
At the rear, there is the familiar cover panel, hiding the connection ports of the MAX. The most important ones include three HDMI ports (2× HDMI 2.1 and 1× HDMI 2.0b with eARC), as well as a 1 Gbit Ethernet port. This ensures fast, stable, and reliable streaming, even when playing large 4K files.
Of course, Wi-Fi 6E and Bluetooth 5.2 are available for the wireless connectivity of the MAX, allowing fast and stable connection to your local network as well as easy pairing with Bluetooth accessories, such as wireless speakers.
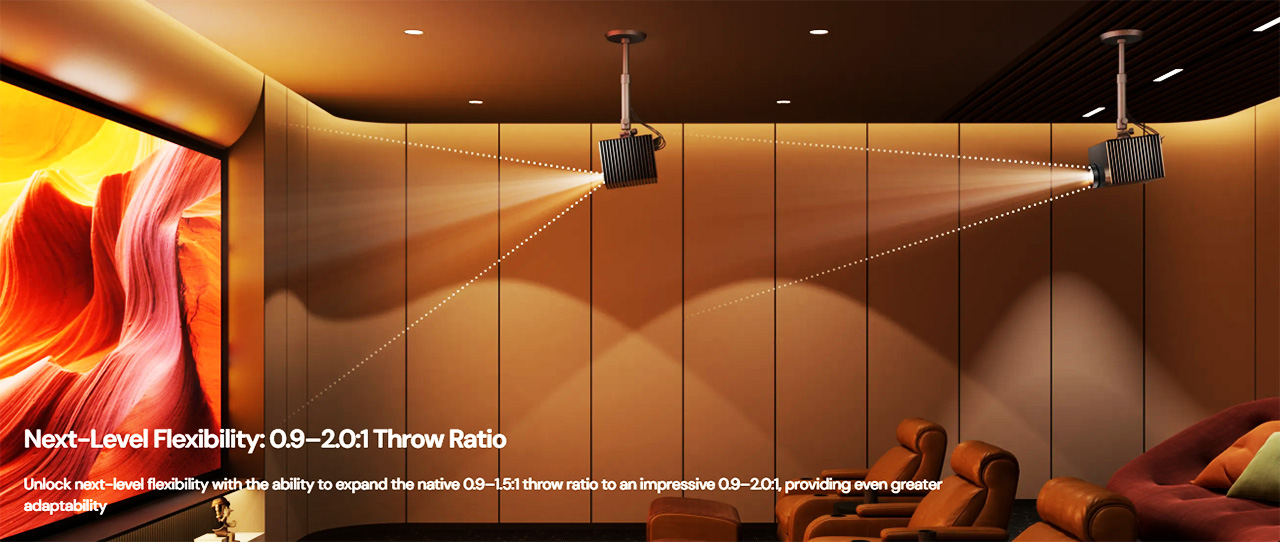
The MAX features a completely different and significantly improved lens compared to the Pro 2. It offers the same throw ratio, ranging from 0.9 to 1.5, meaning the MAX can project a 100-inch image from a distance of approximately 2.0 to 3.3 meters (6.5 to 10.9 feet), the two lenses are otherwise very different.
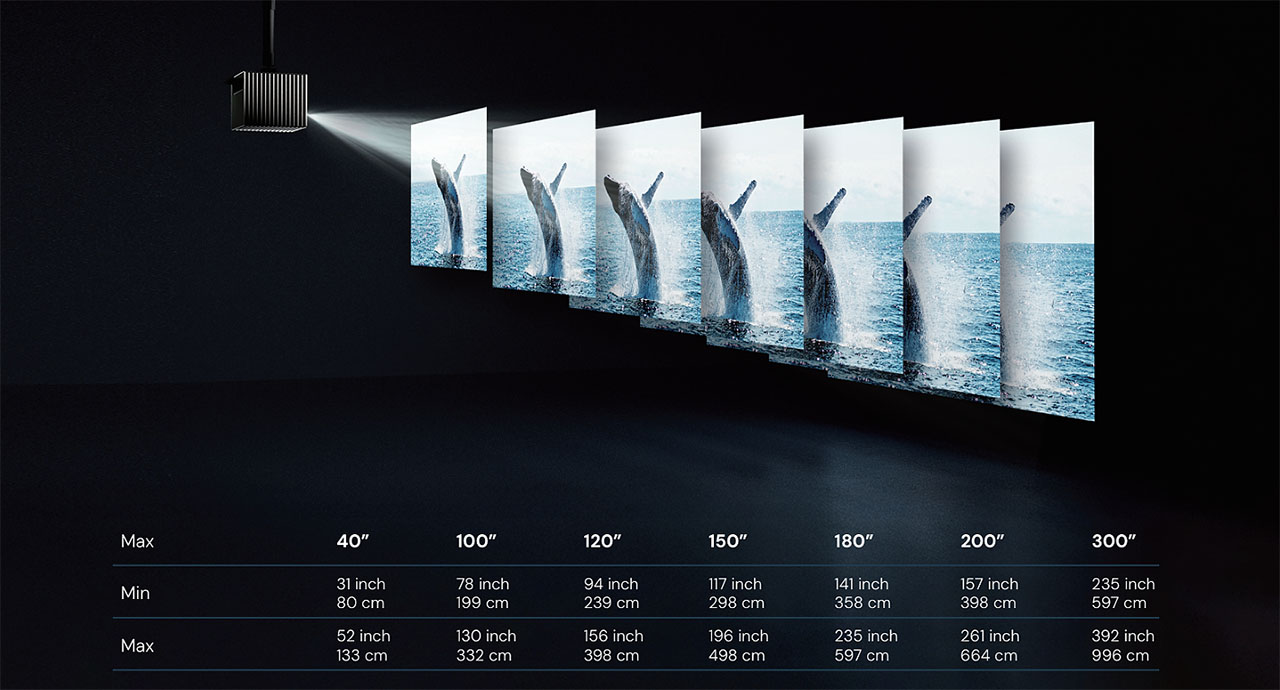
For those who find the 1.5 throw ratio limiting and want to place the MAX even farther from the screen, Valerion offers an optional accessory lens that extends the throw ratio up to 2.0.
This extra lens attaches externally to the MAX and can be a real solution for users with large rooms. With this lens installed, the MAX can be placed at a distance of up to 4.4 meters (14.5 feet) to project a 100-inch image, offering much greater installation flexibility.
The lens of the MAX includes an electronic lens shift of 105%, which makes any type of installation much easier. It also offers one additional convenience, which I will explain next.
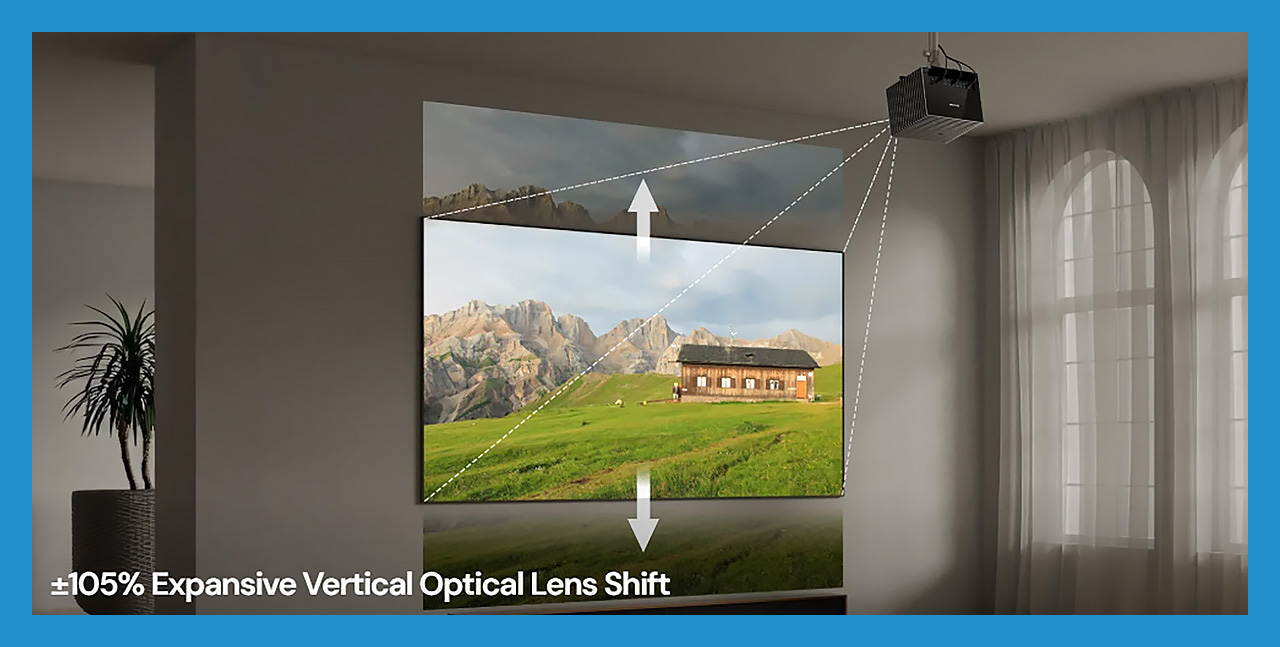
To avoid any confusion about the 105% lens shift, in practical terms it means that the MAX can be positioned so that the lens sits from 2.5 % above to 2.5 % below the projected image frame, and anywhere in between.
This may not be ideal for users who want to ceiling-mount the projector with the image starting much lower on the wall. However, it is extremely useful when placing the projector in front of modern projection screens, such as ALR and Fresnel screens.
With these types of screens, especially ALR screens, it is important for the projector lens to be positioned as close as possible within the image frame, ideally near the center of the screen. This helps avoid hotspotting and ensures better brightness uniformity across the image.
For me, this practical flexibility provided by the lens shift of the MAX, is very useful.
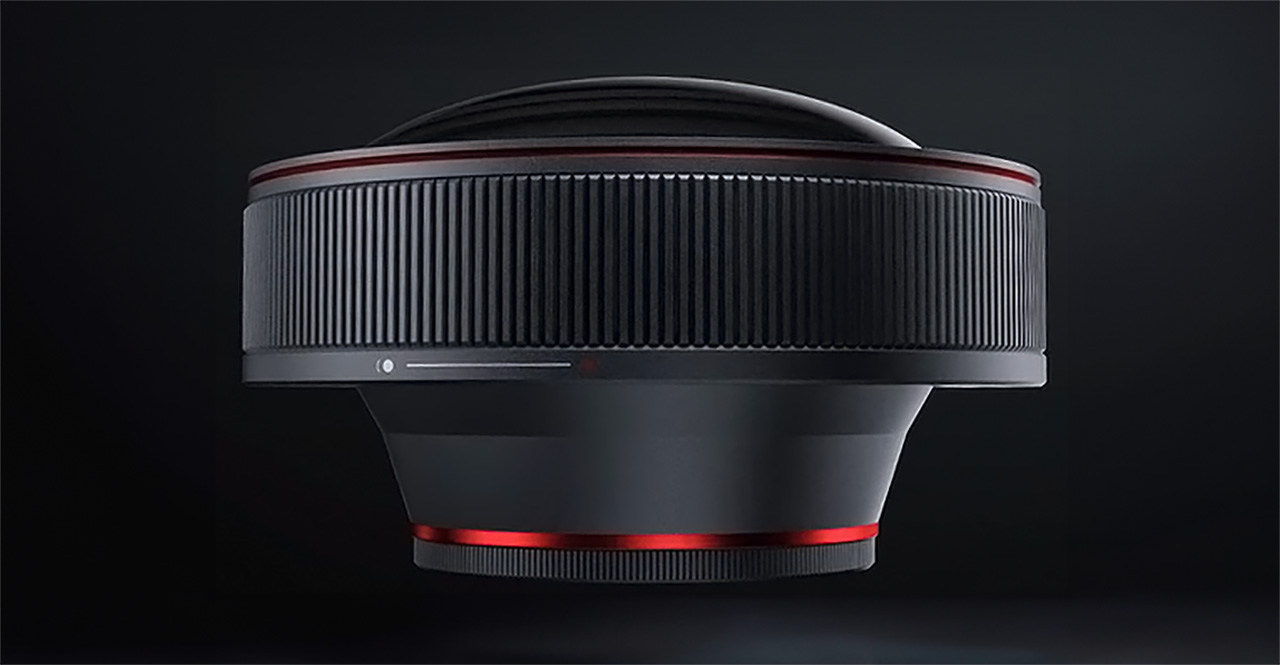
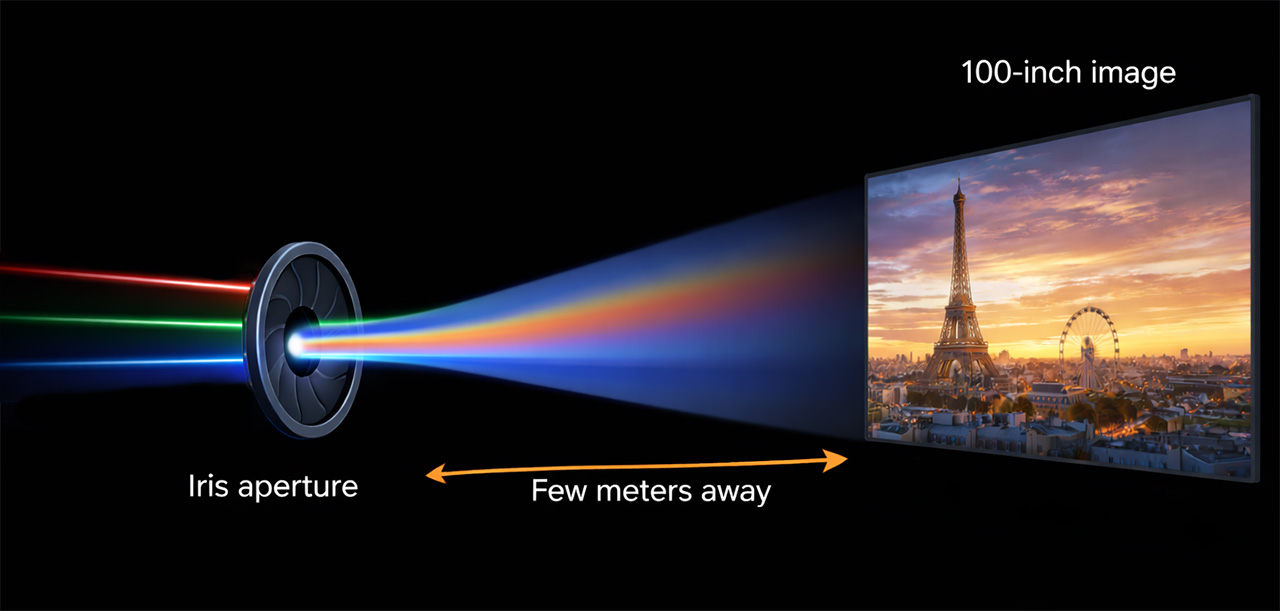
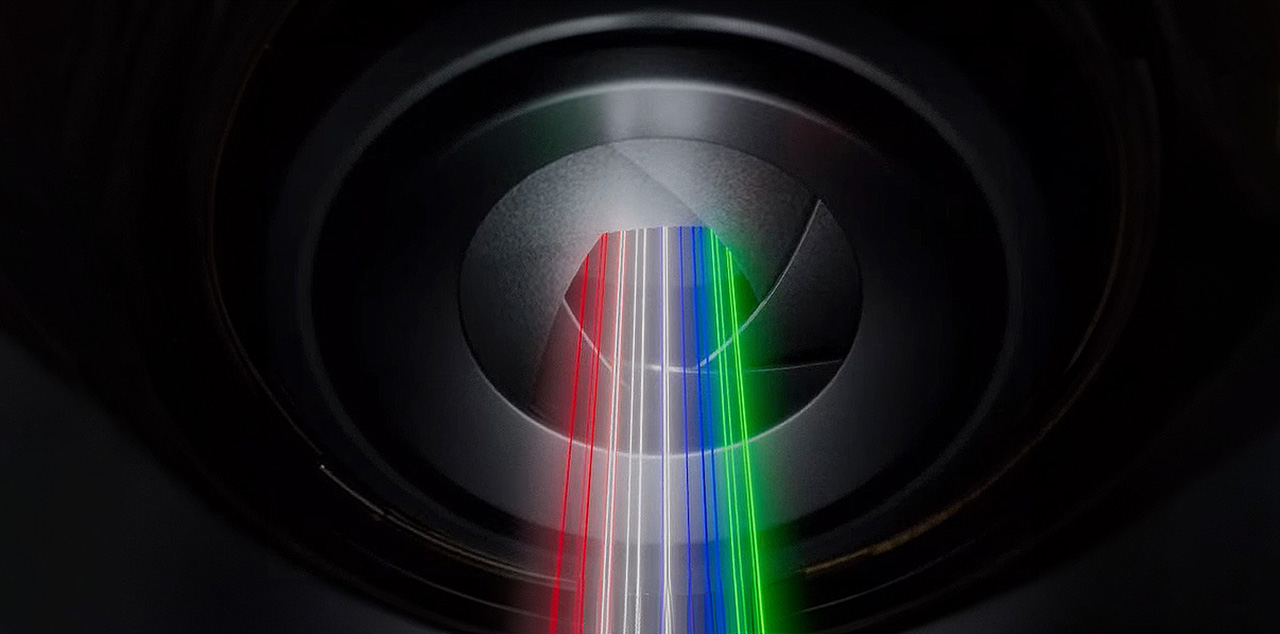
But the real innovation of this lens is hidden inside it, between its glass elements. And of course, I am referring to the iris built into the MAX lens, which I consider to be one of its strongest features.
This high-tech stepped iris can be adjusted in six different positions, effectively changing the lens aperture. The iris blades have a black coating, which Valerion describes as a “special coating”, designed to absorb stray light and prevent it from reaching the screen. This is a type of technology usually found in high-end camera lenses.
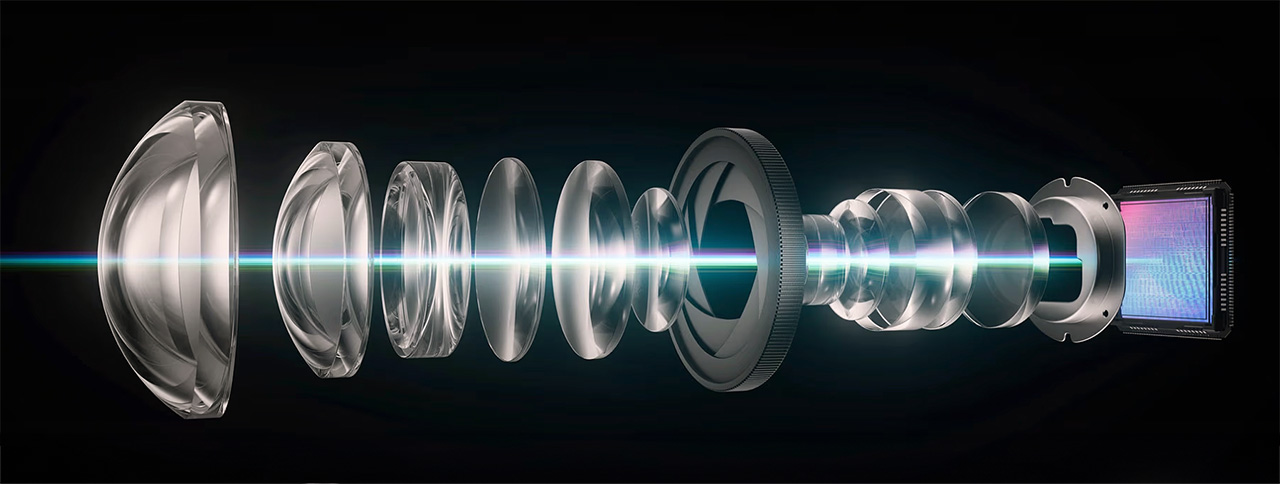
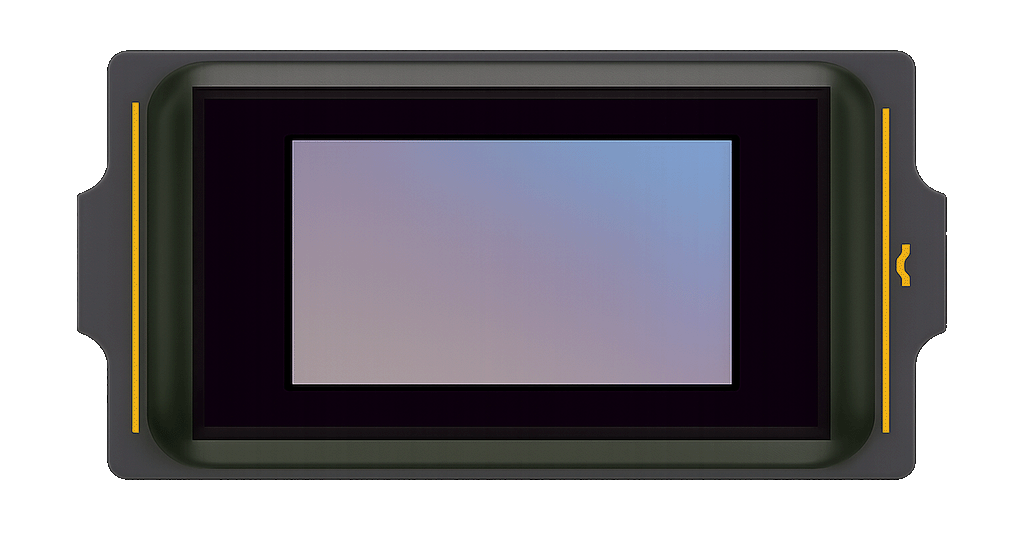
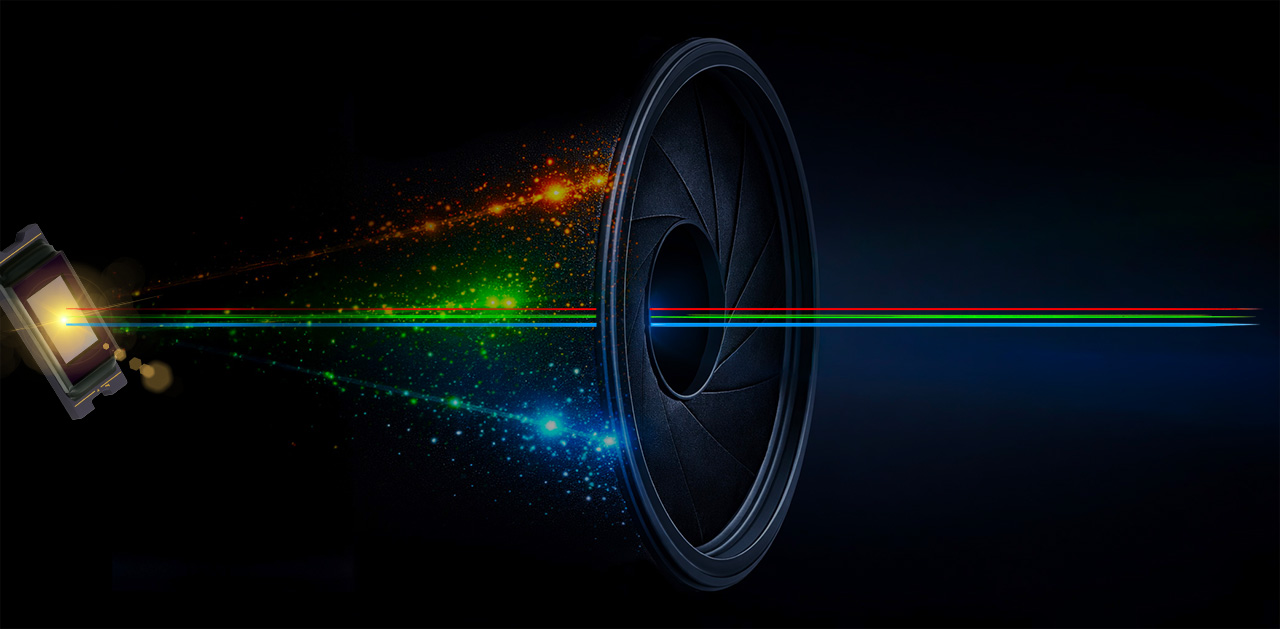
The heart of the MAX optical engine is the 0.47-inch DMD chip from Texas Instruments, specifically the DLP471TP. This is a native 1080p DMD, which, with the help of a 4-phase XPR pixel-shifting module, is capable of delivering the full 4K resolution of 8.3 million pixels on screen.
The MAX uses a latest-generation pure RGB laser engine, based on separate red, green, and blue laser diodes. This otical engine light source allows the projector to achieve full BT.2020 color space coverage, delivering a very wide color gamut and high color purity, which makes it fully “approved” from a color perspective for all modern HDR formats.

The MAX is powered by the MediaTek Pentonic 700 (MT9618) SoC, a modern and powerful chipset designed for high-end home cinema applications. It features a quad-core ARM Cortex-A73 CPU, a Mali-G52 GPU, 4 GB of DDR4 RAM, and 128 GB of internal storage, ensuring smooth system performance and fast app operation.
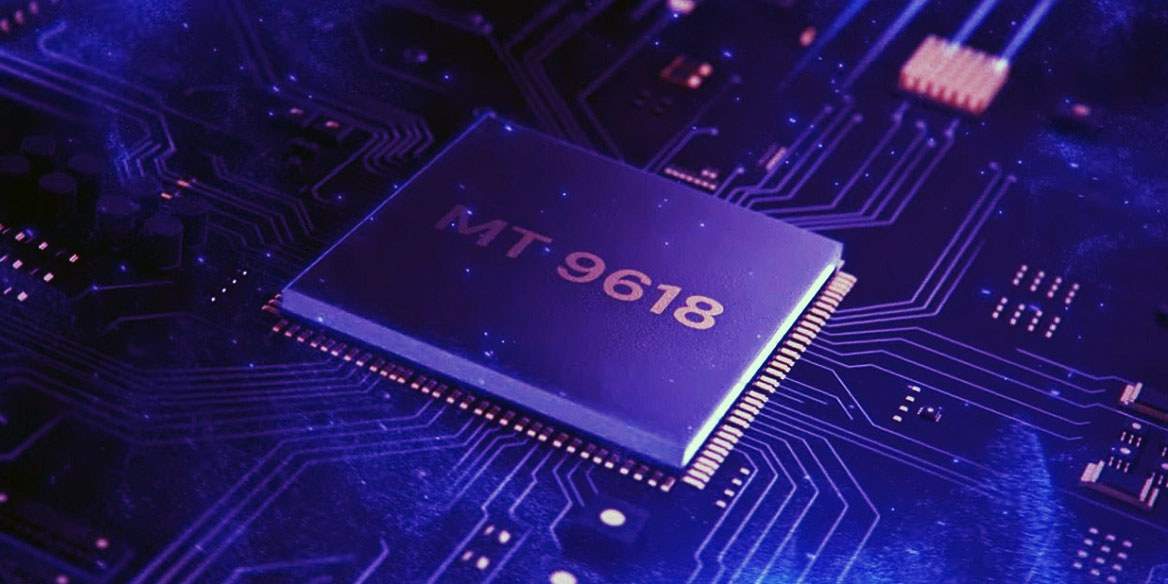
The MT9618 also brings advanced AI picture processing, including AI Super Resolution, scene and object recognition, as well as MEMC support up to 4K60Hz. In addition, it supports all modern video codecs, Dolby Vision, HDR10+, and advanced gaming features, making it a perfect match for the overall high-performance profile of the MAX.
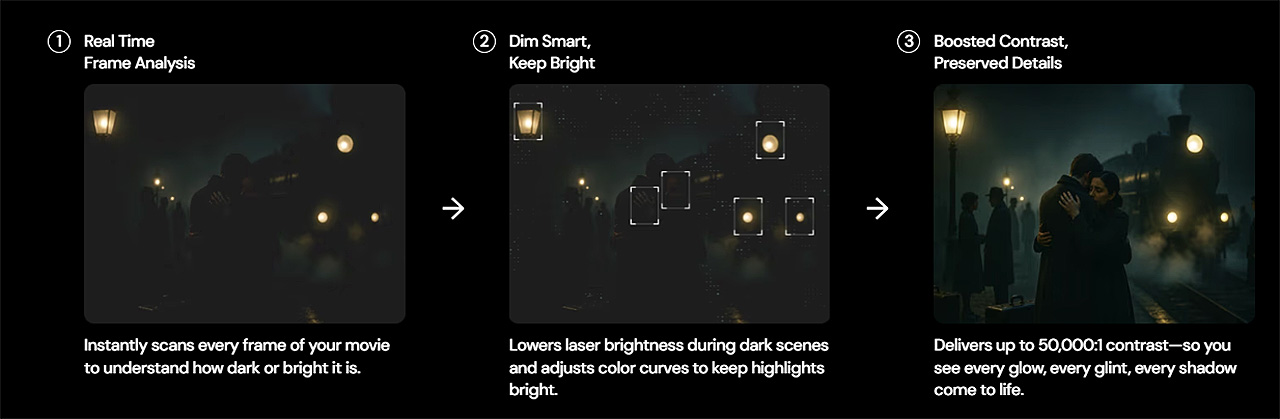
One of the most talked-about and most important features of the MAX is, of course, EBL (Enhanced Black Level). This algorithm analyzes the content in real time, frame by frame, and dynamically adjusts both the laser power and the gamma correction, in order to achieve the best possible contrast and the lowest possible black levels.
A detailed explanation of how EBL works and its real-world performance can be found later in this review.
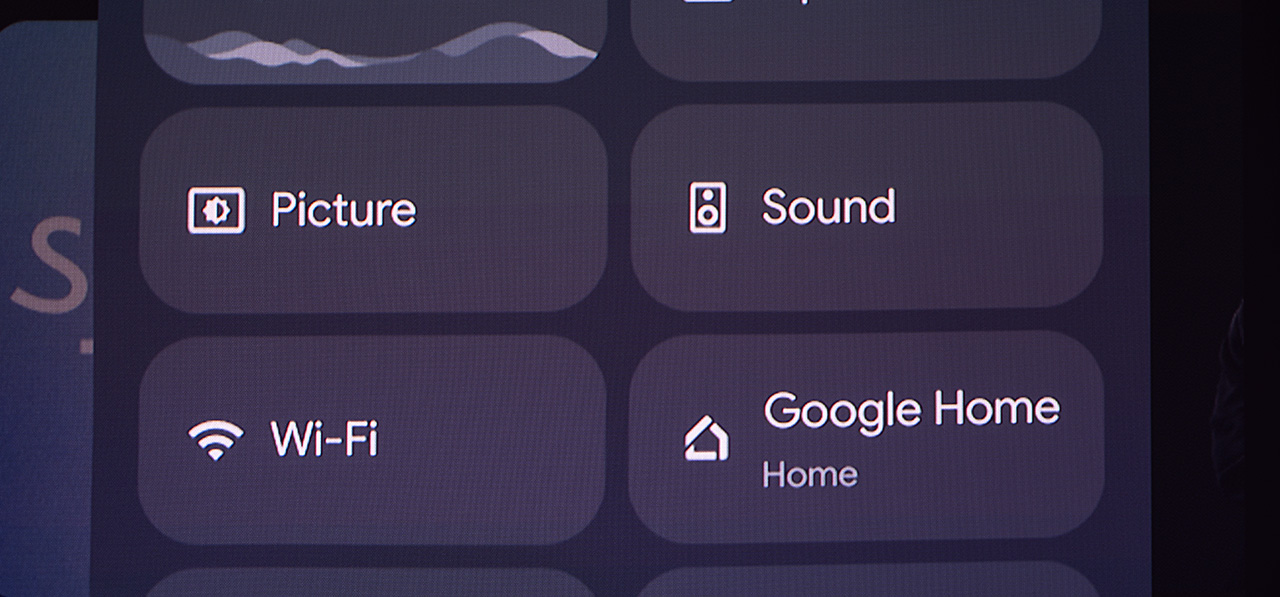
Finally, the MAX comes equipped with Google TV 12, with all the major streaming platforms preinstalled and backed by official licenses. This ensures full 4K streaming without any issues or limitations.
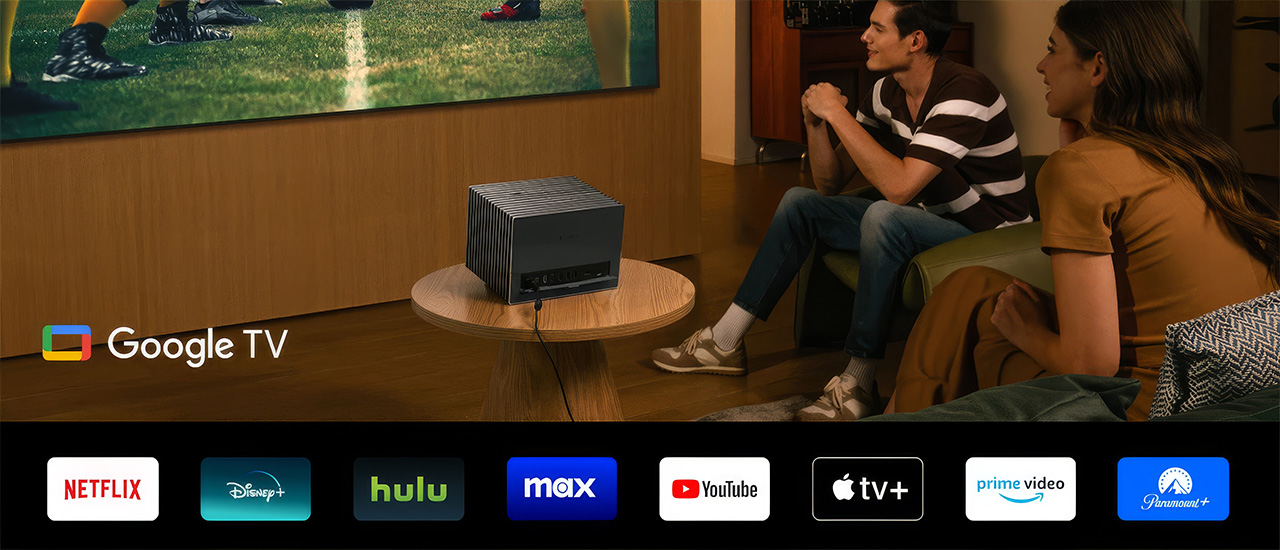
The 4 GB of RAM make a clear difference here. Navigating the Google TV menus and the projector settings is extremely fast and completely lag-free, but the settings menu of the MAX is exactly the same as on the Pro 2, and it also carries with it the same bugs I already mentioned in my Pro 2 review last year.
For example, pressing Back inside any of the settings of the “projector” menu does not take you one step back, as it should. Instead, it throws you all the way back to the main screen. On top of that, the iris controls were placed inside this problematic menu, which makes quick iris adjustments while watching a movie an unnecessarily annoying and slow procedure.
In my opinion, the menu design and overall usability clearly need improvement in a future firmware update. It’s a shame to have such a fast and smooth system, while at the same time dealing with a menu that is hard and tiring to use, even for basic settings like changing the iris level.
I will not go into further detail about the menu of the MAX, as it remains almost identical to the Pro 2, and I have already covered it extensively in the Pro 2 review. For those who wish to read it, you can find the link here https://www.projectorjunkies.com/valerion-visionmaster-pro-2-full-review/
Measurements
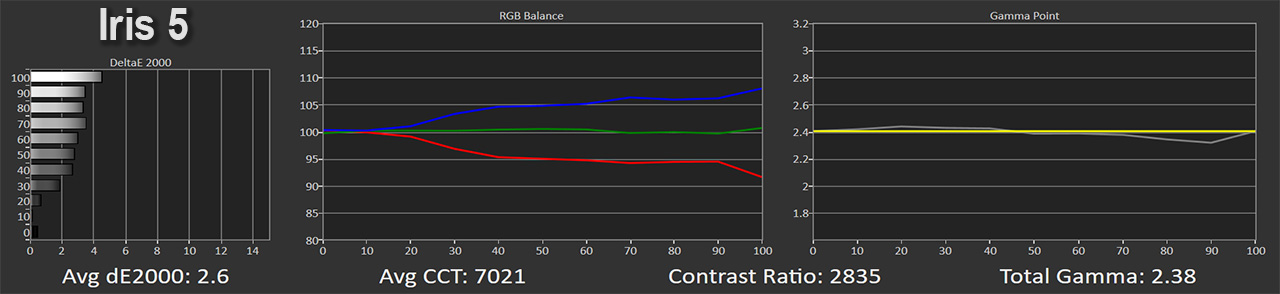
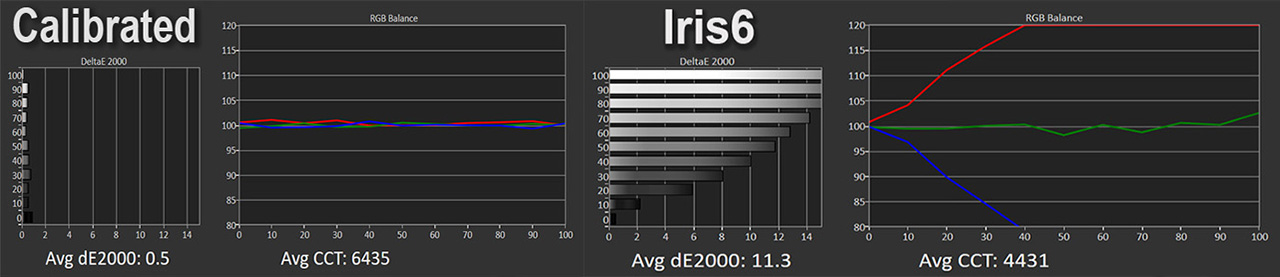
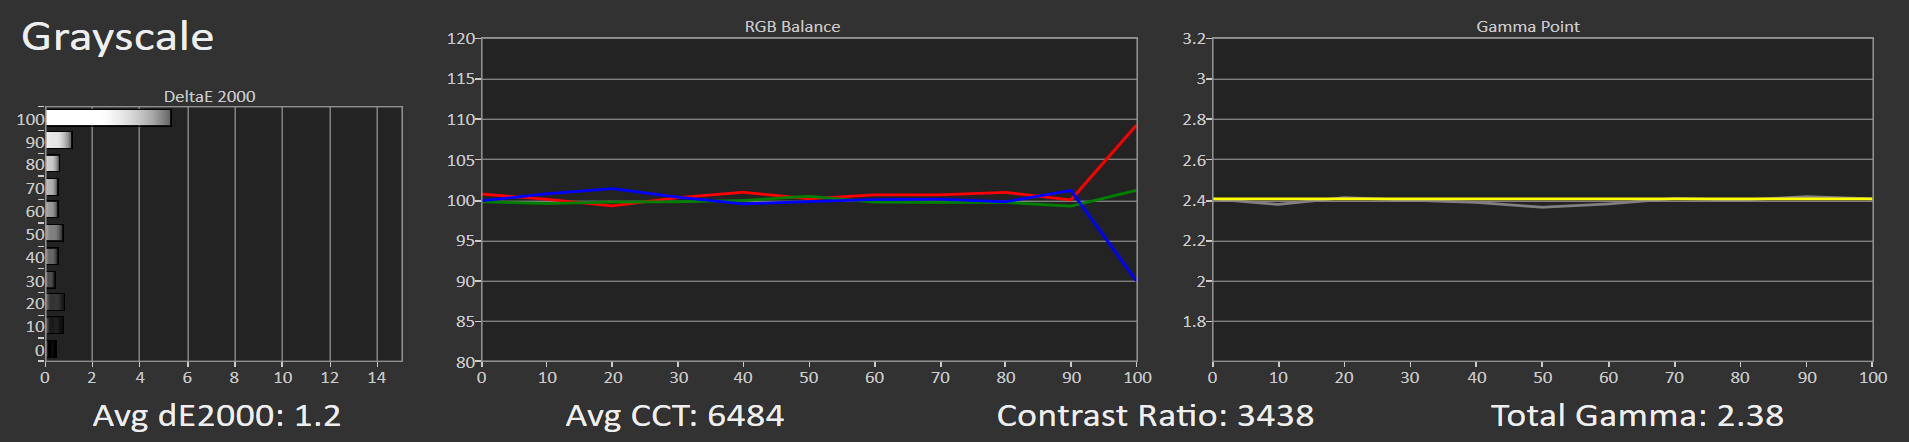
In terms of color performance, the MAX is excellent. It comes from Valerion very well color calibrated out of the box, and I would say it is one of the best factory-calibrated projectors out there.
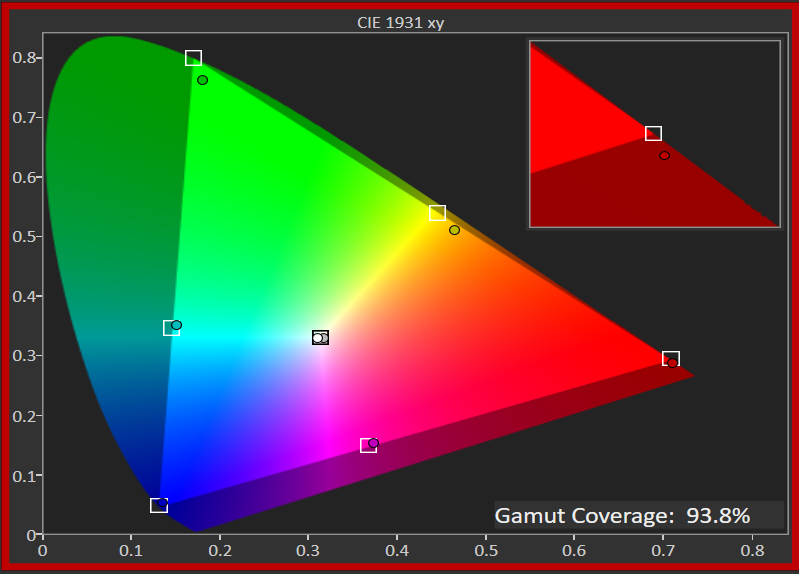
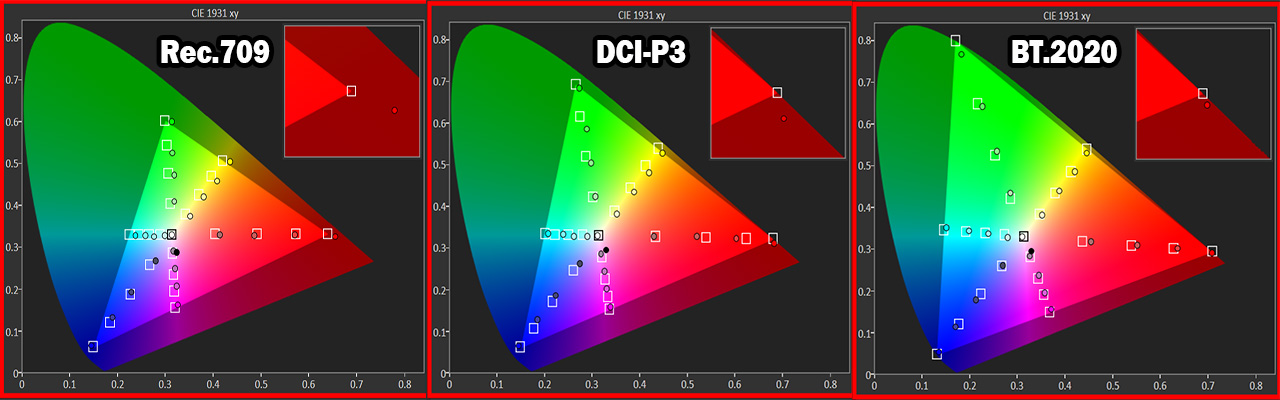
Across all three color standards, it is easy to see the surgical precision with which the MAX handles color saturation and hue for both primary and secondary colors. MAX owners will not need to touch the CMS at all to adjust colors, as the out-of-the-box color tuning is already exceptionally accurate.
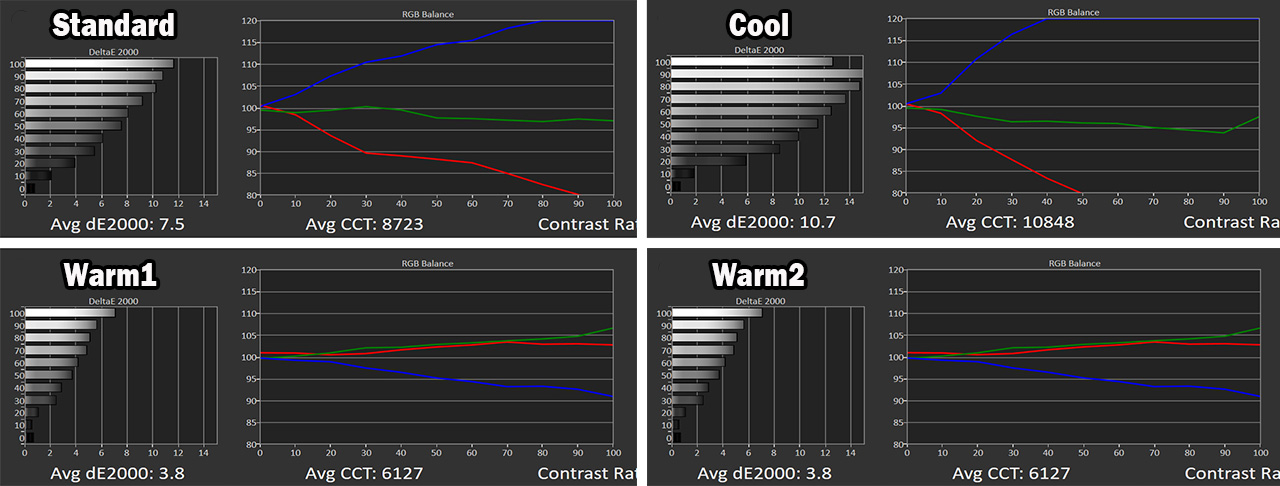
The white balance setting I recommend for the best white balance accuracy, as well as better overall color accuracy, is Warm 1. This is mainly due to the pure RGB sequence used by the laser optical engine of the MAX, which delivers more accurate and consistent color reproduction.
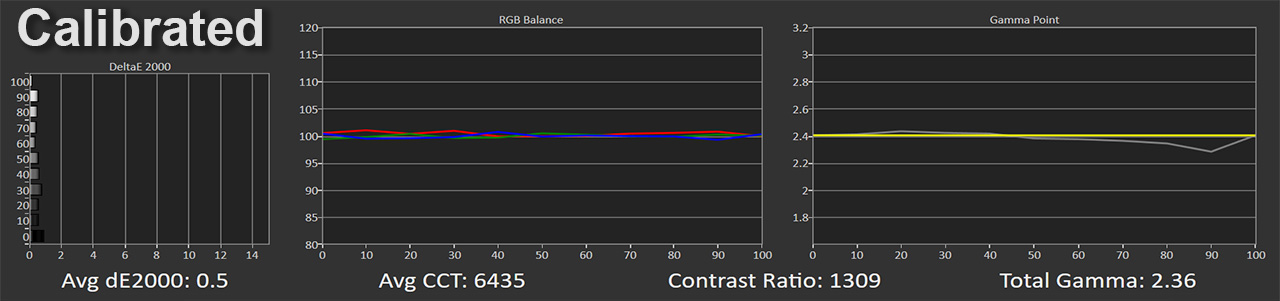
Calibration on the MAX is a very easy process and takes only a few minutes. By adjusting only the RGB gain controls, you can achieve an excellent grayscale result, with a DeltaE 2000 error of just 0.5, which is simply outstanding.
Advice: By lowering the blue gain in the white balance menu to around -15, the entire grayscale becomes very well balanced.
My curiosity was how the iris positions affect white balance, so I took a series of measurements. To keep things simple, I will only show the results from the last two iris positions.
Up to iris position 5, I observed only a slight shift toward cooler tones, which peaks at position 5, with a difference of around 500 Kelvin, moving from 6500K to about 7000K. In my opinion, this is nothing important. You can safely use the MAX with the iris up to position 5 without any extra white balance calibration, exactly as you calibrated it with the iris turned off (or just lower the blue gain a bit more, by around 3–4 units).
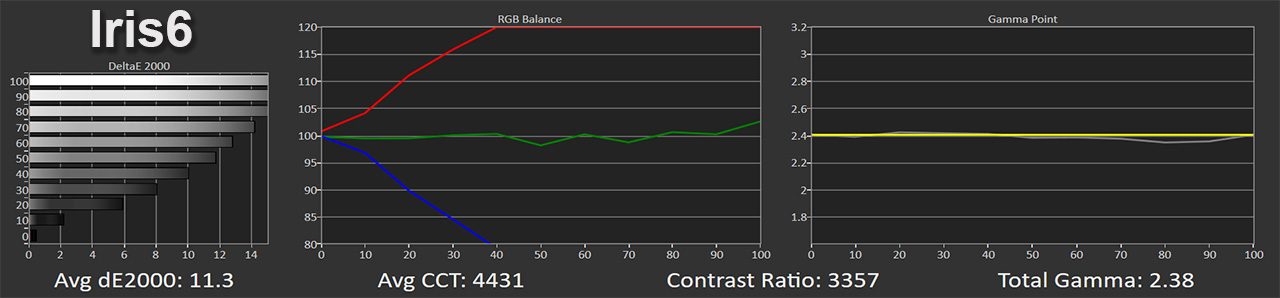
This white balance stability completely breaks down as soon as iris position 6 is selected. At that point, the blue channel totally collapses, while the red channel rises dramatically, causing the grayscale color temperature to drop to an extremely warm level, around 4500 Kelvin.
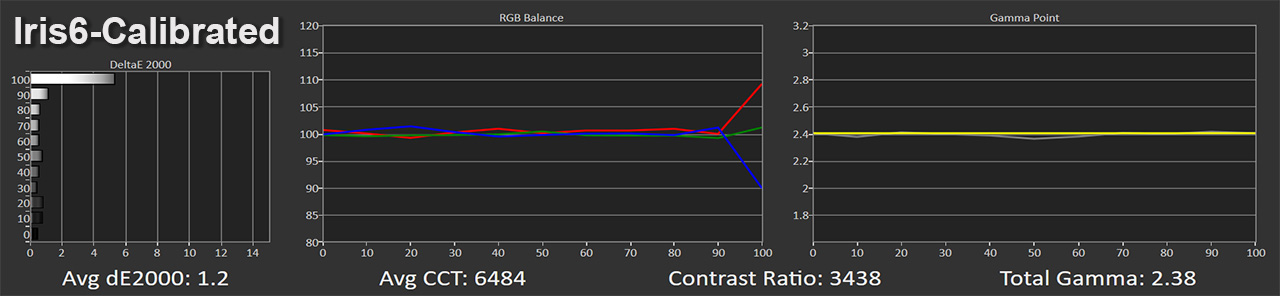
This situation can be corrected up to 90 IRE by simply adjusting the RGB gain controls. Setting the red gain to its minimum negative value (-25) and the blue gain to its maximum value (+25) effectively restores proper white balance within that range.
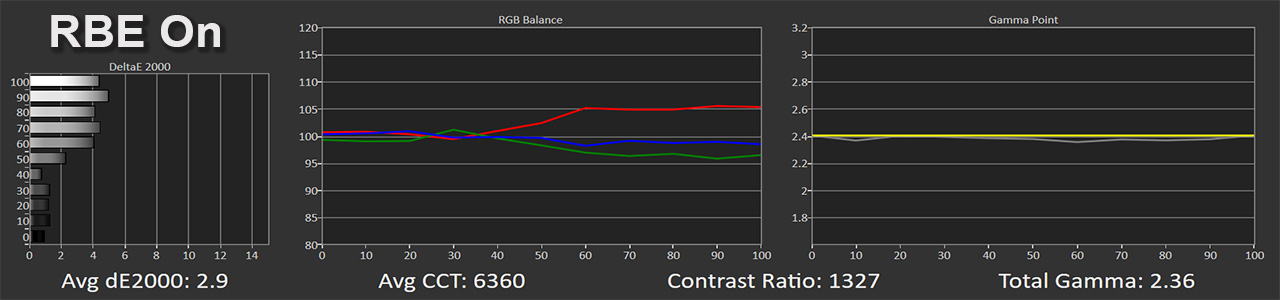
I also took a measurement with RBE Reduction enabled, this unique feature of the MAX that completely eliminates the rainbow effect. Here, I noticed a strange behavior, with a sudden increase in the red channel above 60 IRE, which then stabilizes at the same level all the way up to 100 IRE.
In brightness measurements, the MAX delivered between 3,231 ANSI lumens and 1,010 ANSI lumens, depending on the lens zoom position and the selected laser power setting. You can see the detailed brightness measurements, along with the corresponding power consumption, in the table below.
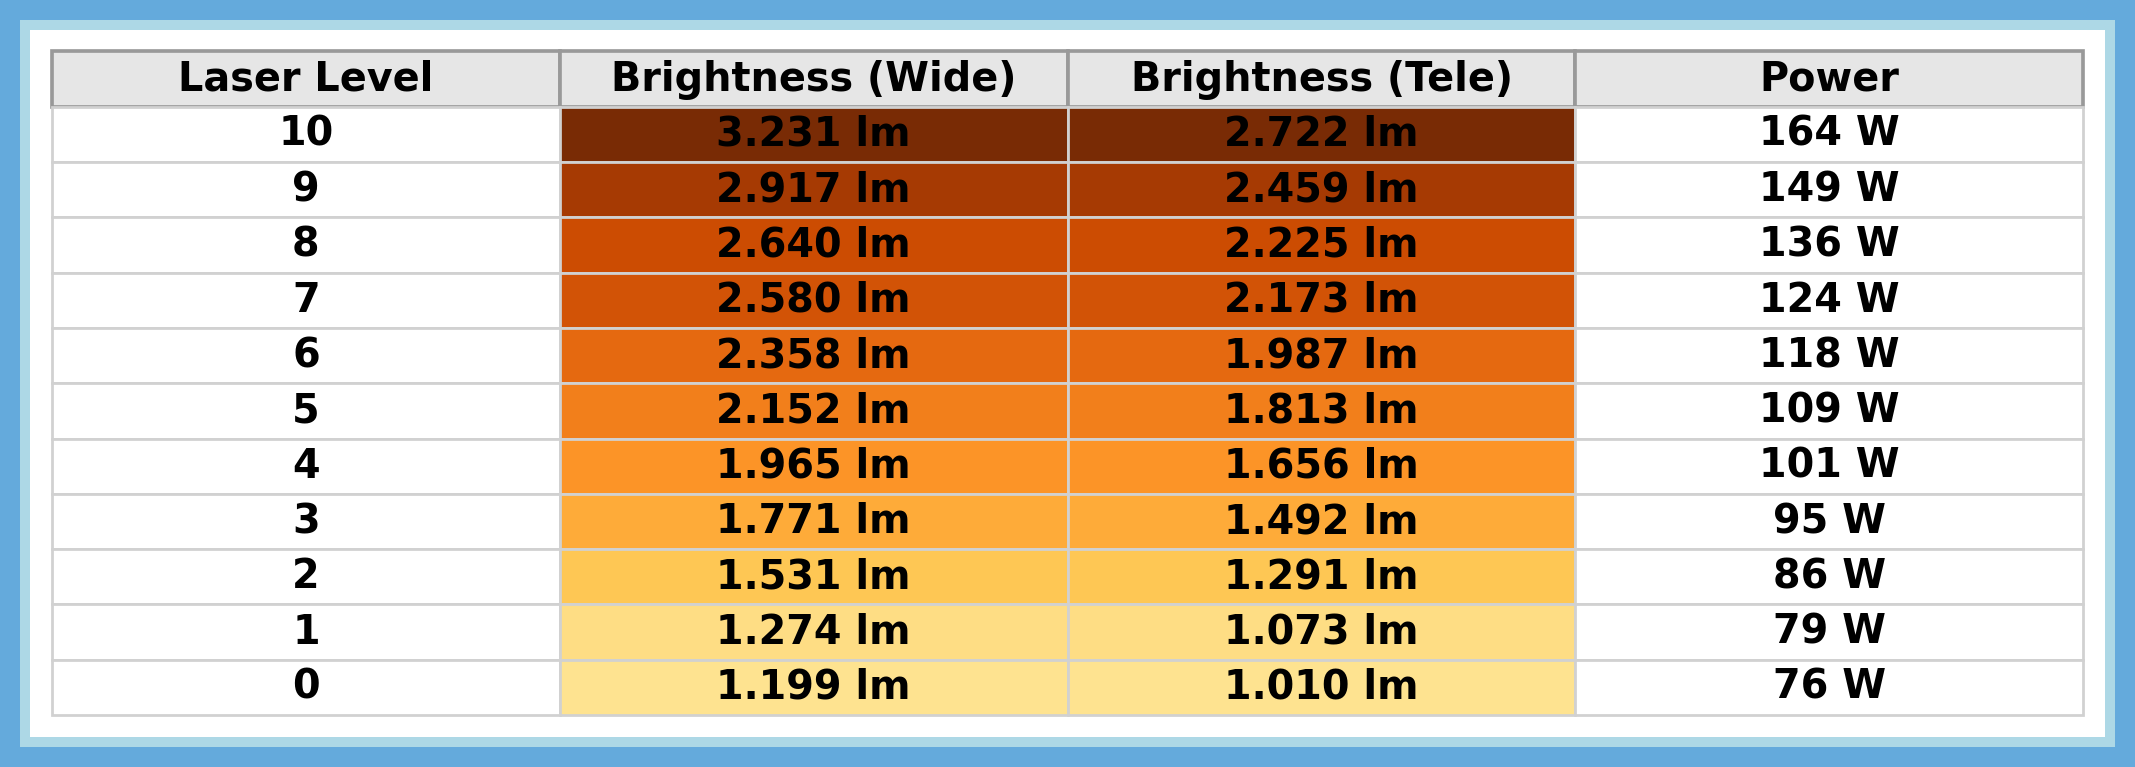
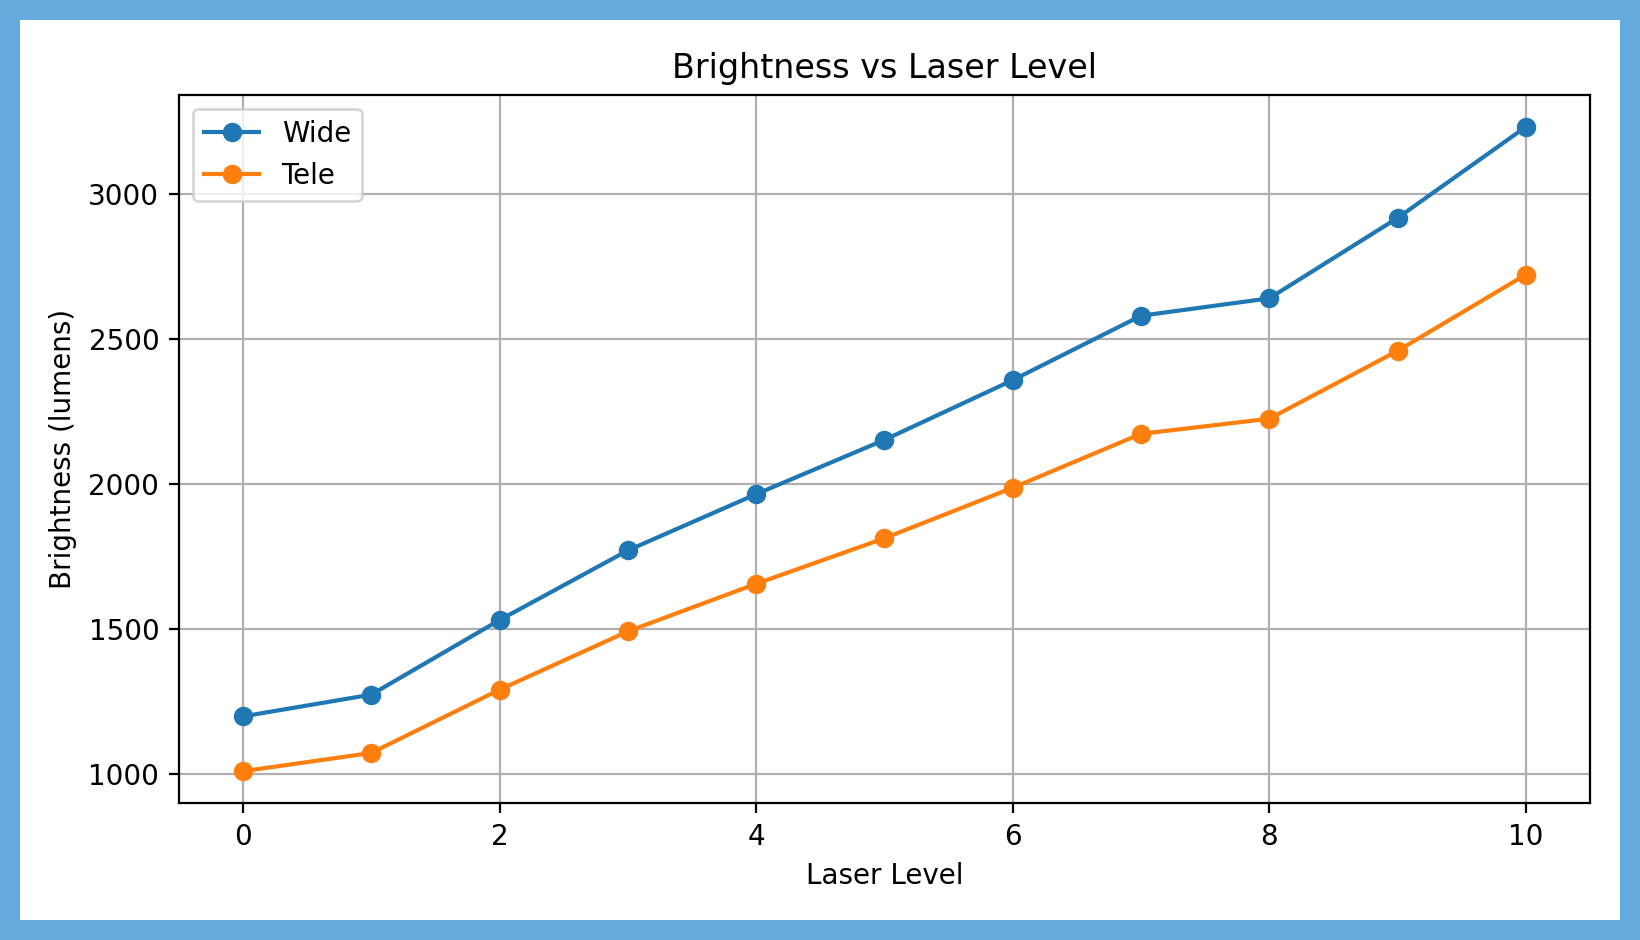
And here is the graph, to make it easier to understand how brightness changes depending on the lens zoom position and the selected laser power level.
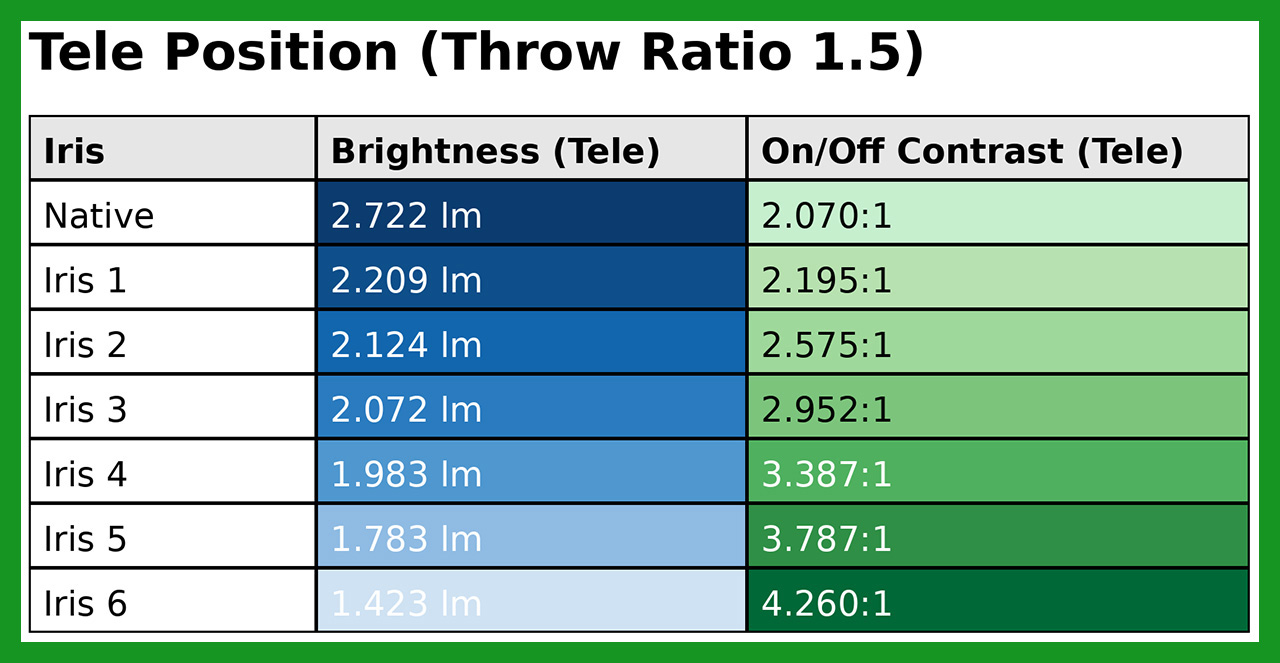
Here you can see the brightness measurements depending on the iris position, always with the laser level set to 10. The lowest brightness of 1423 ANSI lumens is recorded with the iris set to position 6 and the lens zoom at the position that delivers a 1.5 throw ratio.
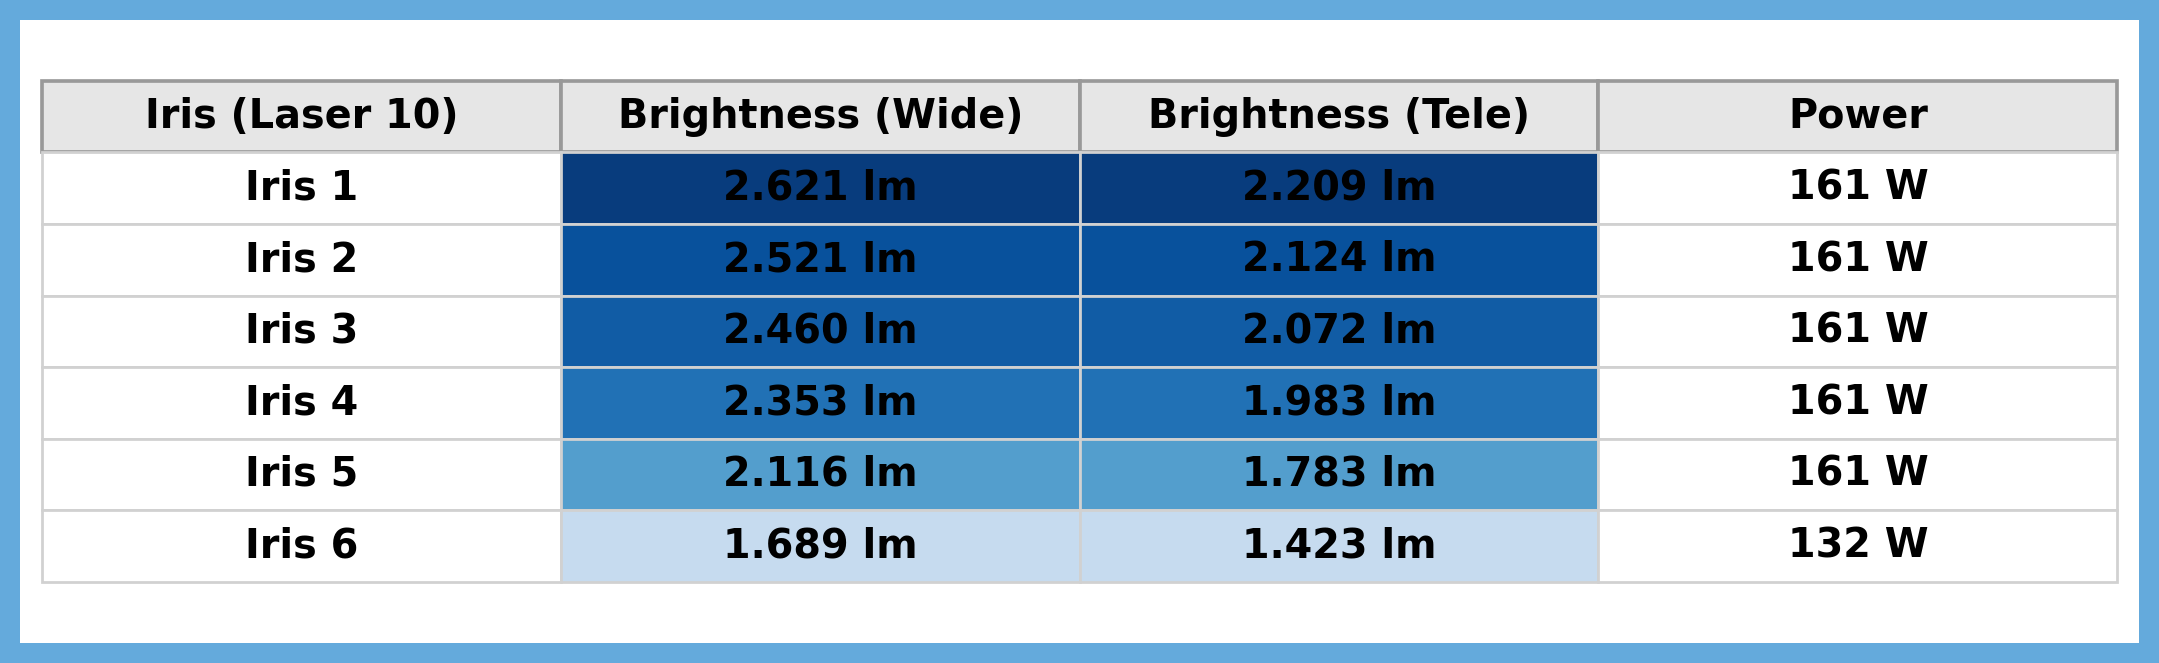
It is also worth noting the drop in power consumption. At iris positions 1 to 5, power consumption remains steady at around 161 W, while at iris position 6 it drops to 132 W. This clearly indicates that when selecting the most closed iris position, the laser power is reduced, most likely for thermal protection reasons I believe.
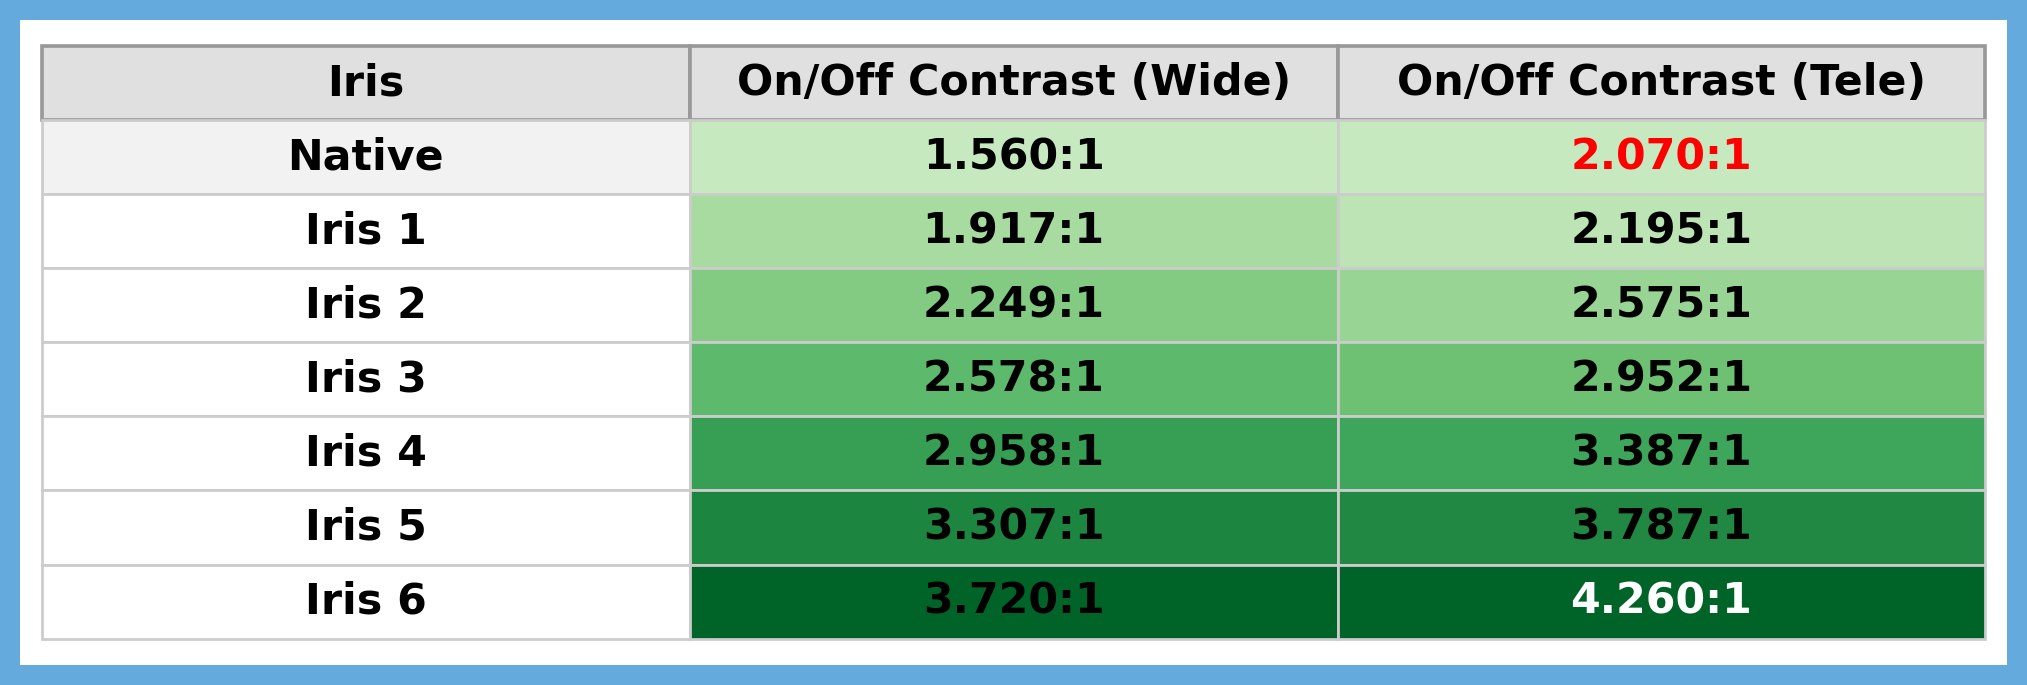
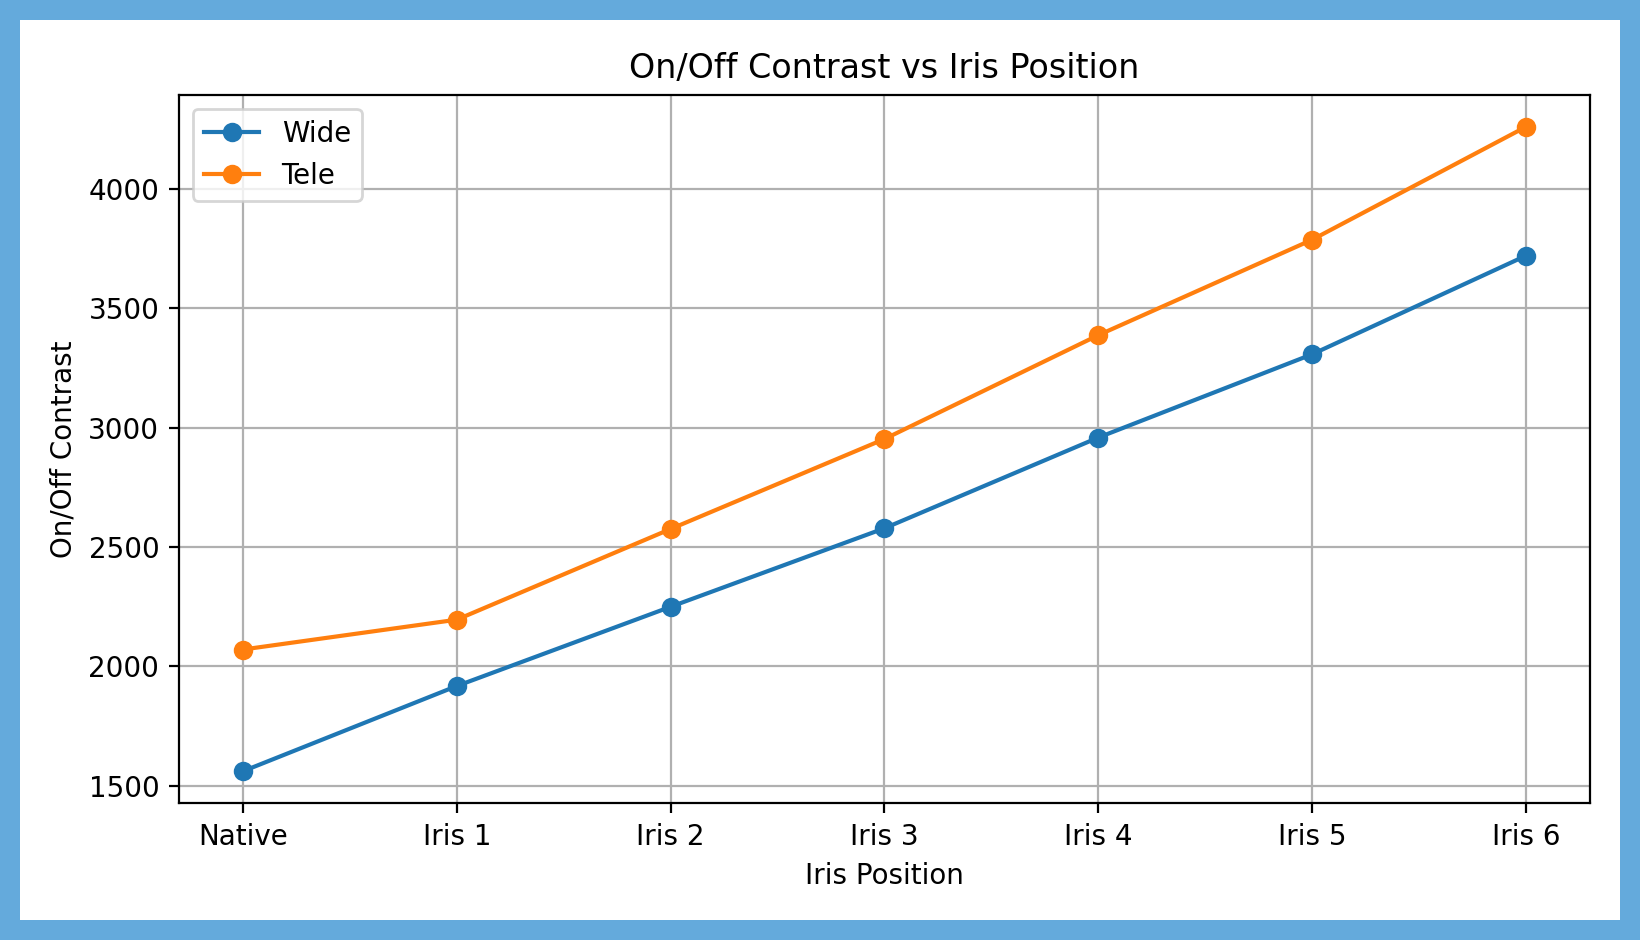
The following table is perhaps the most interesting one, as it clearly shows how native on/off contrast increases depending on the iris position. The lens zoom position also plays an important role here.
The lowest on/off contrast value is 1,560:1 with the iris disabled, while the highest value reaches 4,260:1 with the iris set to position 6.
And here is the corresponding graph, to give you a clearer overall view of how contrast increases in relation to the different iris positions.
Dynamic contrast, with the iris set to position 6 and EBL set to High, was measured at 39,000:1.
But I’ve probably bored you enough with measurements. Let’s move on to more interesting things… Stranger Things! 😄
RBE Reduction – The Revolution
This is one of the most important “things” for me, and one truly unique feature of the MAX. Before I move on to how RBE reduction works, let me first explain what the rainbow effect is on a DLP projector, for those of you who may not be familiar with it.
An RGB laser DLP projector creates the image by rapidly flashing the red, green, and blue lasers one after the other at very high speed. This process happens thousands of times per second, forming the full-color image we see on screen.
This fast color switching is what can cause the rainbow effect (RBE), a phenomenon that many viewers notice immediately and often find tiring and distracting. It usually appears as a colored trail following moving objects in the image, especially in high-contrast scenes.
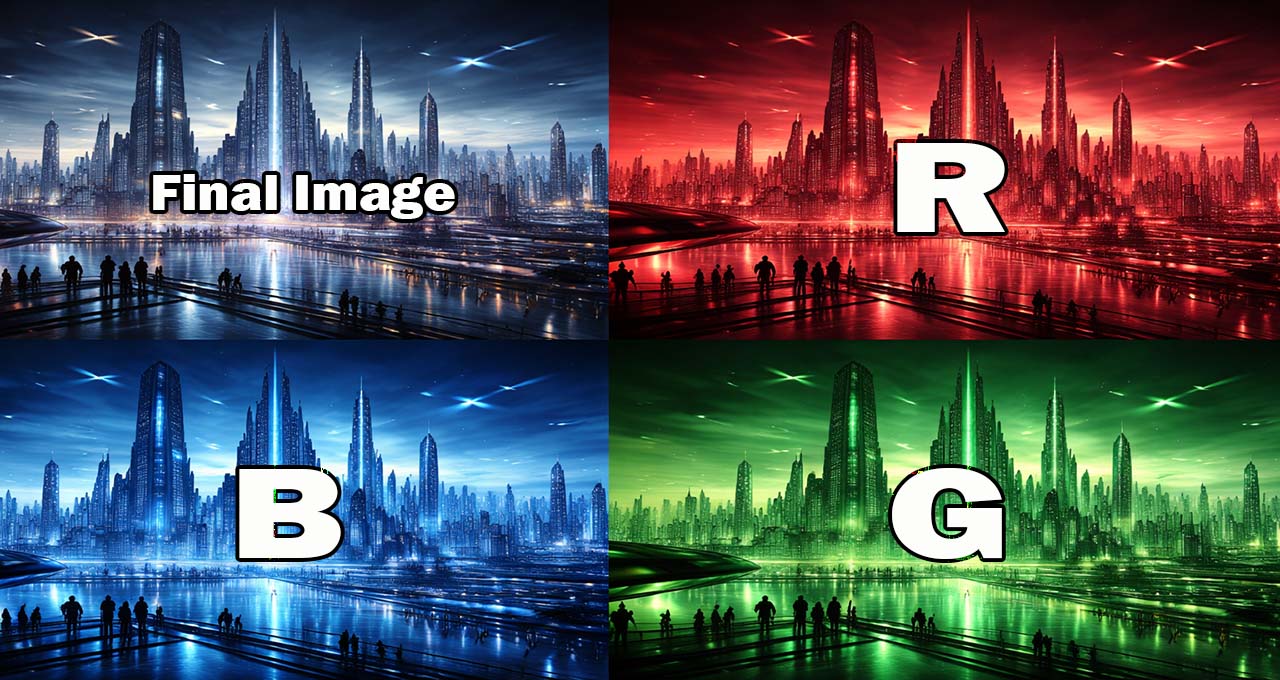
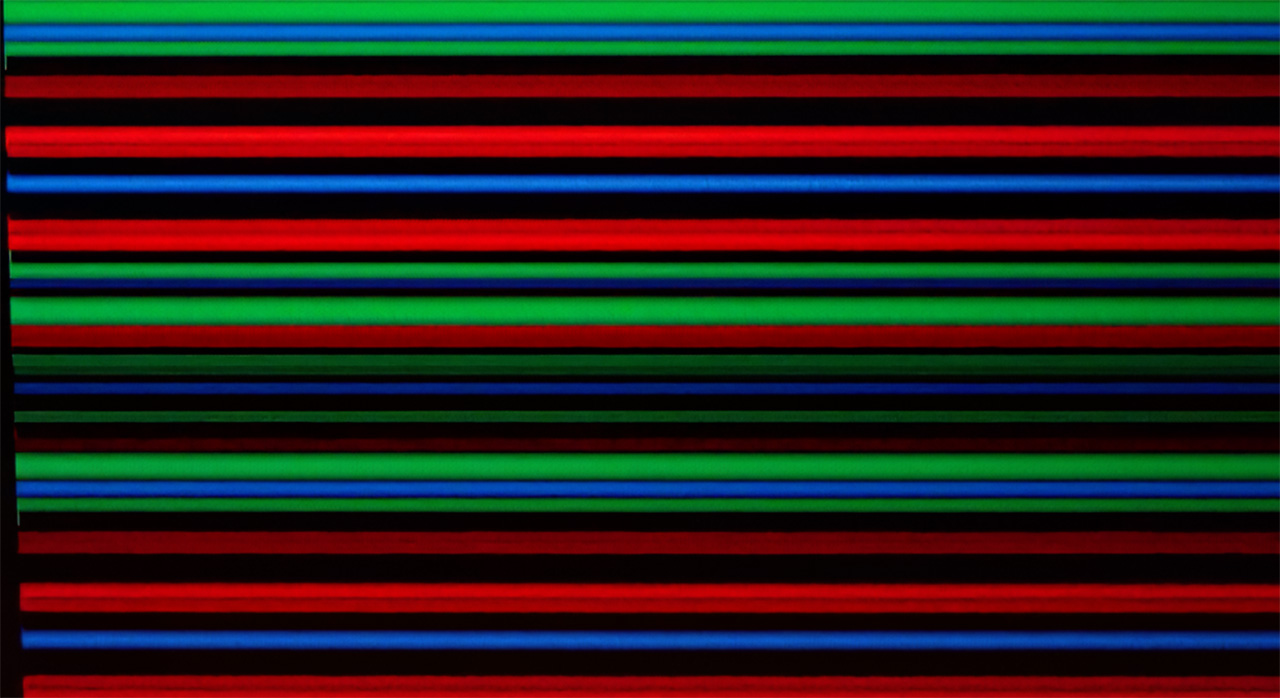
Using my camera with extreme shutter speed settings, it is possible to clearly see how the RGB laser color switching behaves on the MAX.
The color sequence and switching speed change depending on the picture mode and white balance setting.
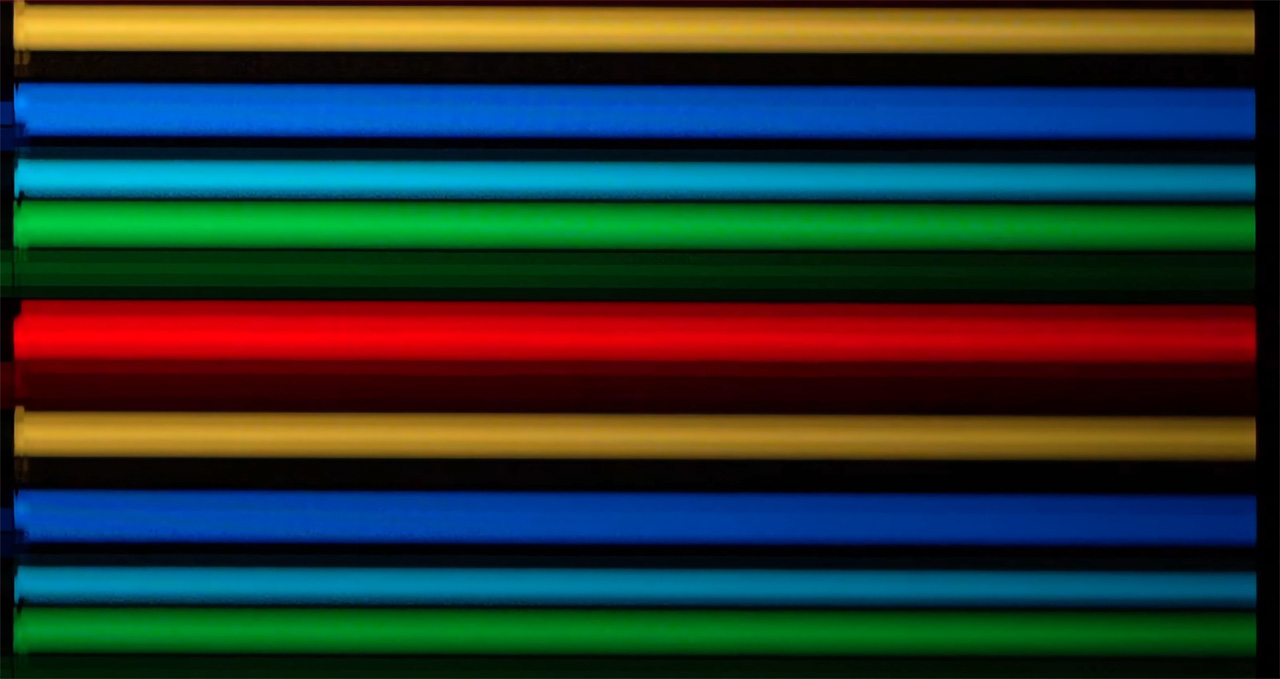
For example, in Warm 1, the projector uses pure RGB switching, with clean but slower transitions between red, green, and blue. This results in wider horizontal color bands when captured on camera. While this mode delivers more accurate and natural colors, it also makes the rainbow effect more visible.
In Warm 2 and other picture modes, yellow and Cyan is added to the sequence, meaning the red and green and green and blue lasers fire together to increase overall brightness. This reduces the visibility of RBE, but it also slightly changes the color behavior compared to pure RGB sequence.
To address this issue, Valerion designed and equipped the MAX with a special RBE Reduction feature. This is not a simple image processing trick. The algorithm works directly on the laser diodes, specifically by changing their operating frequency.
More technically, the system changes the laser duty cycles and pushes them to an extremely high operating frequency, far beyond what has been achieved by any other DLP projector so far. When RBE Reduction is enabled, the RGB switching frequency increases dramatically, which can be clearly seen as the RGB bands multiply in high-speed footage.
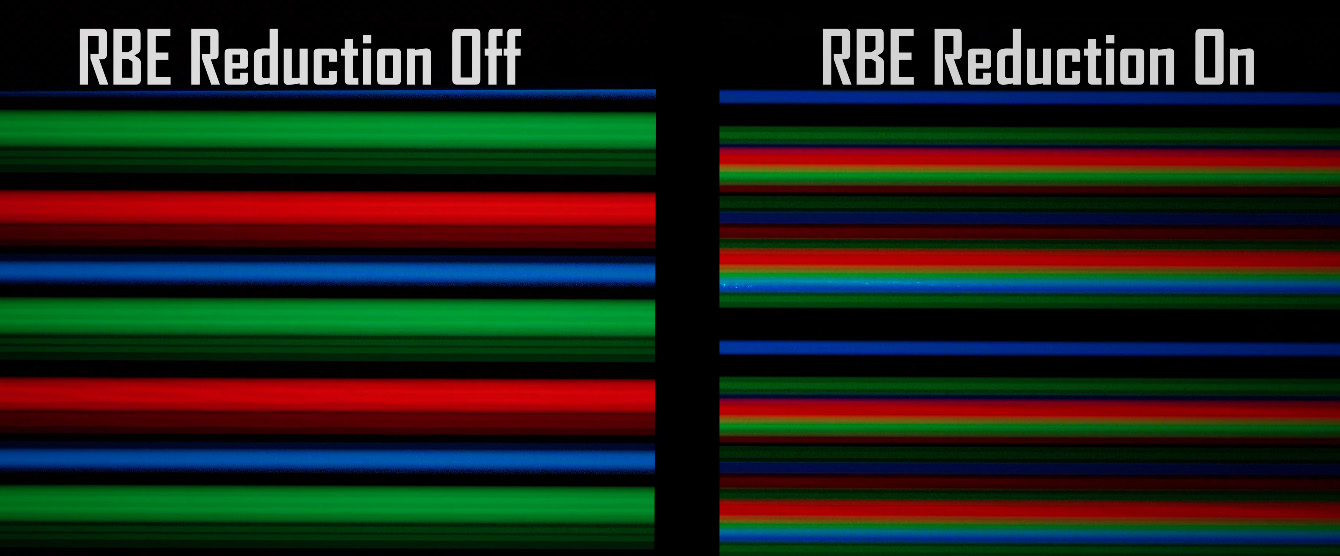
Update: The new P1215 firmware introduces a new laser cycle and duty cycle for RBE reduction, and its performance has been improved even further.
RBE Reduction ON (New Firmware P1215)
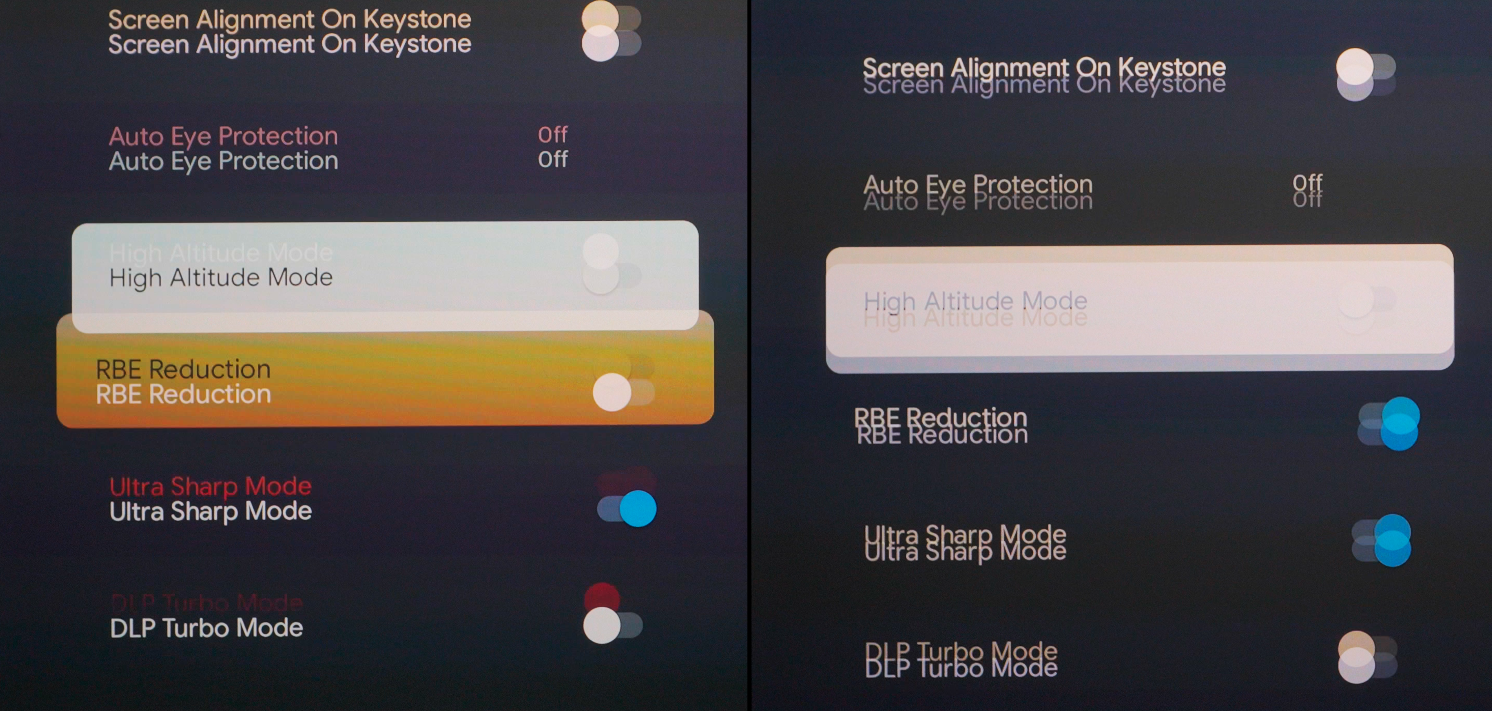
With RBE Reduction turned off, the rainbow effect is clearly visible in slow-motion shots even of the on-screen menu. Once RBE Reduction is enabled, the effect completely disappears.
There is a high-pitched noise that may bother many of you, and it appears when RBE Reduction is enabled and you use a high laser power mode (7 and above), combined with any white balance setting other than the pure RGB Warm 1.
But honestly, why would anyone want to watch using a white balance other than Warm 1, which is also the mode that delivers the best color accuracy, now that the rainbow effect has been totally eliminated?
I have two close friends, one is a professional film director, and they are among the very few people who cannot tolerate DLP projectors at all. They cannot watch a DLP projector for more than 10 minutes without getting a headache caused by the rainbow effect. They notice it everywhere, all the time.
Because of that, I considered them the perfect real-world test for the RBE Reduction feature. Tests and measurements are useful, but in the end, actual viewing experience is what really matters.
Well, no matter how hard they tried to spot any rainbow effect, and they usually enjoy doing so in order to criticize DLP projectors (both are hardcore JVC fans and well-known DLP haters, sorry guys, I know you will read this, but also you know I love you both), they simply could not find any. Both of them told me that in every scene I showed them, whether at 24p or 60p, they were unable to perceive even the slightest rainbow effect.
For me, this fully confirmed what I had already seen in the slow-motion footage captured with my camera.
The MAX is the first single-chip DLP projector that permanently solves a problem that has existed since the very beginning of DLP technology. This feature alone places the MAX in a category of its own, where no other DLP projector can currently stand next to it.
well done Valerion, well done!
Footnote 1: Even if you never see or get distracted by the DLP rainbow effect, watching a 24p movie with the pure RGB sequence of white balance setting Warm 1 and RBE Reduction enabled delivers a much more relaxed and cinematic image. For this reason, I recommend to everyone, regardless of whether RBE affects you or not, to always keep the RBE Reduction feature enabled, especially for 24p movies.
Footnote 2: even with RBE reduction, which increases the color switching speed, we still do not get image creation with fully stable, continuously projected colors. This means that someone, somewhere on the planet might still see very slight rainbow effects. That said, I honestly believe the percentage is now so extremely small that you have far better chances of having a grand piano fall on your head while walking around, than being among the very few people who will still be bothered by rainbow with RBE reduction enabled on the MAX.
EBL & Iris – A Dream Combination
Why the Iris Does Not Crop the Image?
When we close the iris of a projector lens, we do not cut off part of the image. We simply reduce the total amount of light reaching the screen.
This is a question many of you have raised in the emails you send me, and it is a perfectly reasonable one. For that reason, I decided to explain, as simply as possible, the basic mechanism and the theory behind how the iris operates in a DLP projector inside this review, instead of having to explain it individually to each of you.
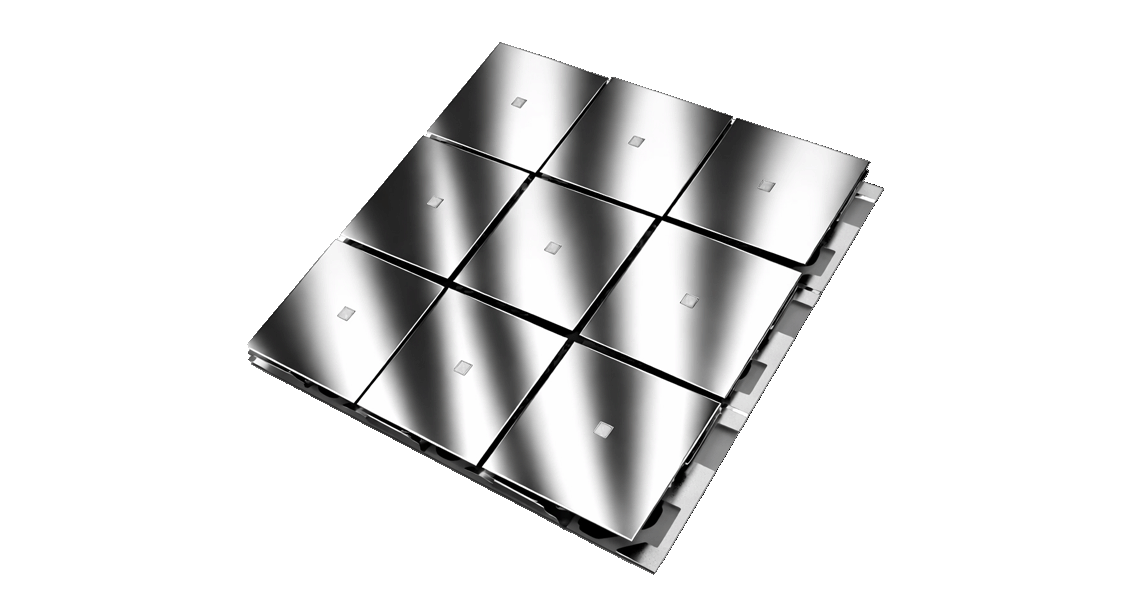
In a DLP projector, the image is created on the DMD (Digital Micromirror Device). The DMD consists of millions of microscopic mirrors, one mirror per pixel. Each mirror reflects light at a specific angle, either toward the lens or away from it, defining the brightness at the pixel level.
At this stage, the entire image already exists as reflected light. The lens does not create or modify pixel geometry. Its role is to collect the reflected light, focus it according to the screen distance, and project it onto the screen.
Each micromirror reflects light with a specific direction, depending on its position on the DMD. That reflected light then spreads out and fills the entire lens aperture. In other words, the photons coming from all pixels (micromirrors) of the DMD overlap together at the lens aperture.
This is the critical point.
A pixel located in the top-right corner of the image does not send its light only through the top-right area of the lens. Its reflected light passes through the whole lens, just like the light from every other pixel.
Inside the lens, there is a specific optical plane where light from all pixels overlaps completely. This is the aperture stop, and this is where the iris is placed.
Even though the light from all pixels overlaps at this point, it does not mix. This is not because pixels use different wavelengths. Many pixels can share the same wavelength and color.
What keeps pixel information separated is angle.
Each micromirror on the DMD reflects light at a unique angle relative to the optical axis. Inside the lens, these light bundles overlap spatially, but they remain organized by direction.
After passing through the lens, those angles are converted into specific positions on the screen. Light reflected from one micromirror is focused to one exact location, while light from neighboring mirrors is focused to neighboring locations.
This angular-to-spatial mapping is what prevents pixels from falling on top of each other.
Because the iris is placed where all pixel light still overlaps, closing it reduces the amount of reflected light from all pixels equally. No pixel is blocked more than another, and no part of the image is cropped.
If the iris were placed after the last lens element, where light rays are already separated and mapped to screen positions, then it would physically block part of the image and clip the frame, the well known masking.
Stray Light and DLP Contrast
One of the main reasons DLP projectors traditionally show lower native contrast compared to other projection technologies is stray light inside the DMD optical engine.
In a DLP system, the image is formed on a DMD chip, where millions of microscopic mirrors reflect light either toward the lens (ON state) or away from it (OFF state). In theory, mirrors in the OFF position should send light completely outside the main optical path, into a specially designed light trap inside the DLP optical engine.
This trap is made of heat-resistant materials and usually has a textured, matte black coating designed to absorb as much light as possible, almost like a black hole.
In practice, this process is never perfect. Some photons escape and often manage to reach the lens, and later the screen, traveling at irregular angles.
On top of this stray light, we must also add the light created by internal reflections inside the lens elements themselves. Together, these two sources are the main reason for the reduction of final contrast that we see on screen.
Simply put, along with the photons that carry actual image information and travel in a controlled way at the correct angles toward the screen, there are also scattered photons traveling at random angles that should not be there at all. These unwanted photons create a form of light pollution, reducing contrast and raising black levels.
This is where the iris plays a critical role
By closing the iris, we reduce the f-number (f-stop) of the optical system. Lowering the f-number limits the maximum acceptance angle of the lens.
As a result, photons arriving at angles outside those defined by the DMD pixel geometry are increasingly blocked by the iris. These photons never reach the next lens elements and never make it to the screen. Of course, the iris is placed at the correct position inside the lens, at the aperture location, where the light beam is at its narrowest point.
Pixel information, on the other hand, remains unaffected, because it travels within the designed paths of the optical system and at the correct angles. This is why closing the iris reduces stray light much more aggressively than it reduces useful image light. As a result, black levels drop faster than peak brightness, and on/off contrast increases significantly.
This “stray light filtering” becomes even more effective when the iris blades use a special black textured coating, like the one used in the Valerion MAX. In this case, high-angle stray photons are not only blocked by the iris, but also properly absorbed, preventing internal reflections inside the lens barrel.
The same basic principle applies to the human eye, to the aperture of a camera lens, and to many other optical systems. The iris controls how much light enters to the final stages of a lens array and helps limit unwanted light that reduces contrast.
The closest real-world example that clearly shows the damage caused by stray light arriving at uncontrolled angles is astronomy.
If we place a telescope inside a city, stray light from street lamps and buildings enters the telescope from many random directions and reaches the lens, washing out the image, raising black levels, and making it almost impossible to see very dark objects in space.
If we place the same telescope in a remote location with no light pollution, even the faintest light from distant objects can reach the lens without interference. Contrast improves dramatically, and details that were previously invisible become clearly visible.
This is exactly what happens inside a DLP optical engine.
Stray light inside the optical engine behaves like city light pollution, while the iris acts as a filter that limits these unwanted random-angle radiation (photons).
I believe that by now some key questions have been answered, such as why an iris does not cut part of the image when it closes, and how it actually increases contrast in practice.
Now let’s move on to see how this iris performs, shall we?
Iris performance
The iris on the MAX does an excellent job when it comes to increasing contrast. For reference, any native contrast value above 3,000:1 already gives a very strong final image, both in overall contrast and black levels. With this specific iris, we are talking about native contrast, not dynamic contrast, because in the case of the MAX, even though Valerion advertises it as “dynamic” (and I believe this may become dynamic in a future firmware update), its current operation is step-based, with six fixed iris positions.
This means that any contrast increase depends on the selected iris position and stays fixed, so we are clearly talking about an increase in native contrast. Personally, I prefer a good step-based iris that I can set manually and leave in one position, rather than a dynamic one which, no matter how well it is tuned, will almost certainly cause visible image issues, such as brightness changes or white balance changes depending on the scene.
With a step-based iris, you simply set the iris to the position that works best for your room and screen, calibrate the projector once, and you are done, especially if you are not a fan of any algorithm running in the background and prefer a stable and consistent image at all times.
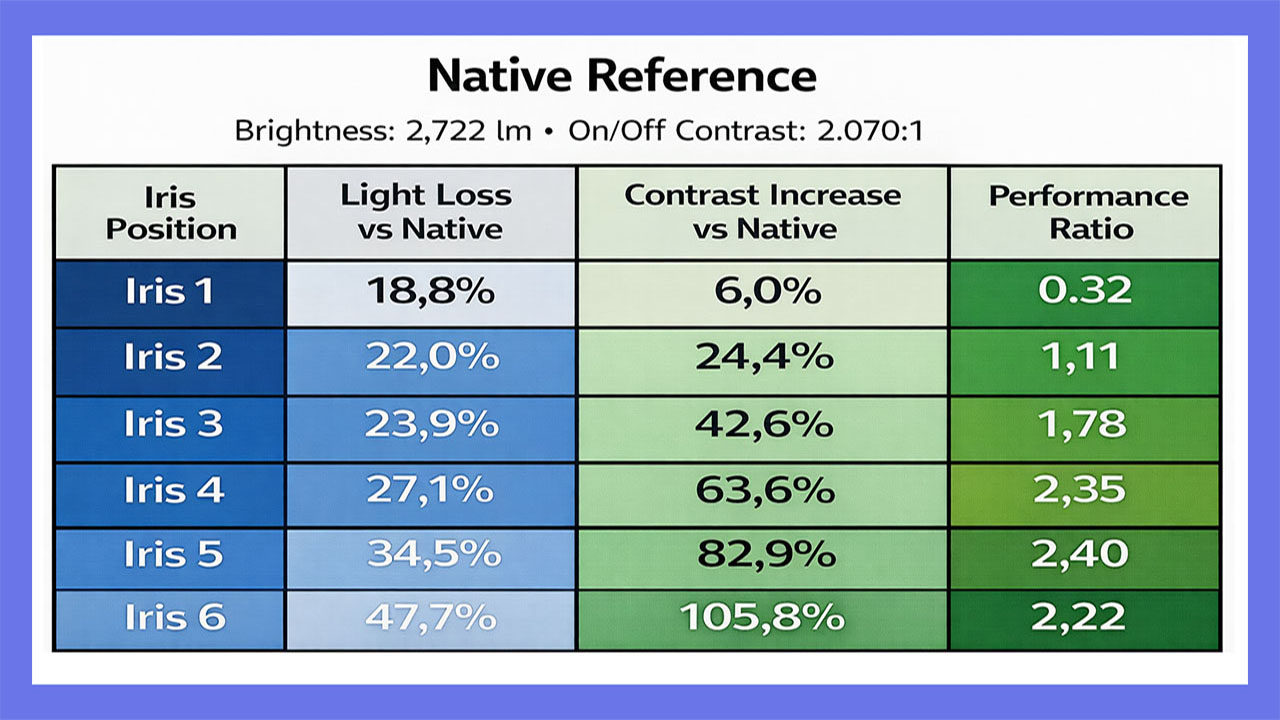
If we assume the projector is used with the zoom at its most closed position, meaning a throw ratio of 1.5, we already reach the key 3,000:1 native contrast point at Iris position 3, while we still have more than 2,000 ANSI lumens available.
The most efficient iris position is Iris 5.
With a performance ratio of 2.4, it delivers a significant contrast increase of around 83%, while brightness drops by approximately 35%, a reduction that is perfectly acceptable and will not affect viewing, even on large screens above 120 inches.
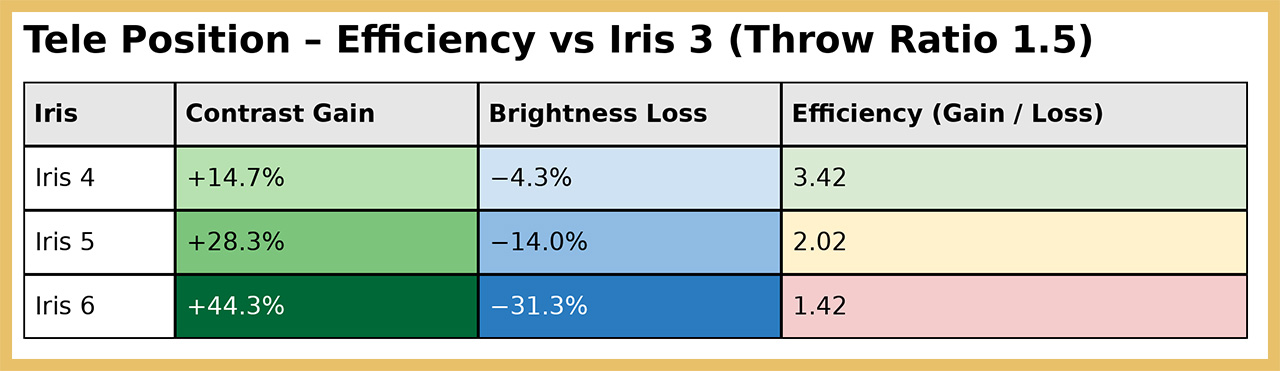
If we take Iris position 3 as the reference point, where the projector reaches close to the critical 3,000:1 native contrast, we can draw the following conclusions.
At Iris positions 4 and 5, which for me are also the most ideal iris positions for the MAX, native contrast increases significantly. Iris 4 delivers the best efficiency ratio between light loss and contrast gain, with a value of 3.42, offering a 14.7% increase in contrast with only a 4.3% reduction in brightness.
Iris position 5, with an efficiency ratio of 2.02, represents what I would call the golden balance, delivering contrast close to 4,000:1 while still offering around 1,800 ANSI lumens.
So, if your goal is the best balance between contrast increase and brightness loss, iris position 4 is the one for you.
And this brings us to Iris position 6. Here, something strange happens, no doubt about it. In all previous iris positions, white balance stays quite stable, with only very small shifts toward the cool side (a slight increase in blue), which are not worth spending more time analyzing in this review.
At Iris 6, however, white balance changes completely. The image becomes very warm, with color temperature dropping to around 4400 Kelvin, red increases strongly, while blue drops significantly.
My measurements show that red appears increased at iris position 6, but in reality this is not the case. What actually happens is that blue drops much faster, while green remains mostly stable. Because blue loses much more light, red only appears stronger by comparison.
This imbalance makes the grayscale much warmer and causes the white balance temperature to drop from around 6500K to about 4400K.
My theory, and it is only a theory, is that because blue light has a shorter wavelength (roughly 450–495 nm), it is affected more when it passes through projector optical elements, and reaches the iris at wider, less uniform angles. When the iris is fully closed, these off-axis blue photons are forced to pass through a very small aperture and interact more with the iris coating, which leads to stronger losses.
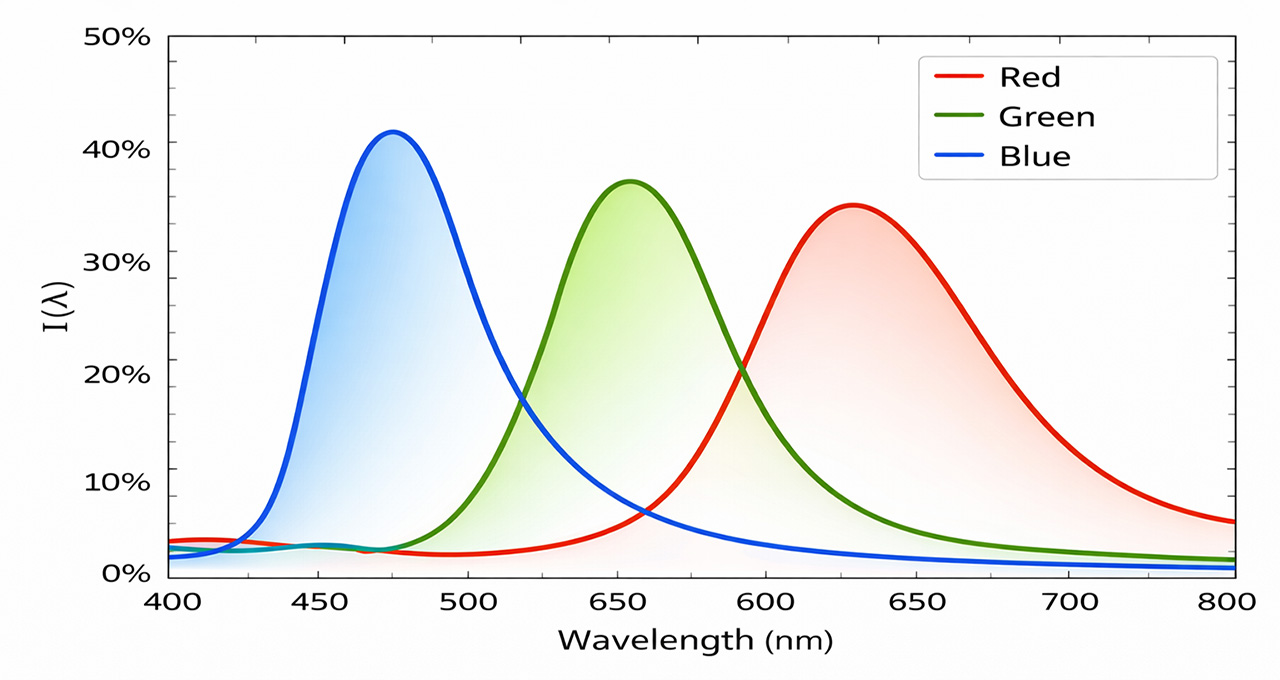
Green sits closer to the center of the spectrum (around 530–550 nm) and remains the most stable, while red (around 620–750 nm) is affected the least. This shows that Iris 6 pushes the MAX’s RGB optical engine beyond its limits, which is why Iris 5 remains the most balanced and usable setting for the average user in my opinion (Me, I am not an average user, so of course I use Iris 6 all the time).
In general, for your information, the shorter the wavelength of an electromagnetic radiation (light), the more prone it is to scattering when it reflects on a surface, no matter how smooth or well-polished that surface may be.
Even if we assume that the DMD micromirrors are perfectly smooth reflective surfaces, in reality, they are not.
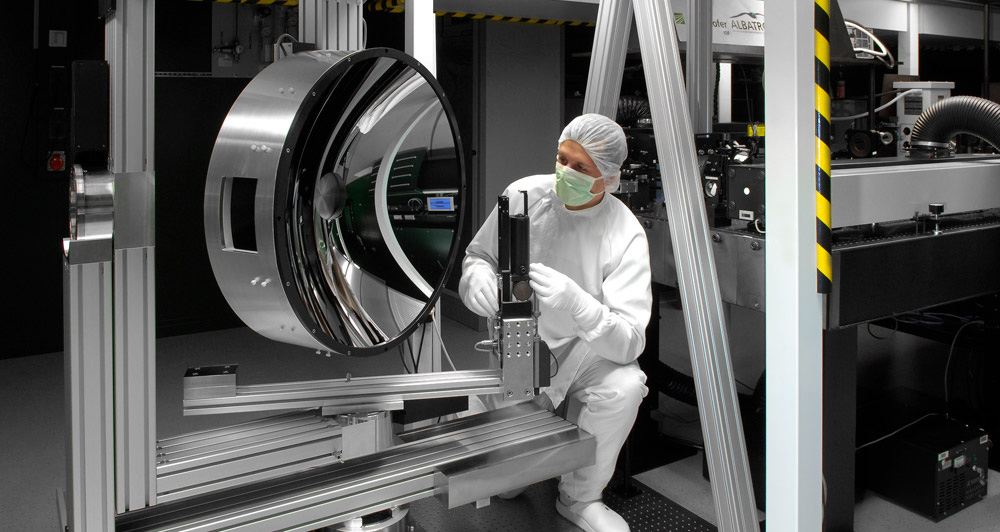
As a reminder, or simply for your info, the relationship between short wavelengths and irregular reflection (scattering) has been a fundamental challenge in lithography, the process used to manufacture modern semiconductor chips. In that field, we are dealing with much shorter wavelengths of electromagnetic radiation, specifically Extreme Ultraviolet (EUV) light.
As lithography moved to advanced technology nodes such as below 10 nm, traditional optical systems became unusable. At these wavelengths, even microscopic surface imperfections cause severe scattering losses, making conventional reflection extremely inefficient.
To make EUV lithography viable, ZEISS developed ultra-precise multilayer mirrors with atomic-level surface smoothness. Without these extremely smooth reflective surfaces, the controlled reflection of EUV radiation would be practically impossible, as the light would be lost almost entirely due to scattering caused by surface roughness.
While in projection systems we are dealing with much longer wavelengths of visible light, the underlying physical principle remains exactly the same. As wavelength decreases, the tolerance for surface irregularities becomes increasingly strict, and even surfaces that appear perfectly smooth are no longer so sufficient.
Sorry for the brief digression, let’s get back to our main topic
If someone still wants to use Iris 6 to achieve the maximum possible contrast, the good news is that it can be done, as long as white balance is adjusted specifically for this iris position. The adjustment is simple: reduce red gain to −25 and increase blue gain to +25.
This correction restores balance and delivers a much more neutral result, as clearly shown in the measurements, with the exception of 100 IRE, which is practically impossible to fully correct. That said, this is a minor issue, since 100 IRE represents only absolute white at maximum brightness, a level that is rarely seen in real movie content.
I will anticipate a common question and answer it directly. Yes, Nikos, we gain contrast, but we lose a lot of brightness, around 35% at Iris position 5 and almost 50% at Iris position 6. Is it really worth it?
My answer is that perceived brightness is not defined by light output alone, but by contrast as well. A single candle in complete darkness can appear brighter than a powerful flashlight viewed outdoors in direct sunlight. Our brain evaluates brightness in relation to black level and contrast, not purely based on absolute lumen output, especially when watching a movie in our home-theater environment.
For example, when brightness drops from around 2,700 lumens to 1,800 lumens, while contrast increases by roughly 80%, together with a significantly lower black floor, the image does not feel as dim as the numbers suggest. The higher contrast gives the picture more depth, stronger highlights (relative to the darker background), and better separation between image elements. As a result, our brain often interprets the image as brighter and more impactful than what measurements indicate when projecting a simple 100 IRE pattern.
In practice, when contrast is substantially improved by closing the iris, the brightness loss shown in measurements does not translate one-to-one into the actual viewing experience. Keep that in mind as a general rule. The higher the contrast, the brighter the image tends to appear, with some exceptions of course, such as scenes that are almost entirely bright and do not benefit from increased contrast, for example a full bright sky shot.
By using the iris at position 3 or higher, the MAX immediately moves beyond the typical contrast levels we are used to from DLP projectors, and the image truly changes. I would say that even without using EBL, Valerion’s well-known laser dimming algorithm, the MAX, using only the iris, will not disappoint when it comes to contrast and black level. In simple words, the iris gives the MAX what is usually missing from a DLP projector, that extra contrast boost that takes the picture from “mm, it’s ok” to “wow, that’s a nice image.”
Iris & ANSI Contrast
Now I want to talk about something I discovered after many, really many tests, experiments, and measurements.
While testing the MAX for this review, I compared it with several other projectors. And always, I really mean always, I liked the MAX image more, but I could not explain why. I calibrated all projectors the same way, played the same clips, on the same screen, in the same environment, with the same media player. In some cases, other models had similar contrast, or even higher contrast than the MAX, but the MAX still stood out immediately, like a fly in milk.
I kept thinking, either I am losing my mind because I fell in love with this damn beautiful black volcanic glass surface of the MAX, or this projector is really doing something the others are not. So, what was happening?
That is where the real search started. I talked with many friends and colleagues who have been in the AV field for years. I invited many people to watch these comparisons in person, and I started digging deeper into this finding. What is it in the MAX image that makes it so pleasing, even compared to its smaller brother, the Pro 2?
So, here is what I discovered and confirmed using some methods and protocols I created, which I will not fully analyze here. I will only say that I reached an almost crazy level of analysis and testing, checking pixel by pixel, with the help of Photoshop, Resolve and AI. I compared the exact same image elements between different projectors, but more importantly, I compared images of the MAX with and without the iris active.
That, was the key.
What I found is that using the iris, and increasing contrast depending on the iris position, also brings an almost equal increase in ANSI contrast. For those who do not know, ANSI contrast is in-scene contrast, meaning the contrast between dark and bright parts of the image when they co-exist next to each other at the same frame.
At that moment, everything became clear to me.
The increase in on/off contrast, achieved by reducing stray light with the iris, also improves ANSI contrast, because that same stray light is responsible for lowering this type of in-scene contrast as well.
So, what destroys in-scene contrast in a DLP projector?
The answer is simple. Reflections inside the lens and the stray light beams created inside the optical path, including the DMD chip. The iris cuts a large part of this stray light, so… voilà! That’s it.
This was the secret behind my unexplained preference for the MAX image when using the iris.
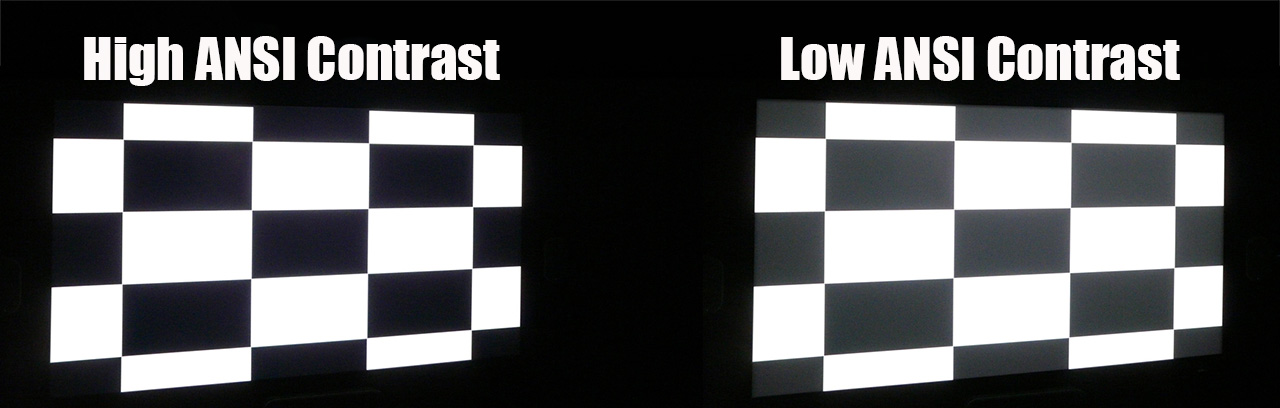
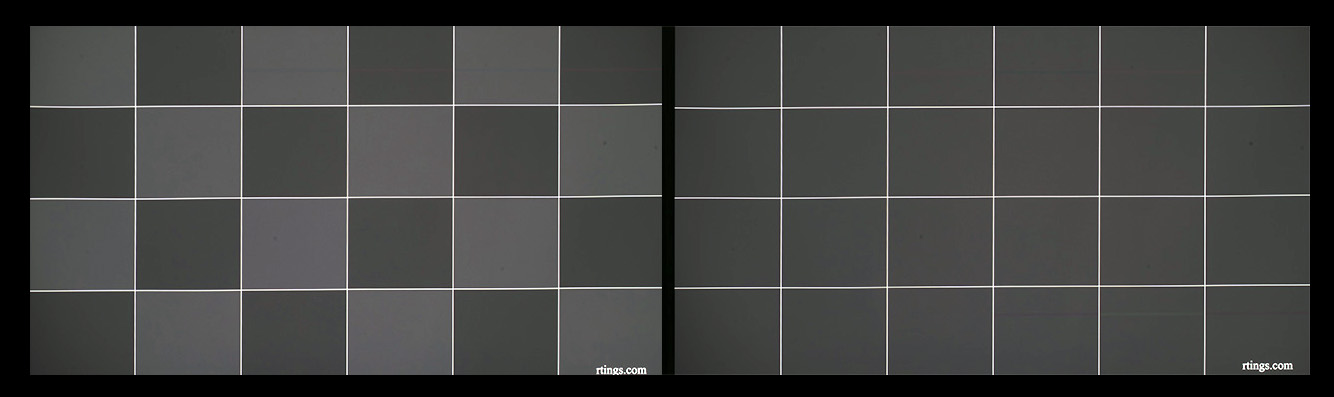
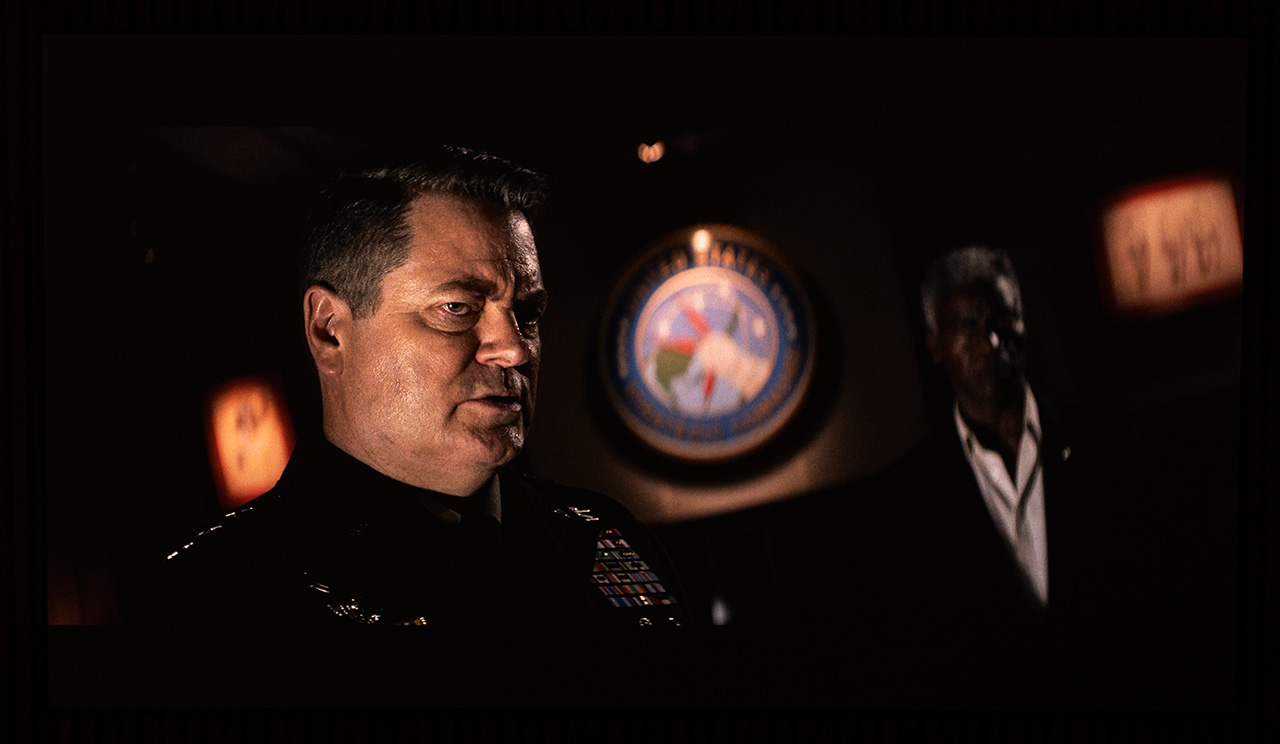
This is something that is very difficult to show with screenshots, but I will try. The high ANSI contrast of the MAX is visible during about 90% of a movie, and usually in all mixed scenes, scenes that contain both dark and bright elements at the same time.
One example is the following scene.
Iris 0 – Laser 10
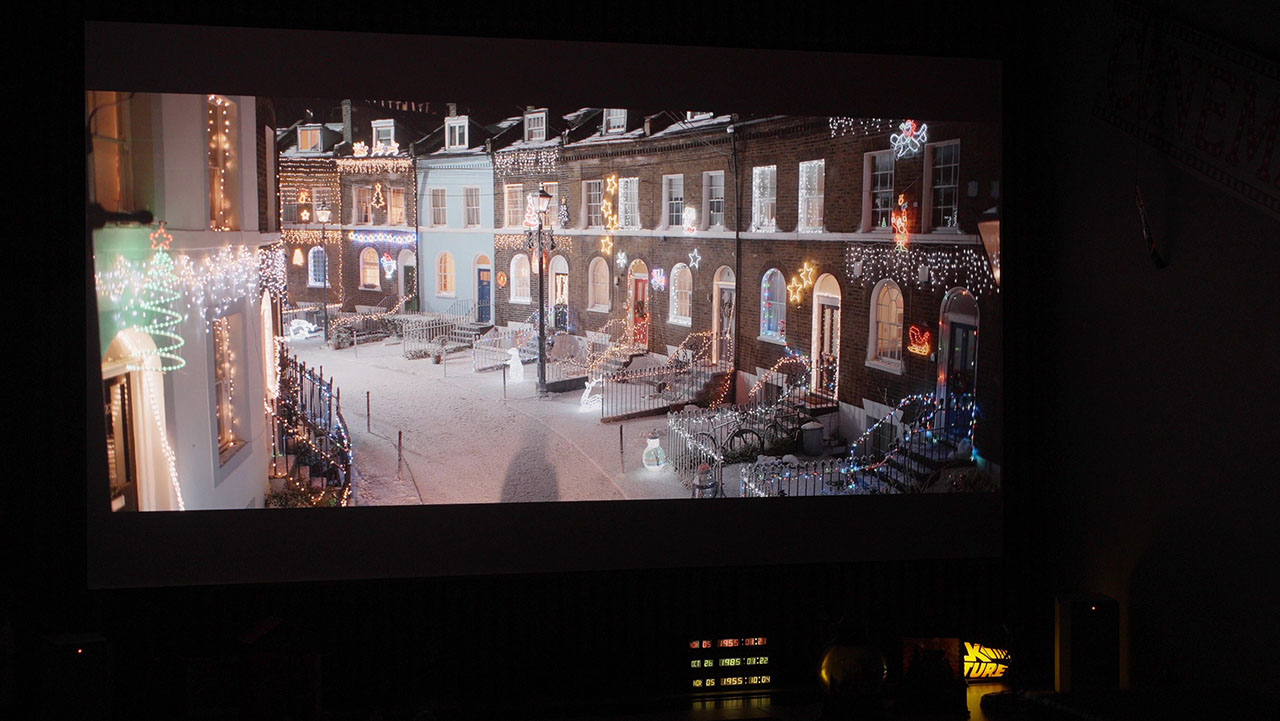
Iris 5 – Laser 10
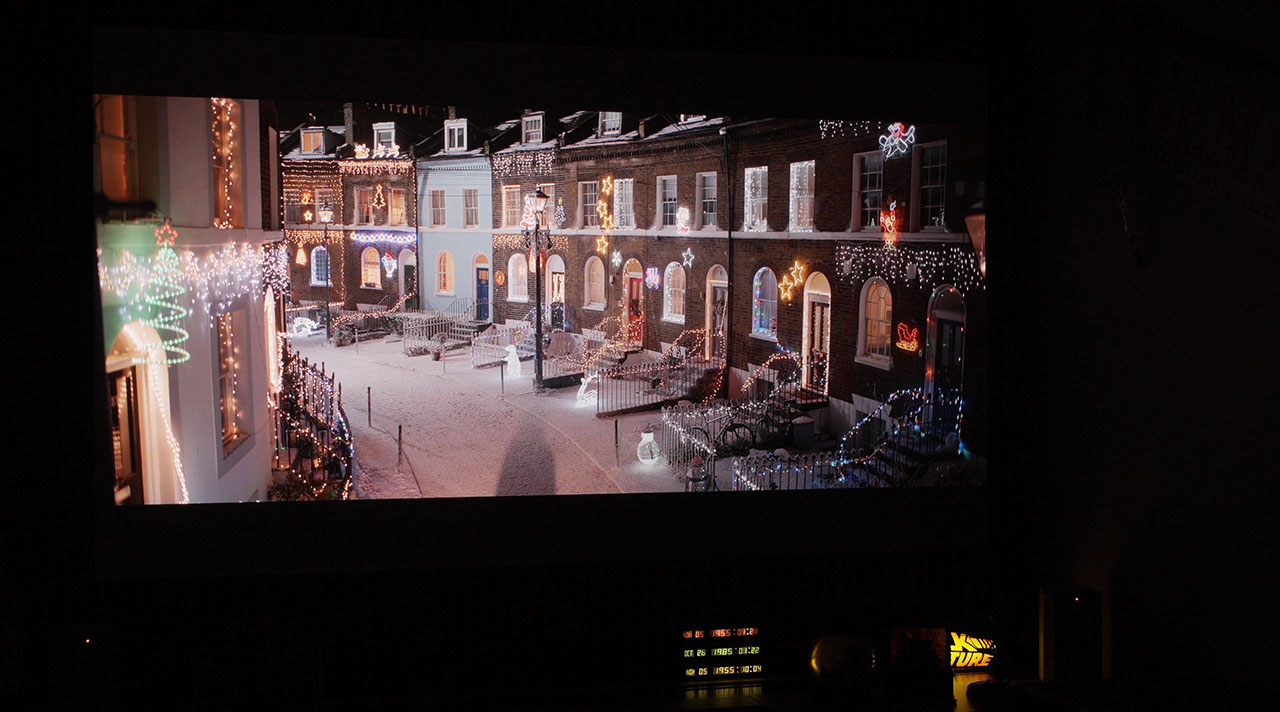
Can you see the differences? The black levels have clearly improved, but more importantly, the light from the bright objects in this scene does not affect the dark areas next to them as much, maintaining very high ANSI contrast, increased almost to the same degree as the on/off contrast.
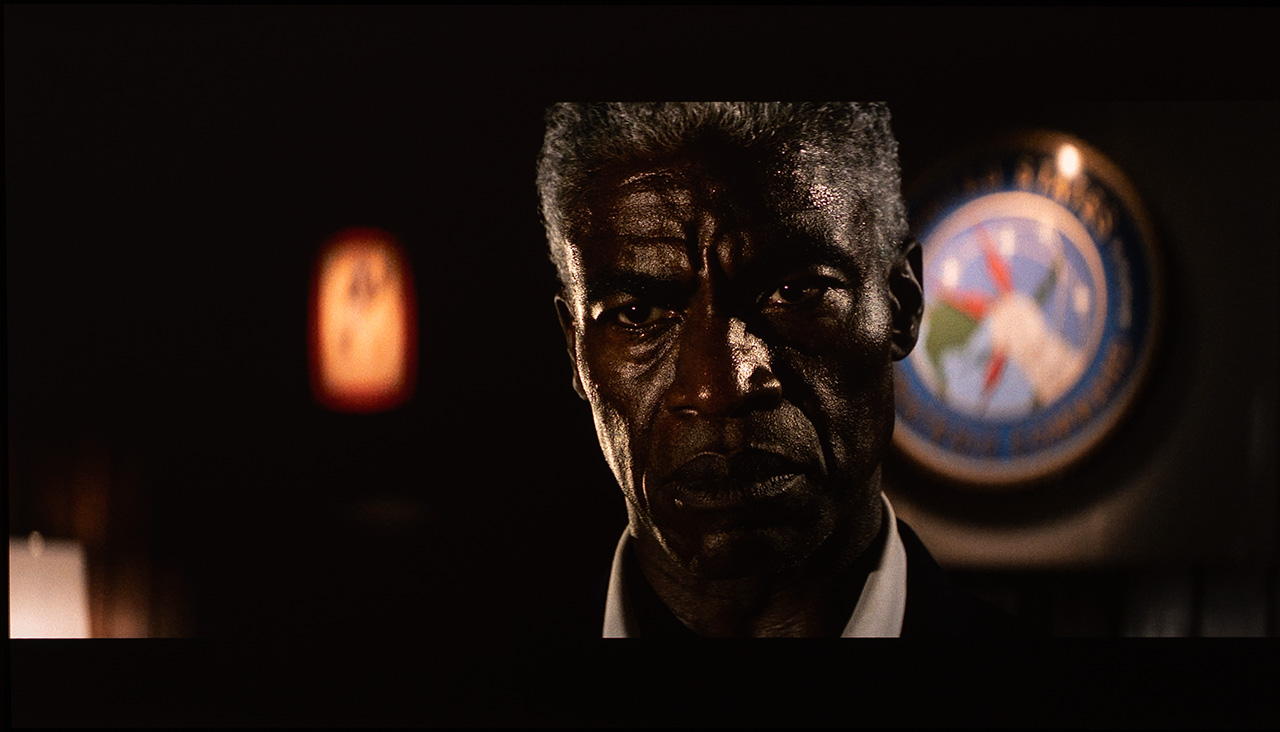
Take a closer look at a zoomed-in section from the same screenshots.
Iris 0 – Laser 10
Iris 5 – Laser 10
This “veil” visible in the first screenshot is stray light affect more the dark areas of the image, as it exits the lens at irregular angles. In the second screenshot, it is clearly visible how much better the bright elements are separated from the darker areas, and I believe you can also clearly notice the reduction of this light “fog” or light pollution that is present in the first image.
This dramatic improvement in ANSI contrast, together with the improvement in native on/off contrast and black levels, is the secret behind the incredibly easy-on-the-eyes and somewhat “hard-to-explain” impressive image produced by the MAX.
In my opinion, the doubling of native on/off contrast offered by the iris is far less important than the increasing of ANSI (in-scene) contrast, which is what truly elevates the viewing experience with the MAX finally.
As a general conclusion, I would say that the stepped iris on the MAX does not simply improve black level, and it is not only about improving dark scenes, as many of you (myself included, until recently) might believe. It is about a global improvement of the image and overall contrast, regardless of the scene type, whether it is bright or dark.
Even if the MAX had no other contrast enhancement features at all, I would personally be fully satisfied with the image quality achieved using the iris alone. However, the MAX also has a second, very powerful tool for further increasing contrast and lowering black level. It is called EBL (Enhanced Black Level), and it has been widely discussed.
Let’s now take a closer look at what really happens with EBL on the MAX.
EBL (Enhanced Black Level)
EBL is an algorithm that truly changed the DLP projector category. For almost 20 years, black levels and contrast in DLP projectors had seen very limited progress.
EBL introduced a new type of dynamic contrast system that became possible thanks to modern pure RGB laser optical engines, extremely fast PWM laser drivers capable of very high operating frequencies, the latest DMD controller from Texas Instruments, and the MediaTek MT9618 SoC.
EBL reads the incoming video signal in real time and analyzes each frame individually. For every frame, it calculates the Average Picture Level (APL), which represents the average brightness of the image.
It also analyzes the nature of the APL itself, determining whether it comes from elements of similar brightness or from a combination of very dark areas with a few very bright highlights within the same frame. Based on this analysis, the system determines whether the frame is dark, mixed, or bright and adjusts the total output of the RGB laser light accordingly.
In low-APL scenes, where most of the image is dark, EBL reduces laser output to allow black levels to drop significantly. However, the system does not rely only on lowering brightness. At the same time, it applies local gamma correction in specific parts of the image.
This adjustment helps preserve midtone and shadow details, while maintaining brightness in brighter elements within the same frame, further increasing perceived contrast even though laser power has been reduced.
This combined operation, laser dimming together with local gamma adjustment, allows blacks to appear deeper without crushing shadow detail of the image. In scenes with high APL, where brightness is critical, EBL limits or disables its operation, allowing the projector to deliver full light output and dynamic range.
EBL operates on a frame-by-frame basis, with extremely fast response and very smooth transitions. Its operation is almost invisible to the viewer.
Take a look at the following two screenshots to get a clear idea of the effectiveness of EBL.
EBL Off
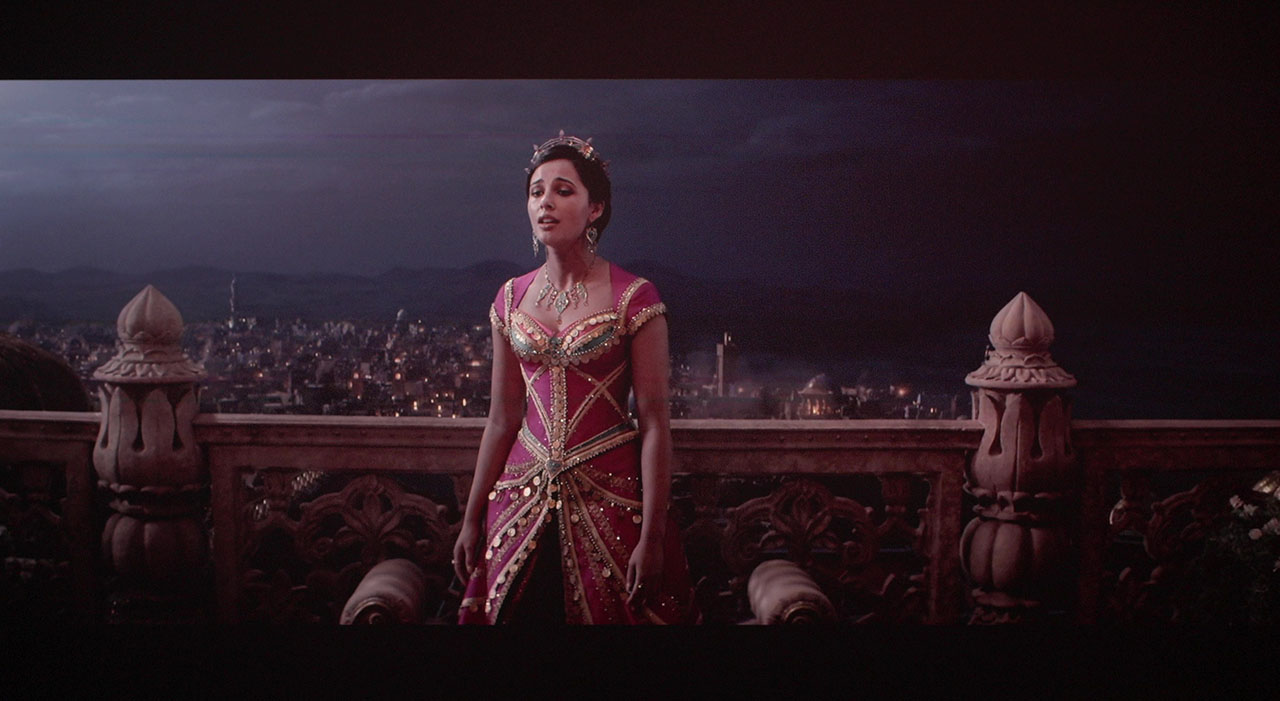
EBL High
EBL literally transforms the image and dramatically increases contrast, to a level where it becomes almost impossible to believe that the picture is coming from a DLP projector. It is, in my opinion, the best dynamic contrast algorithm currently available in a projector, regardless of technology or price.
EBL can also operate in combination with the iris. When the iris is set between positions 4 and 6 and EBL is enabled at the High setting, the result is the best contrast performance and the deepest black levels I have personally experienced on a DLP projector.
In this configuration, it easily surpasses virtually all projectors currently available on the market, with the obvious exception of JVC, although even then, it comes dangerously close.
Take a look at the following screenshots to see what I mean.
EBL Off + Iris Off
EBL High + Iris 5

Keep in mind that EBL High and iris position 6 can result in very dim images in very dark scenes. If your viewing space is well treated and completely free from ambient light, then this is fine. Otherwise, you may want to choose a milder iris setting or switch to EBL Low.
I believe that by now you all clearly understand the two main strengths of the MAX, the iris and the EBL algorithm, as well as how they operate. After analyzing their exceptional contribution to contrast improvement and the dramatic enhancement of black levels, it is time to move on to the drawbacks, because, as we all know, nothing in life is perfect.
Unfortunately, the EBL algorithm can only analyze one frame ahead of the incoming signal, which leads us to the next section of the review.
Iris & EBL Drawbacks
As far as the iris is concerned, the only drawback I observed is a slight black uniformity issue on the right side of the projected frame, giving the black areas a slightly warmer tint. This effect is barely visible and extremely difficult to capture on camera, so I can only describe it. I did not notice any other negative impact on image quality caused by the iris, so for me, it gets the green light and can be used extensively, regardless of the content being watched.
Unfortunately, the same does not apply to the EBL operation, where I identified two main issues that appear as visible artifacts during viewing.
The first drawback is related to a phenomenon that involves highlight clipping in certain scenes. It can appear on faces or objects or worse in fast transition from dark to bright frames when the algorithm decides to keep laser power low, but in order to reach the required brightness for a bright element within the frame, it overcompensates through local gamma adjustment, resulting in clipping of highlight information.
In these cases, the bright details are pushed beyond their limits, causing a loss of fine highlight detail that should normally be preserved. You could also describe it as a short “disagreement” between the fairly aggressive Dynamic Tone Mapping of the MAX and the EBL, like two strong forces pulling the same rope from opposite sides.
An example of this behavior can be seen in the screenshot below.
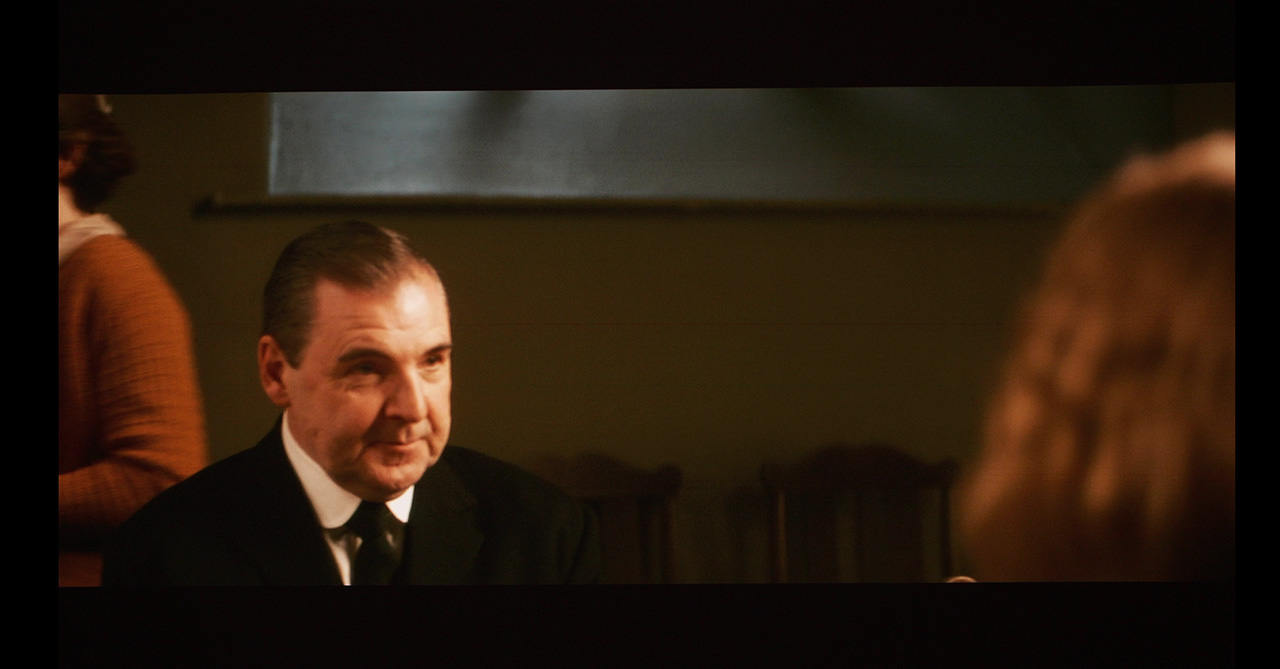
Focus on the circled area, where the highlight clipping I described earlier, becomes clearly visible.
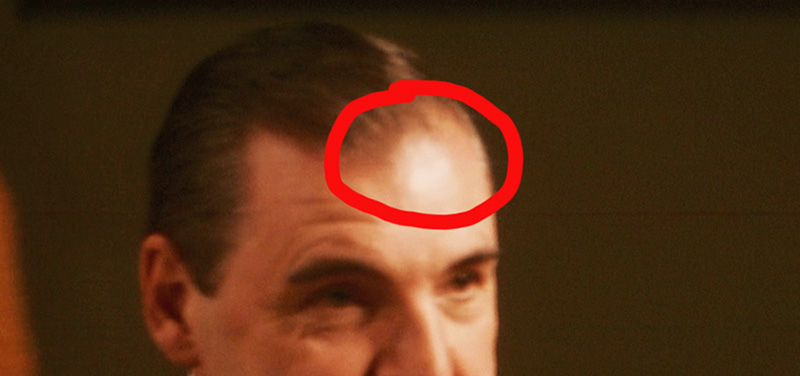
This clipping can also appear during a fast scene change, when after a dark or semi-dark scene, a very bright element suddenly appears in the next frame. In this case, the algorithm needs a short moment to decide to increase laser power, but in the meantime it has already pushed the gamma adjustment too far and compressed the specular highlights enough for the effect to become visible to the viewer, until the system stabilizes and the image returns to normal in the following frames.

My main question, and at the same time my suggestion to Valerion, is the following: why should EBL intervene in such bright scenes at all? Why isn’t EBL fully disabled beyond a specific APL, so that situations like this can be completely avoided?
In scenes with high overall brightness, maintaining full laser output without EBL intervention would preserve highlight detail and eliminate the risk of gamma overcompensation and lead to highlights compression, without serious negative impact on black levels or contrast.
In practice, this clipping phenomenon appears in very few scenes in a movie, and in many cases, is almost invisible. There is also a simple solution. If the issue appears more often in a specific movie, choosing EBL Low instead of High will make the phenomenon almost disappear.
EBL Low works in a gentler way and is less aggressive in high-APL scenes, reducing the chance of gamma overcompensation and highlight clipping. However, do not expect the same deep blacks and exceptional contrast that EBL High delivers.
But I repeat, this is not something that is easy to notice, since it does not appear often. And even when it does, it usually affects small objects outside the main action you are watching.
For example, you might see clipping on an apple on a fruit bowl in the back right of the scene, while your attention is on the actors and the action on the left. In that case, you will not notice it at all.
However, there are some exceptions, movies or series where this clipping appears on faces or on important parts of the image that are inside the main action. In those cases, it does become a real problem, and you have to change to EBL low or disable EBL completely.
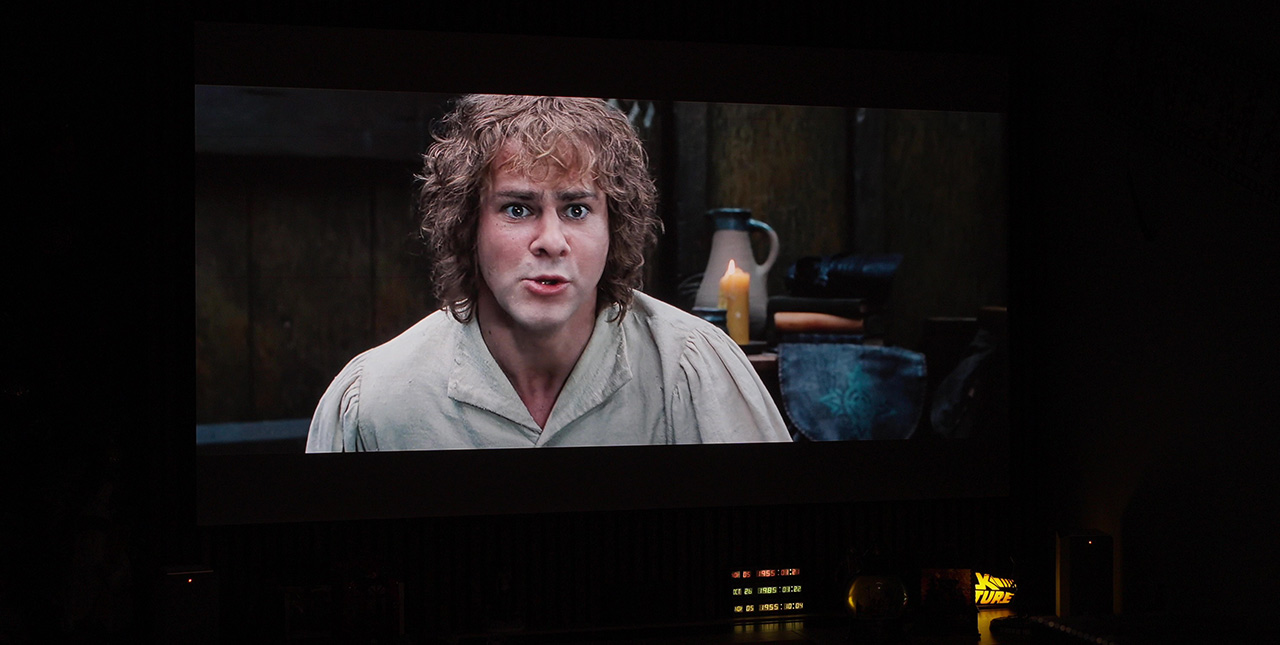
For example, I watched the entire last season of Stranger Things with EBL set to Low and the iris fully closed at position 6, because the clipping with EBL high during transitions from dark to bright scenes was bothering me a lot, and that final season had a lot of those. I almost had a seizure!
![]() Off topic for a moment.
Off topic for a moment.
Didn’t the ending of the Stranger Things give you also a bit of a depressed feeling?
Or is it just me being too sensitive? I won’t say that I got emotional, no, no, of course I didn’t.
Do men cry? No, they don’t! 😄
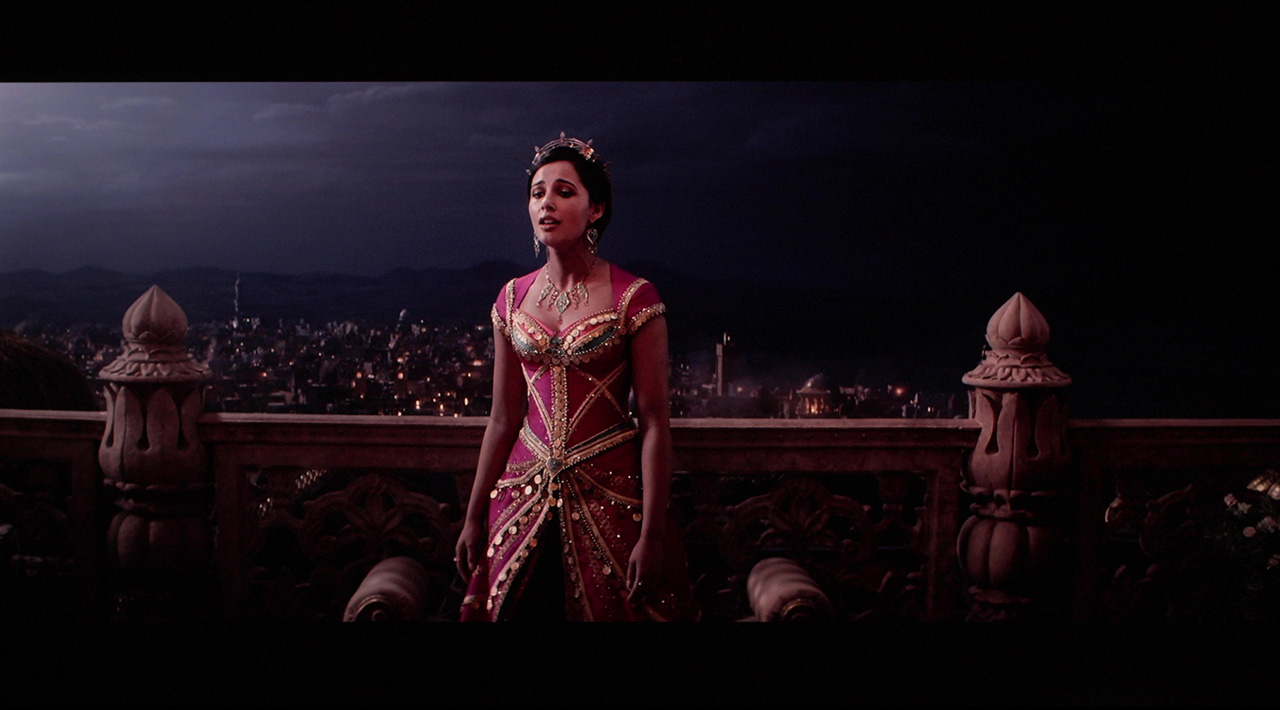
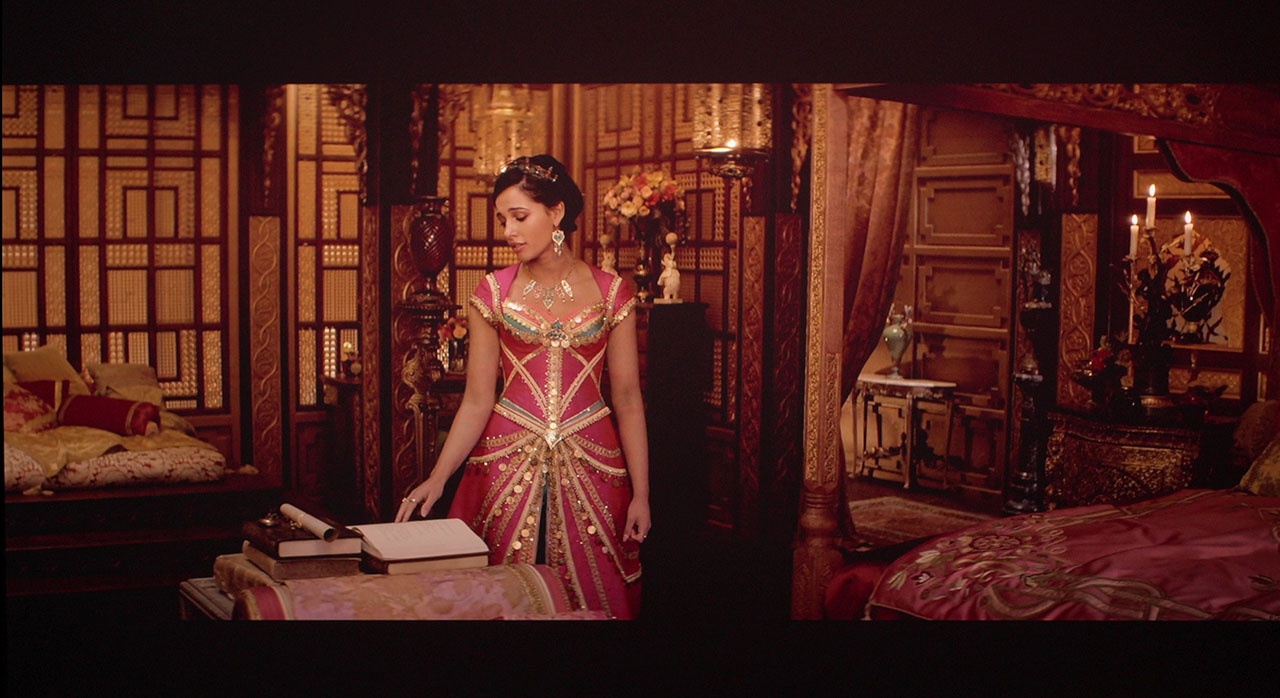
And this brings us to the second, and in my opinion most important drawback of EBL, which is white balance and color shifting. This issue appears as a very fast change in skin tones, and sometimes even in the background, shifting back and forth between a greenish and a reddish tint.
This behavior is extremely distracting, and in movies or TV series where it occurs, it becomes impossible to watch with EBL enabled, no matter how insensitive someone may be to color changes.
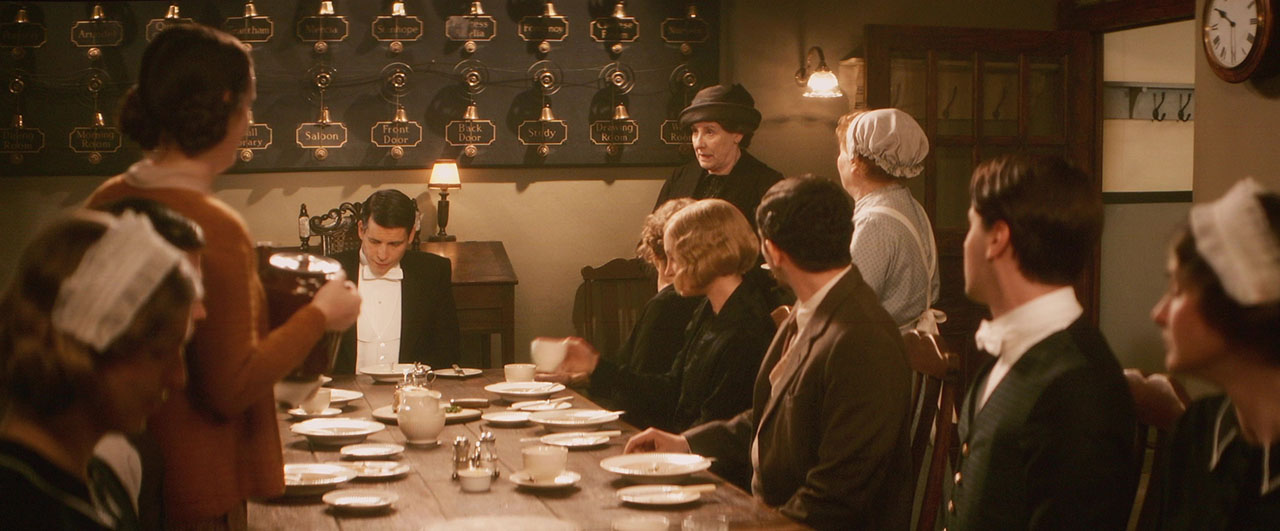
The most affected content tends to be movies or TV series with flat contrast, such as Downton Abbey, where this color shifting becomes much more noticeable.
Unfortunately, switching from EBL High to EBL Low does not help in this case, as the color shifting remains at the same level in both settings.
What is interesting is that this issue appears only with specific content, most often Dolby Vision, while with other content it does not appear at all. Across all the blockbuster movies I watched over the last two months, this problem was almost never present. However, when I started watching Reacher series for example, specifically the 3rd season , I was forced to disable EBL, as the issue became very frequent and highly distracting.
In short, this behavior depends entirely on the content being viewed. If I had to quantify its frequency, I would say that out of 10 movies, one may have some serious and noticeable color drifting with EBL enabled, forcing you even to turn it off. The remaining nine can be watched without any issues, and in the worst case, you may notice two or three brief moments where a weak point of EBL becomes visible, and nothing more than that.
The good thing about the MAX is that even if you come across a movie or TV series where EBL struggles and you have to disable it, you can always rely on the iris. By using the iris, you can still watch that content with decent contrast and solid black levels, without any major compromises.
Personally, I always watch content with EBL set to High, and across more than 30 movies I’ve watched over the last five months, EBL artifacts never seriously bothered me, since I noticed them and they distracted me only in a few isolated scenes. Of course, there were also one or two cases where I was forced to completely disable EBL because of very strong artifacts (both clipping and color shifting). One of those movies was Downton Abbey: The Grand Finale.
The last thing I want to mention is the use of EBL in combination with subtitles. Personally, I don’t watch my movies with subtitles, so it’s a bit difficult to share long-term viewing impressions, and I can only refer to the tests I performed in order to inform you.
What I noticed is that in dark scenes, where EBL would normally deliver excellent black levels and contrast, the appearance of subtitles can sometimes affect its behavior. In those cases, the moment subtitles appear, we may see a sudden rise in black level and a drop in contrast, almost as if the EBL is briefly disabled.
In other scenes, however, EBL is not affected at all, and instead the subtitles themselves become less bright. In general, depending on the average brightness of the scene, either the subtitles affect the operation of EBL, or the EBL affects the brightness of the subtitles.
Since I only tested individual scenes and not an entire movie with subtitles, I honestly cannot say more about the extent of this behavior or how much it might affect overall viewing quality. I’m simply reporting what I observed during my tests.
One useful trick, if you watch your movies using an external media player and subtitles from a separate file, is to slightly gray out the subtitles, meaning to lower their brightness, so they don’t interact so strongly with EBL. I tried this for testing on the Zidoo Z9X player I am using, and this trick works quite well.
So, is EBL ultimately worth it, or does it only create problems in the image? In my opinion, it is not only worth it, but I personally watch almost everything with EBL set to High, with very few exceptions. The surgical-level adjustment of the laser and gamma, depending on the brightness of each scene, delivers incredible dark scenes, with deep blacks and high contrast, and makes movies with lots of dark content a real pleasure to watch, especially when combined with the use of the iris.
The few artifacts I described in detail, which do not appear often, cannot undermine the overall experience, which in 99% of cases is clearly positive. Is there room for improvement? Absolutely. There is definitely space for refinement in how EBL operates, and the brilliant engineers at Valerion I am sure are already working on it.
MAX Performance
Lens & Sharpness
I’ll start by saying that the lens of the MAX performs better than the one on the Pro 2, and it truly delivers surgical-level sharpness across the entire projected frame. In the screenshot below, you can see the upper-left corner of the image. Focus uniformity is simply excellent, especially for a lens offering 105% lens shift.
I have also noticed a significant improvement in color fringing compared to the Pro 2, even when using lens shift at its extreme positions. It does not reach the absolute perfection of the lens on the XGIMI Horizon 20 MAX, as there is a very slight hint of red aberration, but we’re talking about something minimal, truly minimal.
24p Performance
The MAX includes a dedicated “Film” option within the Motion Enhancement menu. When this setting is enabled, the projector reproduces native 24p film content by internally multiplying the frames to 120 Hz. Taking into account the XPR pixel-shift mechanism, which further divides each repeated frame into four sub-frames to form the final 4K image, the internal operation effectively reaches 480 temporal sub-frames per second.
It is important to clarify that the actual image information remains strictly 24 frames per second, exactly as encoded in the film. No additional motion frames are generated. The remaining frames are either simple repetitions of the original 24p frames or the four XPR sub-frames used exclusively for spatial resolution, not motion.
As a result, viewers who are fans of the traditional 24p cinematic motion can continue to enjoy it exactly as intended. This is what truly matters in film reproduction.
Below, you can see the well-known motion test pattern, which the MAX passed successfully.
HDR 10 & Dolby Vision
While I had already completed an extensive section analyzing the MAX’s performance in high dynamic range content, a firmware update (P1215) arrived just two days before I was about to post it and forced me to throw everything away. All that work and analysis, gone — and within two days, I had to retest everything from scratch, just to be as up to date as possible for you.
Damn you, Valerion! The MAX is already great! Stop releasing new and improved firmware, we don’t want it! Just kidding, of course… 😄
This new firmware further improves the internal Dynamic Tone Mapping for HDR10 and HDR10+ content, and it also adds a new DTM level. Now, DTM is no longer just enabled or disabled, you can choose between Off, Low, and High.
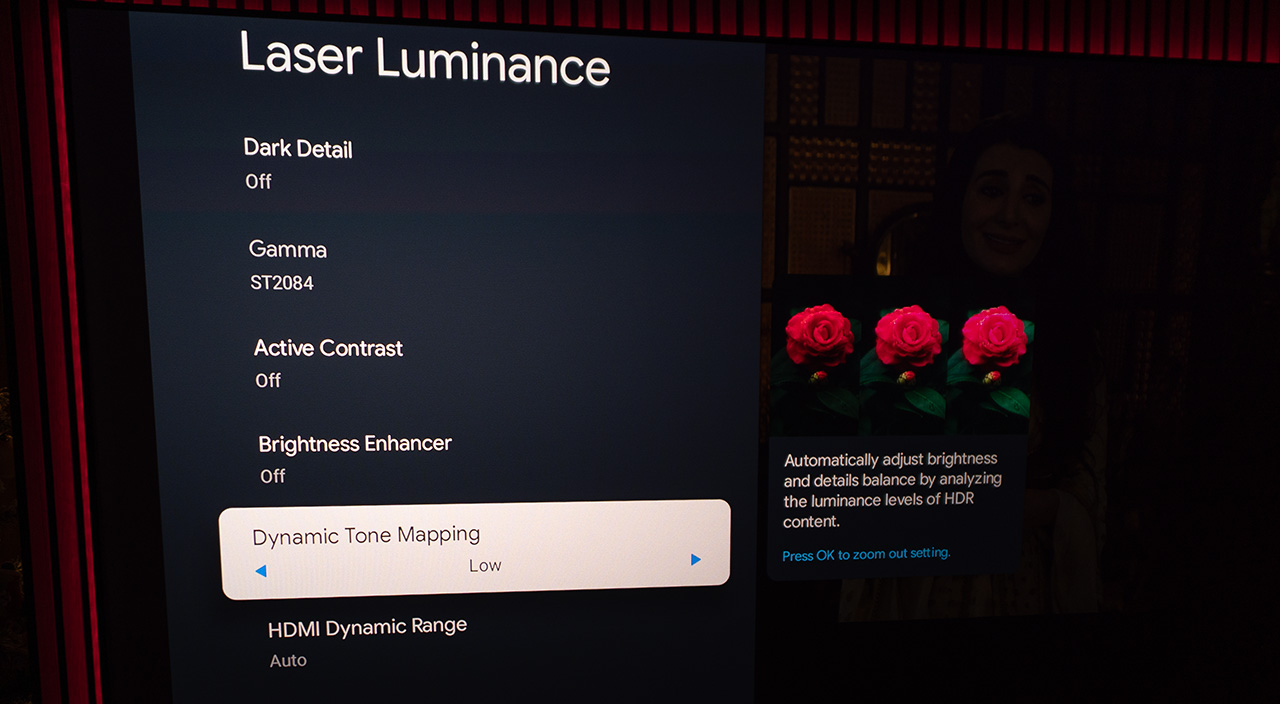
However, a more aggressive DTM setting (High) can sometimes compress highlights too hard, especially in dark scenes with very bright specular elements, particularly on DLP projectors with low native contrast, where DTM tries to save as much black detail as possible. This can lead to overall highlight compression or visible clipping.
In such cases, the new DTM Low setting can be a better choice, as it applies gentler tone mapping, preserving a more natural highlight roll-off and a more stable overall image.
Simply DTM Explanation
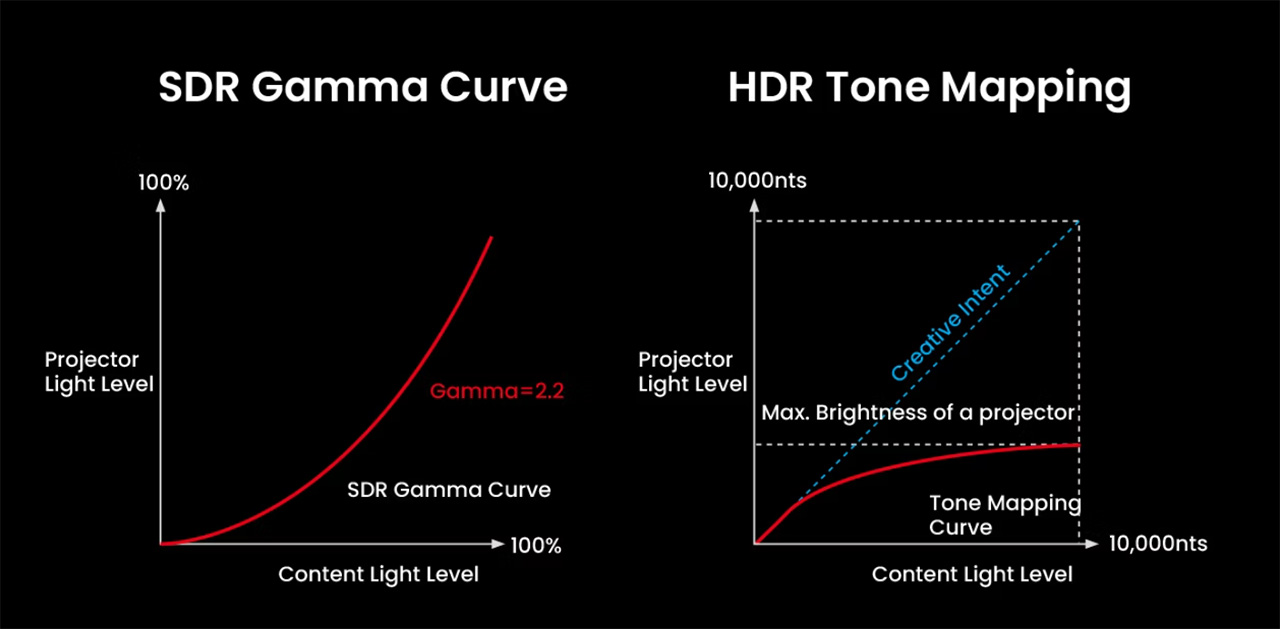
In very simple terms, so everyone can understand it, let’s assume the MAX is capable of reproducing image levels from 0 (absolute black) to 100 (absolute white). Now imagine a dark scene with a fireplace burning inside a dark room.
The HDR signal of the movie talks to the MAX in perfect Faroese — the language spoken in the Faroe Islands — and says:
“eldstaðurin hevur ljósstyrki á 300 til 500 og myrka rúmið frá 0 til 10 við sínum graderingum”
Which simply means: the fireplace has brightness from 300 to 500, and the dark room goes from 0 to 10, with all its steps in between.
– Faroe Islands…who the hell is living in such an awful place anyway –

The poor MAX, of course, only speaks Chinese and doesn’t understand a single word of this language.
That’s where the official Valerion translator comes into play, the DTM (Dynamic Tone Mapping). DTM doesn’t just translate this information so MAX can understand it. Without MAX even knowing it, DTM also changes those values into numbers that MAX can actually show, inside his 0–100 dynamic range. Because if DTM tells him to play at 500, the poor MAX will get depressed 😄.
In this case, High DTM pushes the bright highlights to play between 90 and 100, very tightly packed, so everything looks very bright, impressive, and punchy. As a result, our eyes perceive more contrast, meaning more distance between dark and bright objects (that’s contrast, for those who don’t know).
The new Low DTM, on the other hand, places the highlights in a safer and more spread-out range, roughly between 70 and 100. Of course, they don’t look as impressive or as bright, and they sit closer to the dark areas (which means less contrast), but there is much less compression in the highlight steps, resulting in a more natural and smoother image.
In this graph, you can also see visually how DTM performs this translation that I described above.
In practice, DTM Low often feels more relaxed and cinematic, especially in movies where highlight detail and balance are more important than impressing the viewer with aggressive dynamic range pushed to the projector’s limits. Having both Low and High options allows users to choose what fits each movie best, instead of being locked into one single DTM correction for all content.
Personally, I found the Low setting to be ideal for most of the content I tested, while in a few cases, the High setting worked better and felt more appropriate.
The new Valerion Dynamic Tone Mapping is working perfectly to my eyes, and HDR10 and HDR10+ content is a real pleasure to watch.
The high ANSI contrast and deep black levels are combined with a fairly gentle BT.2020 color gamut conversion (mmm, a bit more gently that I personally prefer), and the result is truly impressive.
I would even say that it has now reached near perfection, at least according to my personal taste.
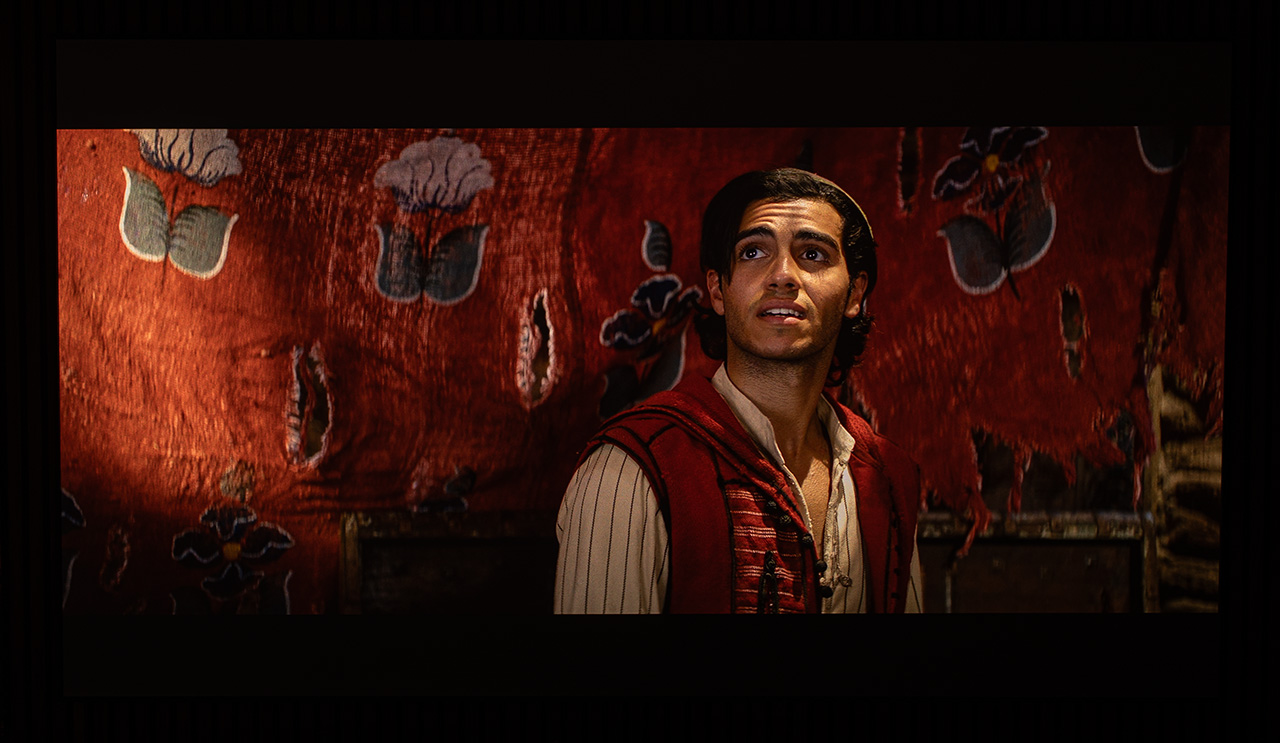
The following screenshots were taken with EBL set to High, the dynamic iris at level 5, and DTM set to Low. The dynamic range that the MAX can deliver to our eyes is just phenomenal for a DLP projector. Impressive, isn’t it?
By using the iris combined with EBL, the dynamic range becomes almost unreal for a DLP projector, but the very high ANSI contrast that the MAX achieves is what really makes the difference for me here.
Dolby Vision is the real thing, and in my opinion the future of the movie industry. Everything is checked and calibrated at Dolby’s labs, and the user does not need to worry about how DTM translates the metadata, as with HDR10, or how those metadata were originally created by the studio that finalized the movie.
In the case of the MAX, even though I didn’t have enough time to run all the tests I wanted, I can say that its Dolby Vision performance with the latest firmware looks improved. Personally, I found that the Dolby Vision Bright picture mode fits my taste much better, and this is the mode I used almost exclusively for all the movies and series I tested.
I found the Dolby Vision performance on the MAX to be simply impressive. The highlights are always kept in the correct range, with excellent gradation, and the handling of dark scenes with EBL enabled is almost always spot on. In general, I believe that if someone wants to see the maximum dynamic range the MAX can deliver, they should choose Dolby Vision content whenever possible.
I also believe that the latest firmware brought a small improvement to the Dolby Vision tone mapping. This is my conclusion, based on the limited time I had to test it (hopefully it’s not placebo).
Also, I think that the MAX in Dolby Vision content offers the smoothest DCI-P3 to BT.2020 color translation (not necessarily the most accurate!) among all the projectors I’ve tested recently, something I personally like a lot.
One thing I need to point out here is that to get the best possible results from HDR content in general, the MAX must be properly calibrated. This is very important, and it should be done based on the iris position you plan to use, if you want to take the MAX out of your MAX. Ok, that sounds weird..
3D Performance
Here things are a bit controversial. First of all, the MAX has something that is insignificant for many, but very important for me, since I have become lazy and picky in recent years. I am talking about the auto 3D detection/selection. When it detects 3D content, it automatically enables 3D mode. So far, so good!
What it does not do, however, is select the correct 3D format. For example, if the 3D file is SBS, you have to go manually into the 3D menu and select it yourself. And guess where this menu is located. Come on, I’ll give you a bit of time.
Of course, it is located inside the difficult and problematic “projector” menu, the same menu where the iris setting is. Where else could it be, guys? Inside the fast and proper picture settings menu, where you have direct access and everything actually works correctly? Come on, don’t be so picky and grumpy!
Jokes aside, this poor usability and the inconvenience that this specific projector menu offers, in my opinion, must be a top priority for the next firmware update.
The 3D performance of the MAX, in my humble opinion as always, is one of the most technically solid among all the recent projectors I have tested. The synchronization of the DLP-Link glasses is truly perfect, and the frame switching is perfectly matched with the opening and closing of the glasses’ shutters. This delivers the maximum depth you can get from 3D content and a very comfortable viewing experience. The perfect synchronization also helps achieve the maximum possible brightness.
Unfortunately, there is one drawback, quite important for many, though not so much for me.
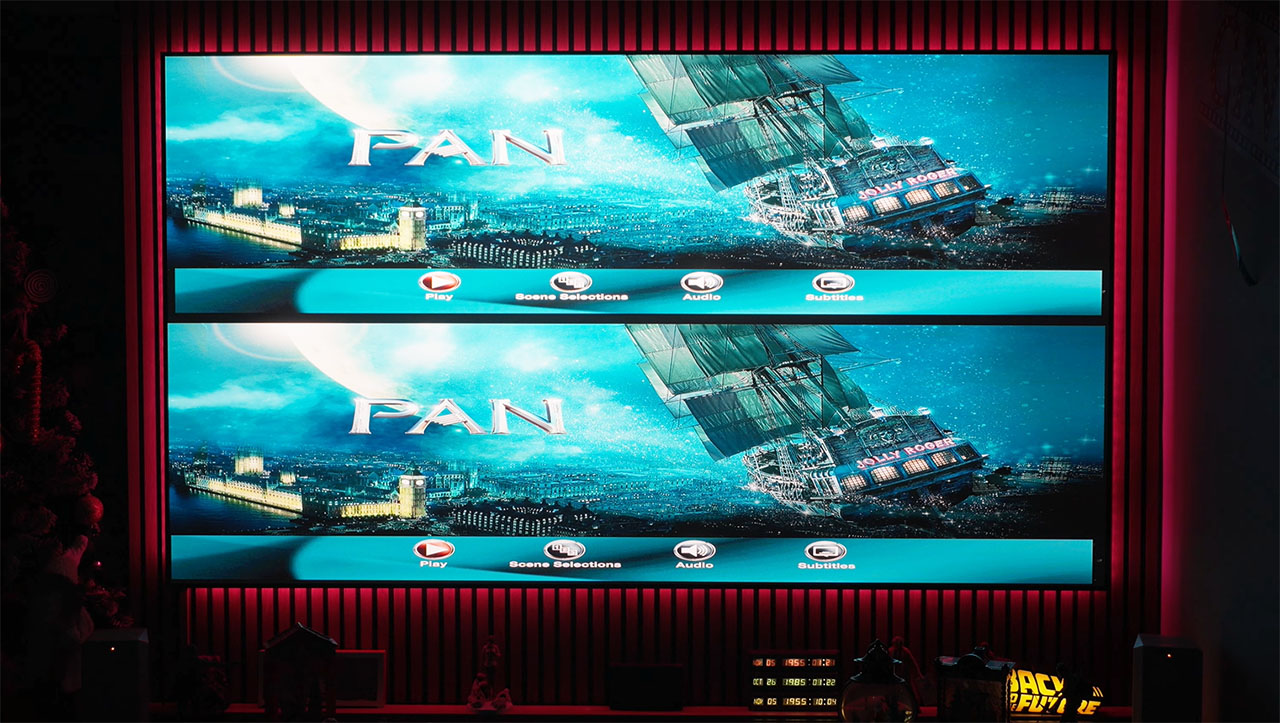
The AVS member ht2tweak, who is very experienced and has deep knowledge of 3D, discovered that many modern 3D-capable DLP projectors play Full HD 3D content at half horizontal resolution. The thread is this one, and I strongly encourage you to read it if you want to stay fully informed about 3D performance across current projector models.
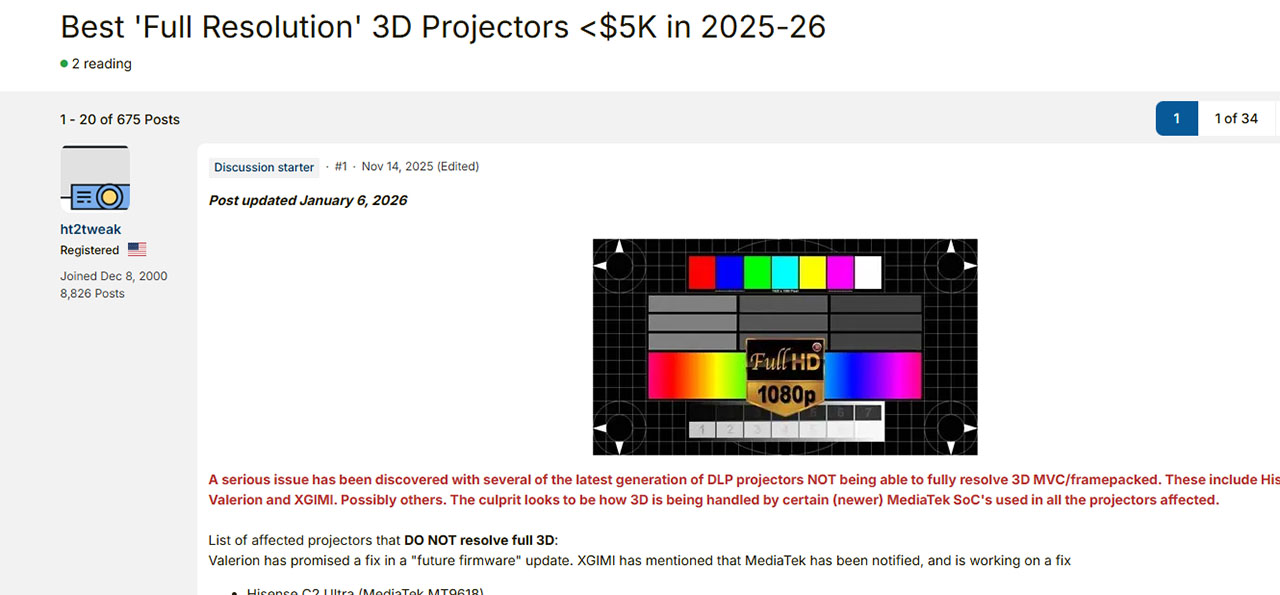
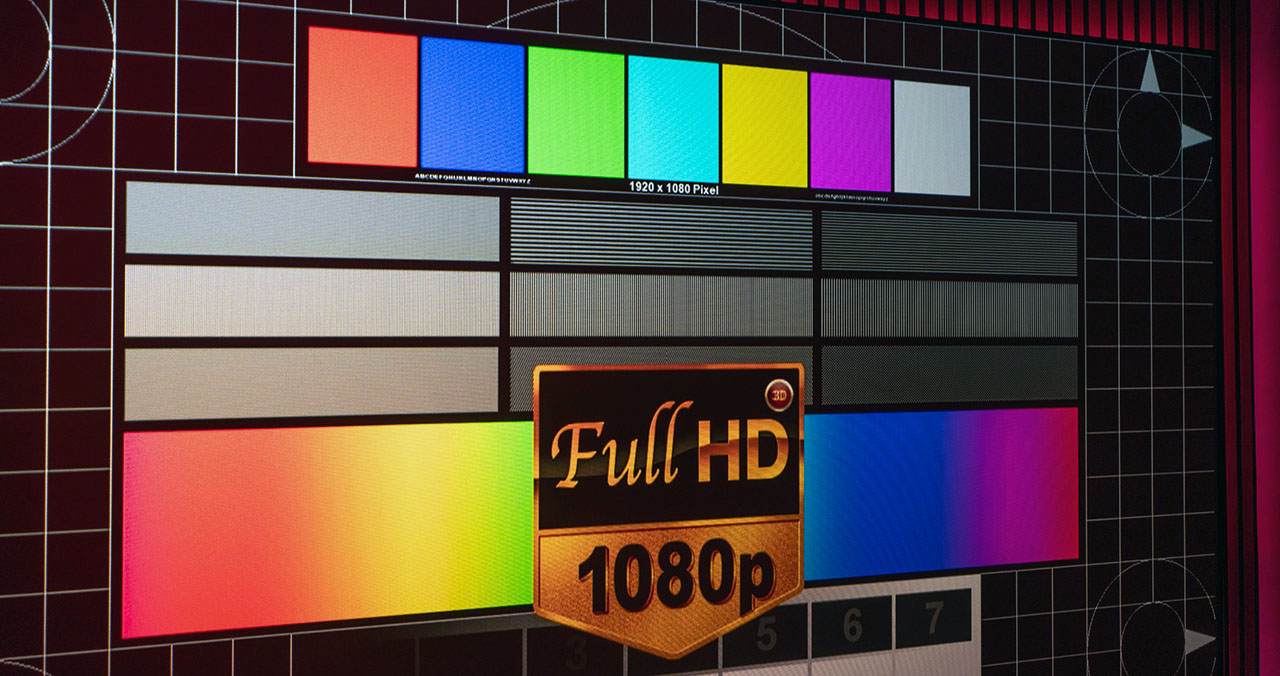
By using a 3D video test pattern, you can check which projector suffers from the half-resolution issue. So, I ran this test, and it showed that the MAX also suffers from this limitation in 3D resolution.
You can download this video test pattern and check your own projector. Here is the link https://kodi.wiki/view/Samples#3D_Formats
The problem most likely comes from the MediaTek SoC, based on everything we know so far. Valerion is already aware of it and is working on a solution, which, according to my information, will be delivered soon via a firmware update.
3D is starting to attract more and more people again, and for me this is mainly because of the 3D capability offered by most modern lifestyle DLP projectors, like the MAX. Their high brightness, combined with these amazing RGB laser optical engines, and the large image size they can produce (3D needs inches, lots of inches!), are bringing more and more users back into the 3D game.
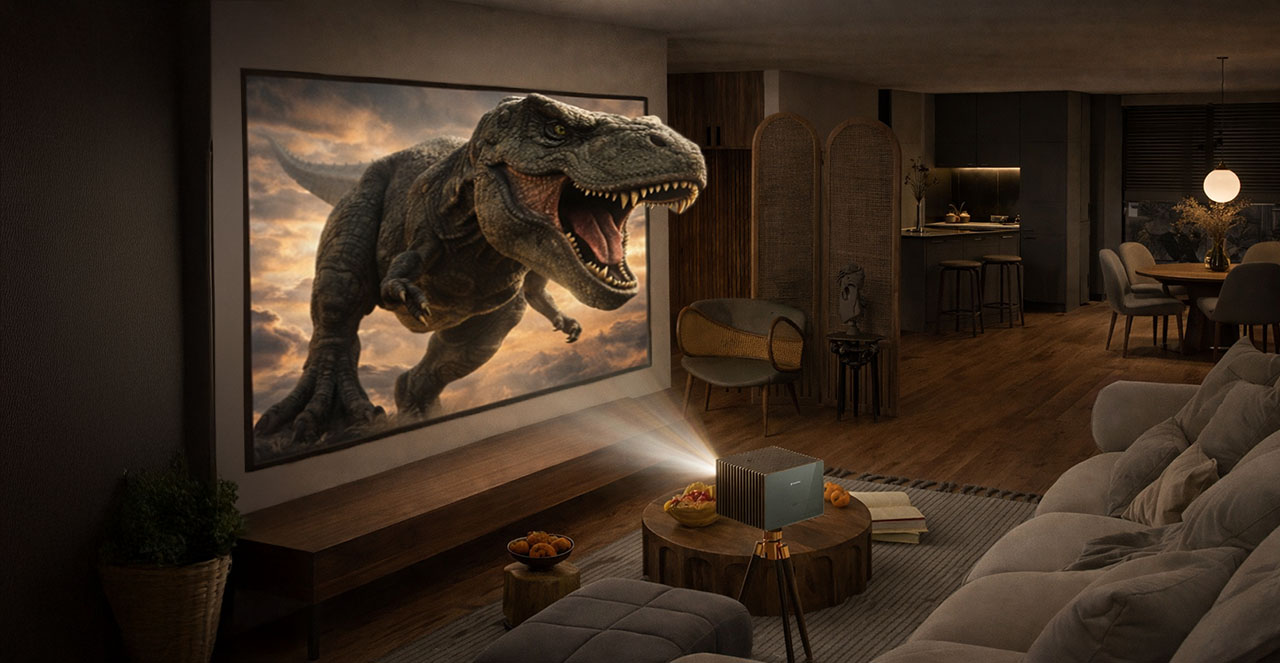
And this is, in my opinion, a very positive thing, because the 3D viewing experience on these projectors is something that all of you should experience at some point. It is simply magical.
The Useless Tip of the Day
Many of you may be wondering what those LEDs on the top of the MAX are, and what the small switch next to them actually does.
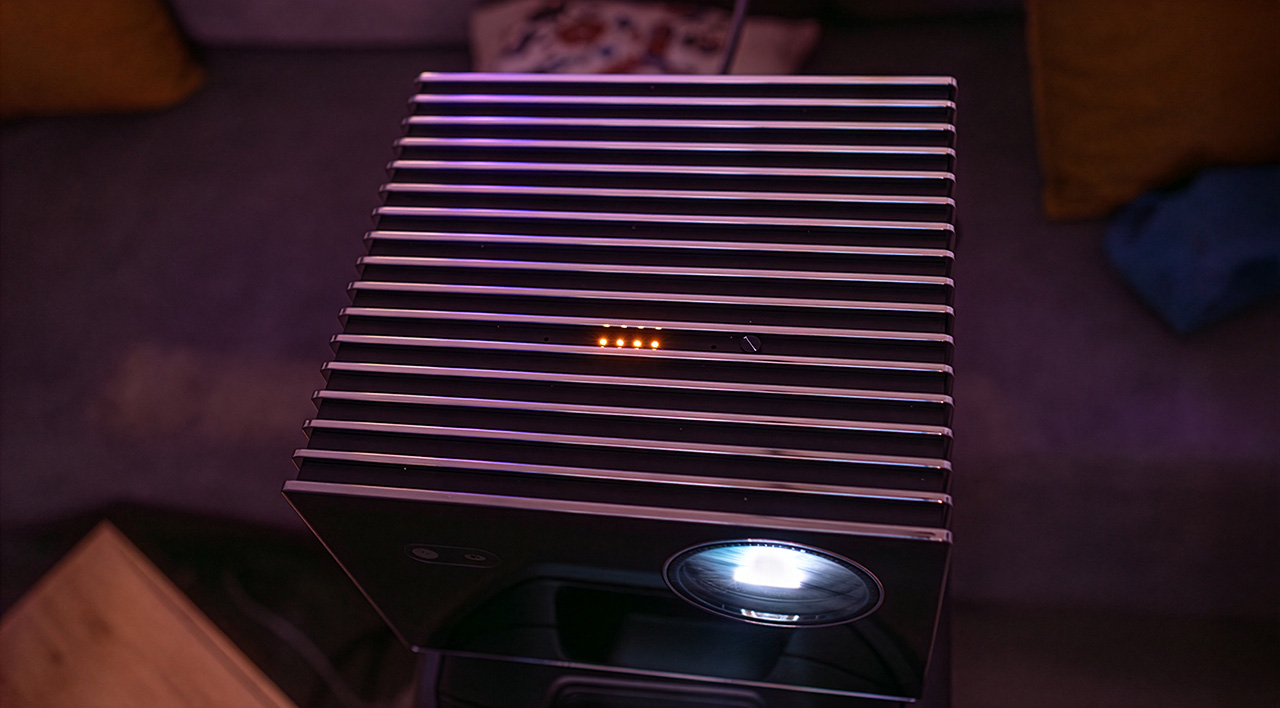
The MAX has a built-in microphone that can stay permanently active when this switch is set to ON, as long as you have given the proper permissions in the Google TV settings. If you do that, you can literally shout “Hey Google” like crazy in your living room and give voice commands to the MAX, without using the remote control (which, of course, also has a microphone).
When you do this, you will see the LEDs change color and then turn off, as the MAX executes your commands. You can even turn the projector on or off using your voice.
Cool! 😎
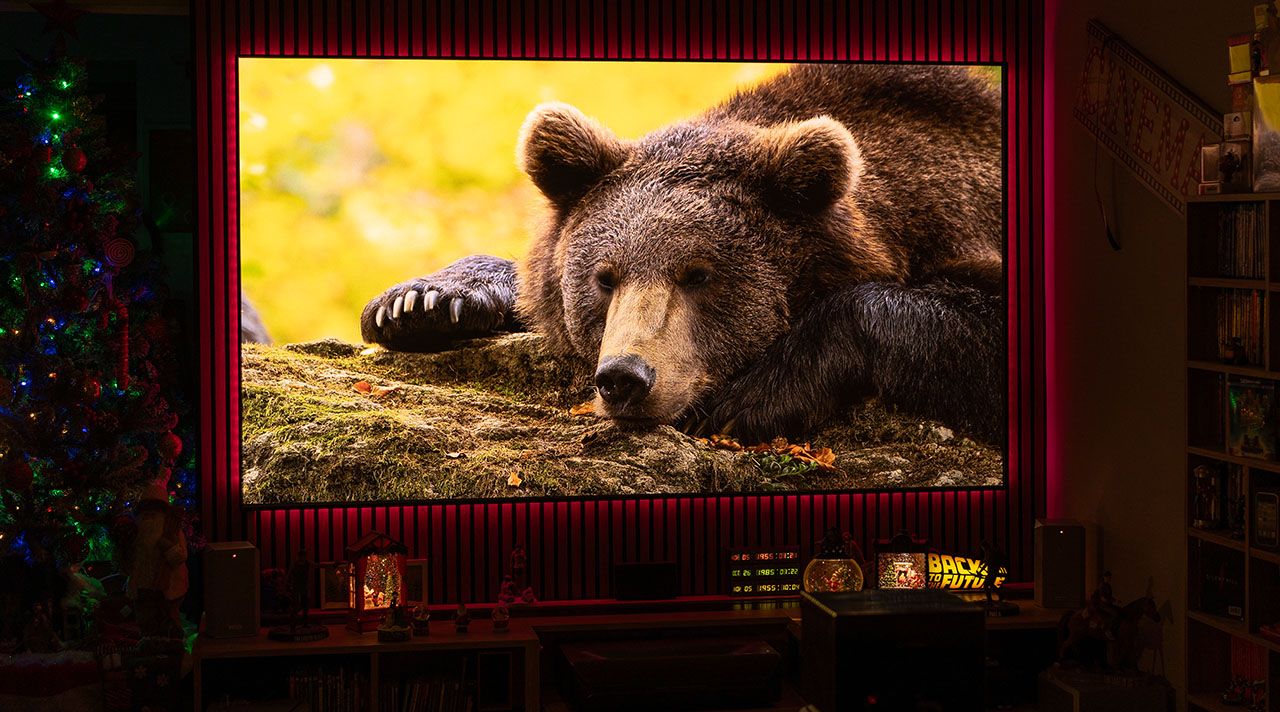
I created a special Christmas video for you, not so much for you to enjoy the MAX in action, who cares, but mainly to send you my wishes in this way 🎄
Anyone who doesn’t believe in Santa Claus, please do not click this video, it’s not for you! 😛

Final Thoughts & Conclusion
I have read and heard many opinions about the MAX, both positive and negative. I have read and watched most of the reviews, all positive, of course 😄
After five months of owning the MAX, I believe I now have the right, and that the time has come, to share my own opinion.
– The addition of an iris on the MAX is not exactly what I expected. It is not dynamic, as Valerion promised. It is only manually stepped, with six fixed positions. The menu used to control it is one of the most difficult and unfriendly menus someone could design, and at position 6 it creates white balance issues. Thankfully, it does increase contrast quite a lot, which is the main goal. It could do a bit more, if I want to complain about something.
– EBL, while doing an excellent job at boosting contrast and lowering black levels, does have some issues. Sometimes it compresses and clips strong specular highlights, sometimes it affects white balance while operating, and finally, subtitles are not exactly its friends.
– RBE reduction, while it eliminates the rainbow effect and makes the image much more comfortable to watch, can in some cases — for example when using white balance settings other than Warm 1 and maximum laser brightness — produce a high-frequency noise that will bother many people.
– Lens shift, while it is certainly a welcome addition, is something I personally wish had more range, especially if you want to mount the MAX high, close to the ceiling, and have the image start much lower. It works, but I would describe it as “yes, but…”.
– The 3D performance, while fantastic in terms of glasses synchronization, frame stability, and depth, delivering a very comfortable image and overall one of the best 3D images out there, still plays 1080p 3D content at half resolution, which takes away the pleasure of a true high-definition 3D experience.
– The black, glass-like, volcanic style surfaces of the MAX are beautiful, but they pick up fingerprints very easily and need constant cleaning if you touch it (or pet it from time to time, like I do 😄). Unacceptable. I have already informed Valerion about it, twice, and they keep saying to me that I should use the cleaning cloth included in the box. Unacceptable after-sales support, I am not a cleaner!
Taking all that into account, my opinion is quite clear:
The MAX is the best DLP projector that has ever passed through my personal home cinema, and I say this without any hesitation.
It delivers an image that simply leaves you amazed.
You get addicted to it, bright, with insane contrast for a DLP projector, great colors, sharpness, zero RBE, everything. It is no coincidence that whenever I compare another projector’s image in my mind, my reference is always the MAX.
How does this projector perform compared to the MAX?
How does the other one look compared to the MAX?
It’s always the MAX. That says a lot, I believe.
And since someone finally has to do it, I will do it..
Valerion, I want to thank you, not as a reviewer, but as a simple home cinema fan. Thank you for pushing the entire DLP category to the next level. Thank you for your passion and for building such innovative products. Thank you for giving us the MAX.
Until my next review, take care everyone!
Nikos Tsolas
14 Comments
You didn’t say anything about the Iris presets, Cinema 1 and Cinema 2. How do they perform in comparison to your favorite Iris settings, 4 and 5?
Cinema 2 is no different then Iris 6. Cinema 1 I’m not sure about.
Nikos, excellent review! You put so much work (and heart) into your write-ups, and make the more techie stuff approachable, it’s always an enjoyable read. And thanks for being that critical liaison and advocate between the community and manufacturers, and passing information you can share.
I have got my MAX as well. Now, i m wondering, what is the best setting in a light controlled room.
why is ebl in reviews always going from gray to oled black? it doesnt look like that in reality
Because your eyes adapt before you even realize it. The difference is only noticeable when you shoot with a camera with a fixed exposure.
So with the valerion max setting screen size alters the gamma curve any input on this? also filmmaker mode or theater what exactly is the difference if any and what is the most accurate?
Thanks for the review! I upgraded my firmware from 0910 to 1215 and my color is really off, with warm1 on the iris 5 which I usually use there’s noticeable green tint.
Otherwise those settings were great on the obvious firmware.
What would you do in the color settings to adjust that?
Another fantastic review—no surprise there! I’ve been impatiently waiting for your Max review, and it was 100% worth it. I learned a ton about the Max that I didn’t know before, and I’m excited to try these tweaks on my own unit.
The white balance calibration tips were especially appreciated, since the out-of-the-box color accuracy left me a bit disappointed.
Thanks, Nikos, for always putting so much passion and effort into your reviews. This is an outstanding write-up. ProjectorJunkies.com continues to be the go-to source for the best projector reviews.
Nikos – What screen are you using with the Max? Do you notice any laser speckle with your screen? I am struggling to get a good blacks as shown on your review screenshots and also the laser speckle is really bad on my 1.4 Gain White Matte Screen. Any suggestion to achieve a good black is appreciated. My HT room is a Batcave with black walls and ceiling.
You need to use an acoustic material, such as a SilverTicket Matte White WAB screen. That is what we use in out HT room and zero laser speckle.
Please note that the 24fps mode is not bringing up 24fps to 120fp. The XPR can not go beyond 240Hz. At 24fps input, the Valerions do 48fps which makes the XPR run at 192Hz. Hence also supposedly increased RBE for those sensitive to it.
https://www.avsforum.com/posts/64495510/
https://www.avsforum.com/posts/64495558/
https://www.avsforum.com/posts/64495624/
which screen did you used? White gain 1.0?
Hi Nikos, I absolutely love your reviews because they are down-to-earth, informative, realistic and have an element of humour.
Although this is a lifestyle projector, I am under the impression that these would be excellent in a fully light controlled dedicated home theatre. I have a few questions and will appreciate your input:-
1. in terms of overall image fidelity and image sharpness, how does the Valerion VisionMaster Max compare to the Epson QB1000?
2. Any idea if the Valerion VisionMaster Max is compatible with SofaBaton X2?
3. I am hoping that you will do a comparison between the Valerion VisionMaster Max and the new Xgimi Noir Max. Have you seen the Xgimi Noir Max in action? Any first impressions?