The ultimate 4K HDRexperience | JVC DLA-N5
Undoubtedly, JVC is in the field of video projection what Ferrari is in the world of automobiles, the ultimate weapon.
For those of us who we are just hobbyists or professionals in the field we know very well that if you want to get the best out of a home cinema setup, choosing a JVC model is essentially a one-way decision.
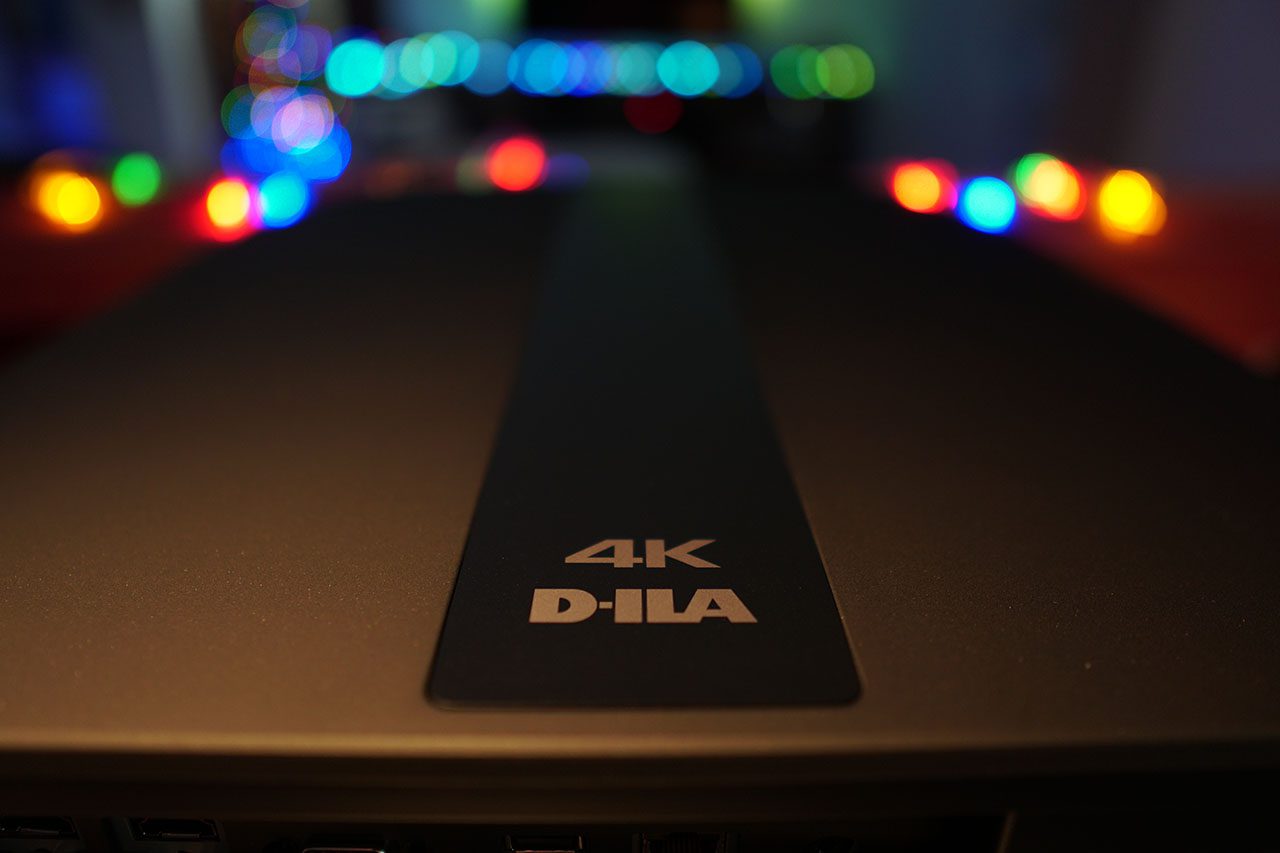
The big weapon of the company is of course the patented DILA optical engine and the extremely high native contrast that it produces by dissolving we would say any competition from the locker rooms.
The JVC N series has been with us for about 2 years now and has matured considerably through firmware upgrades that JVC provides to owners at regular intervals.
The latest V3.50 firmware upgrade was probably the biggest and most anticipated upgrade since JVC has been preparing us for months now stating that this upgrade is essentially a radical upgrade in the performance of the projector especially in 4K HDR.
The truth is that I am not a big fan of HDR and in general all this marketing that has been set up around it, but as a sworn fan of DILA projectors I really wanted to try this new firmware and explore a bit the changes it has brought to the performance.
So in collaboration with the Greek JVC delegation I received a fresh JVC DLA-N5 and I had the opportunity to play with him a lot during the two weeks I had it in my possession.
So let me convey my impressions to you …
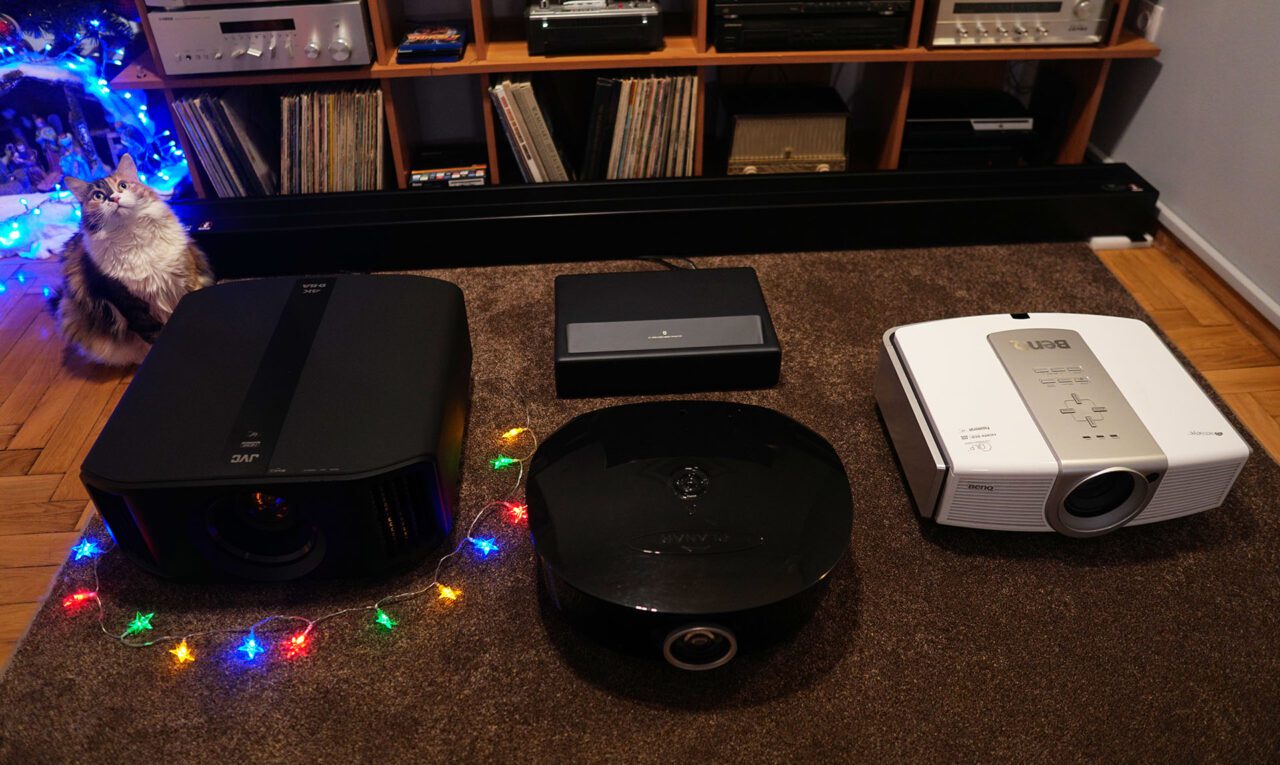
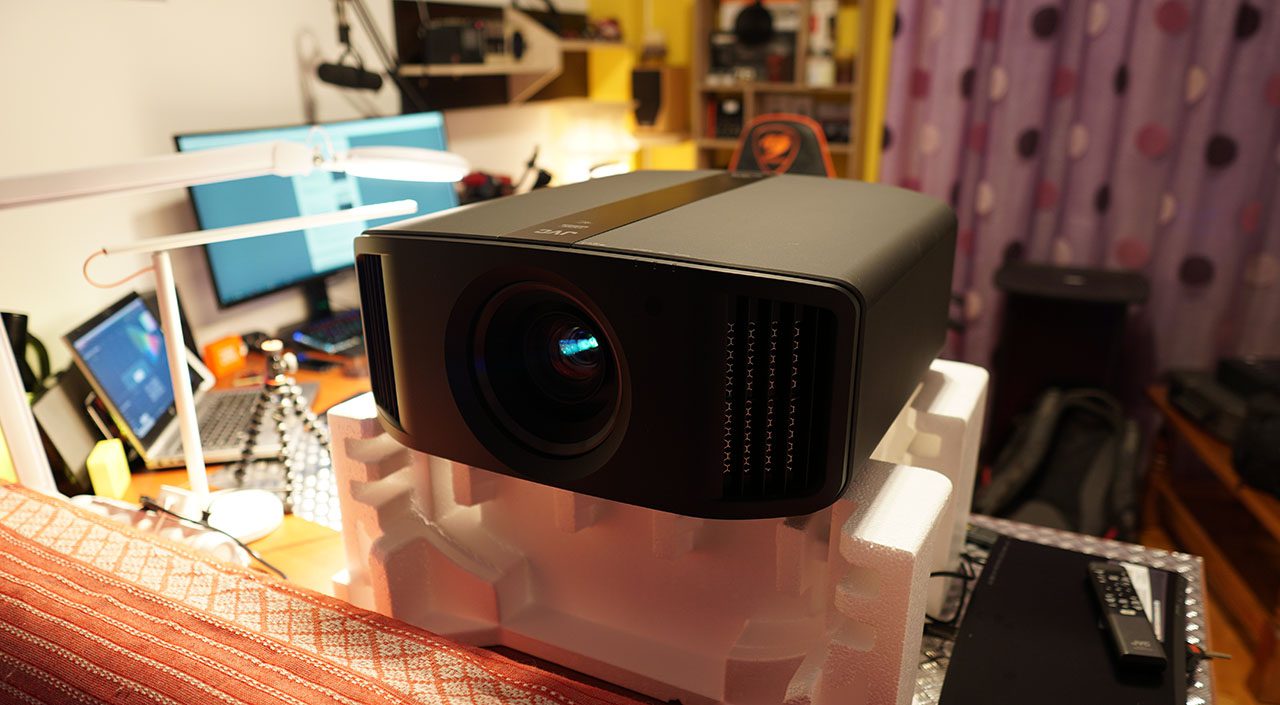
The N5, like the other 2 projectors in the N series (N7 and NX9), is a heavy-duty projector. He is huge no matter how you look at him. With a length of 52 cm, a width of 50 cm, a height of 24 cm and a weight of close to 20 kg, the N5 requires special care in it’s installation. Even transporting it in the huge box that comes packaged involves difficulties.
Comparison with the rest of the projectors in my collection can give you a sense of size…
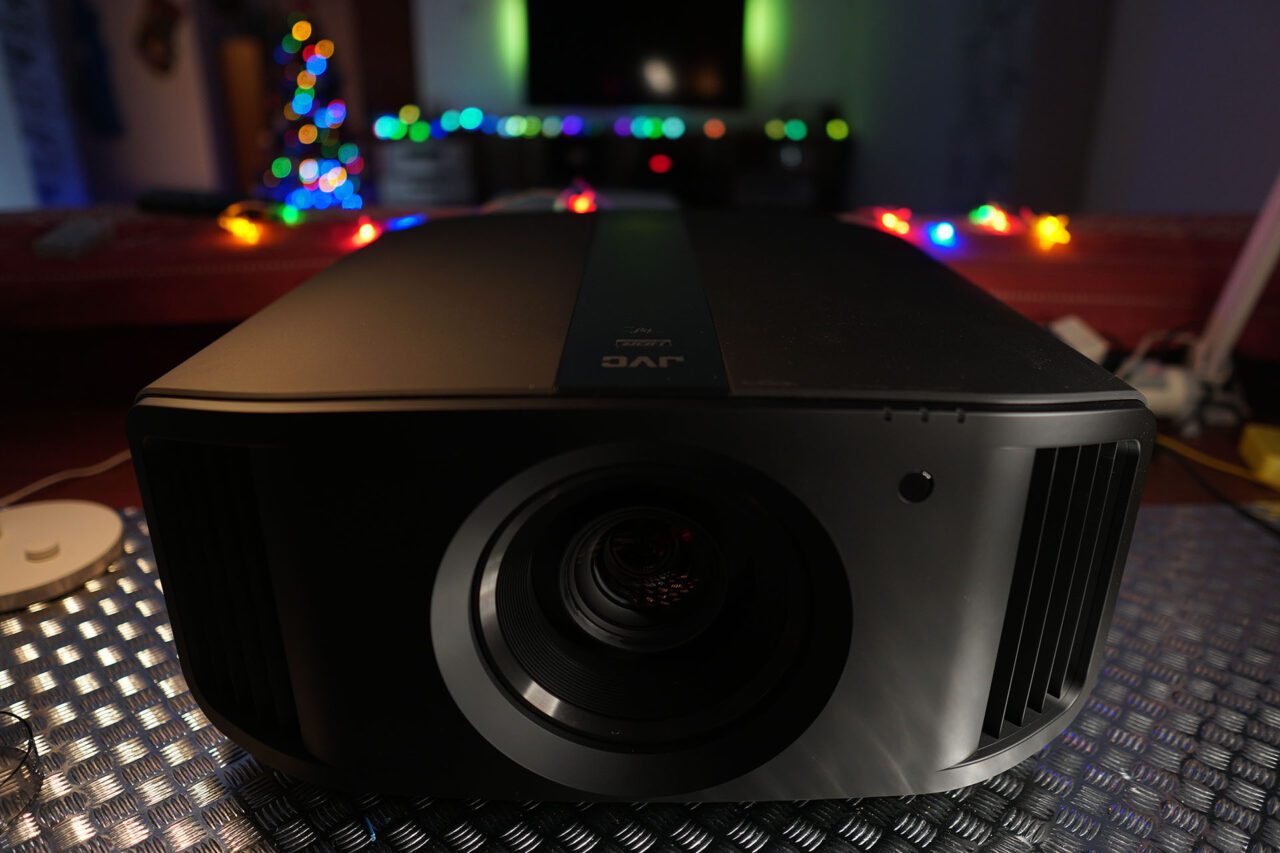
If you get over the initial shock of size, N5 is a beautiful projector, jewel. Totally symmetrical, its plastics in matte black with flawless fit and an imposing lens dominating the center at the front. You want to stare at him even when he’s not playing…
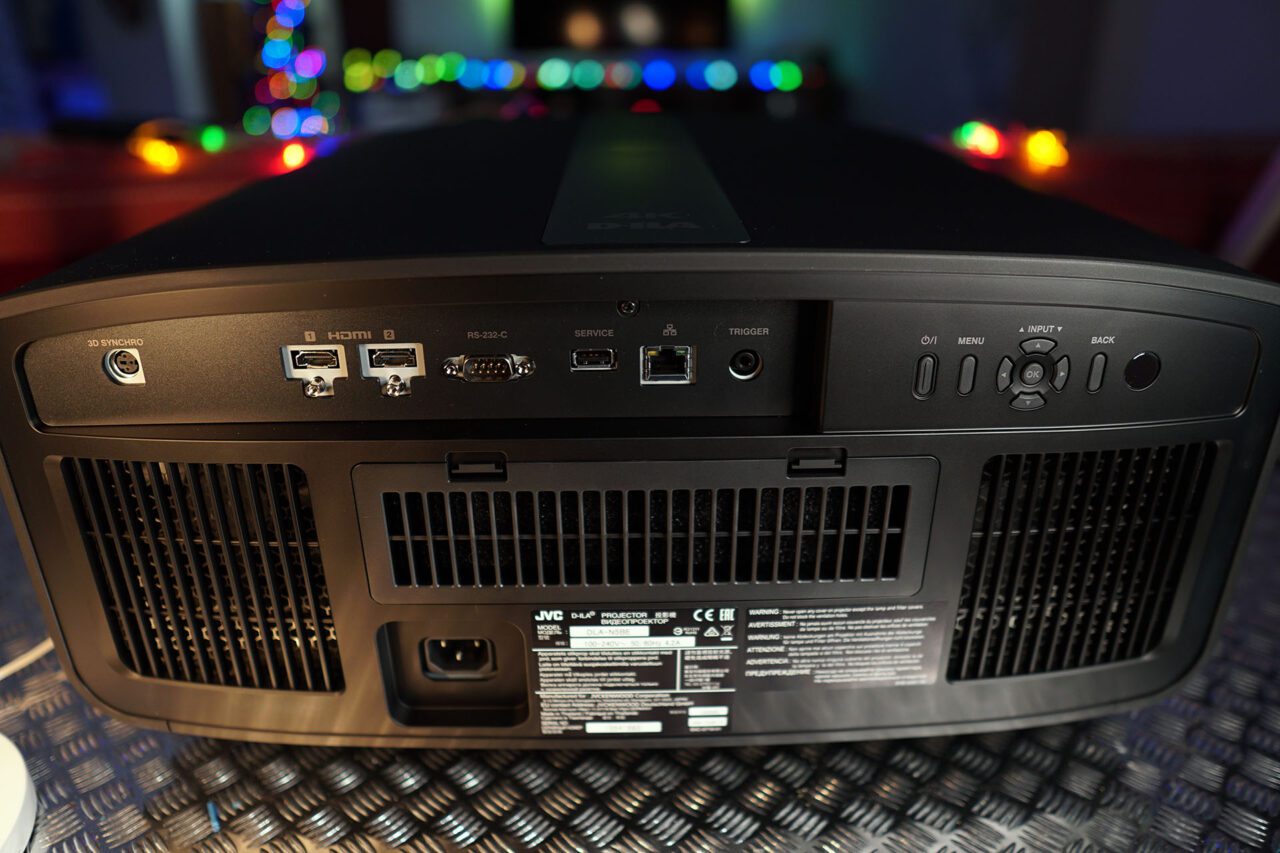
At the back we meet the absolutely necessary.
2 HDMI 2.0b ports, one serial and one USB service port, ethernet for connecting to our network, trigger port for connection to our screen and port for 3D emitter..
Also on the right the N5 has operating controls so that we can operate it without a remote control.
Before we go to the test, let me refer briefly to the peripherals I used to project with N5.
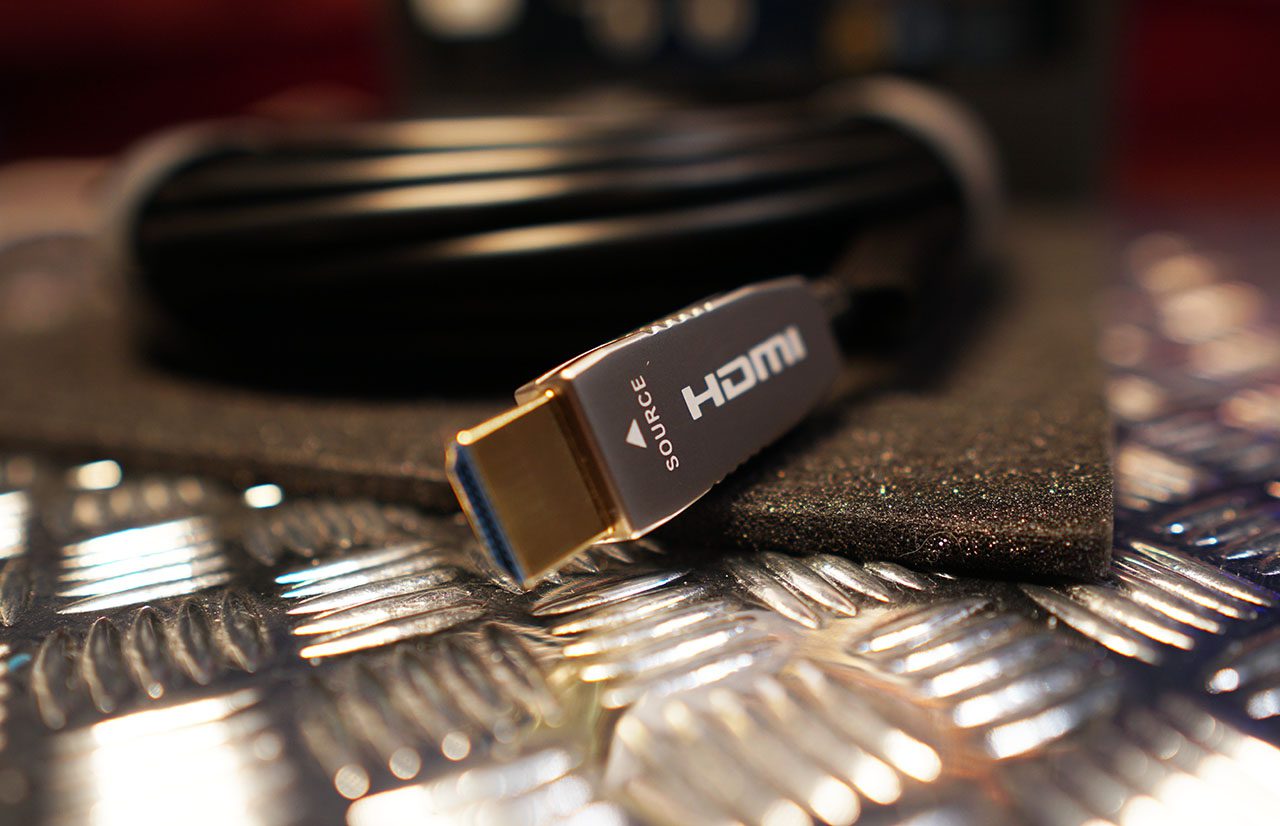
The cable I used (the ultimate VFM in my opinion) active HDMI 2.0b 10 meter optical fiber cable of Celexon.
This cable has certification for 4K60 and because of the fiber optics you simply forget future damage, de-synchronizations, etc.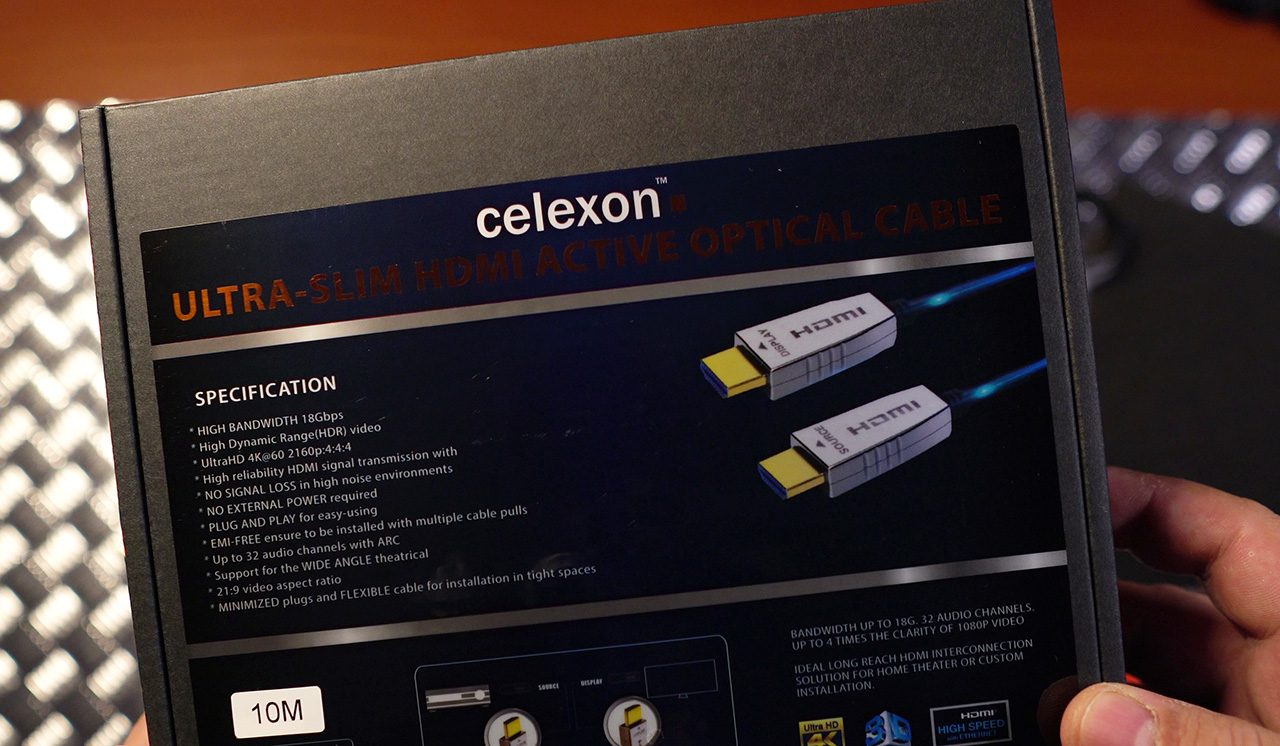
As it is an active cable has of course one way connection in its placement, so the other way, does not work.
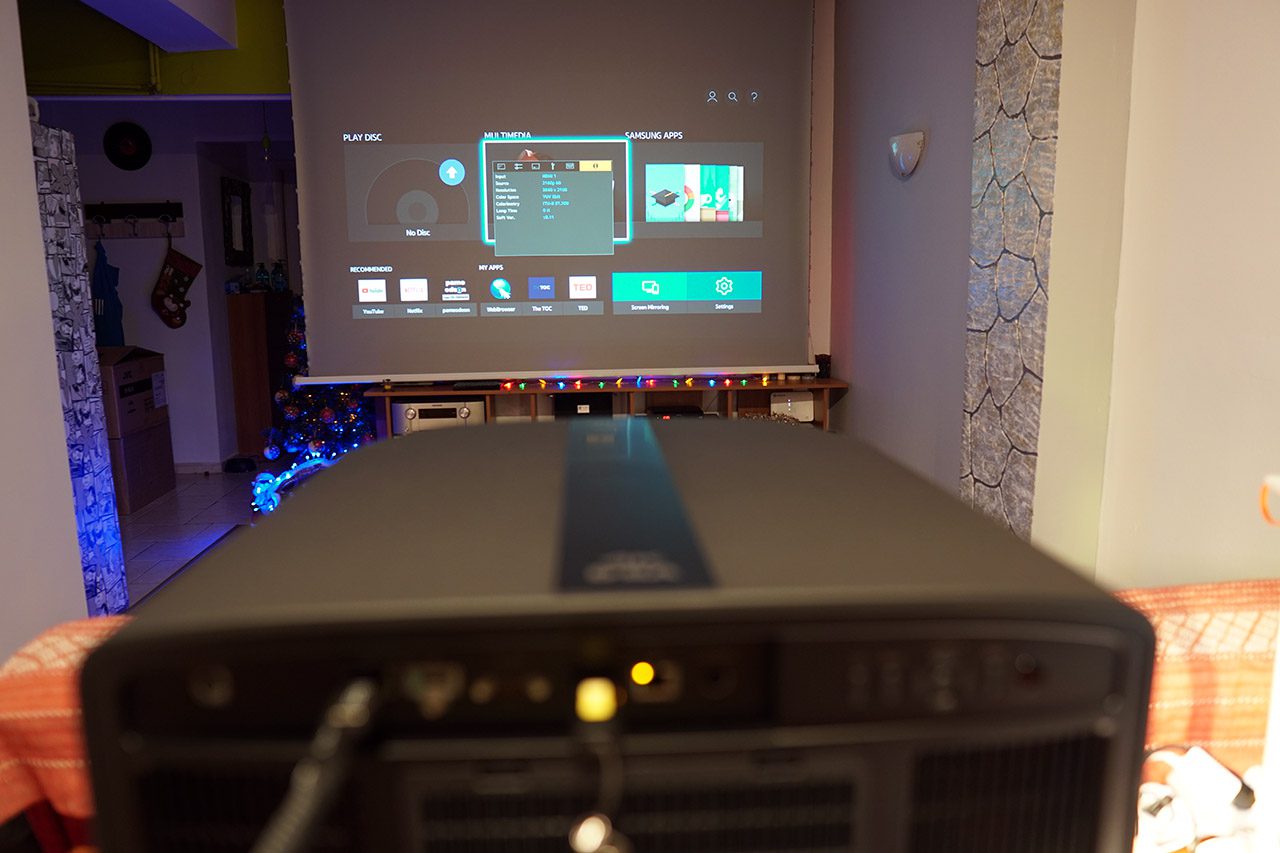
For screen I used of course my personal screen Celexon Dynamic Slate ALR with gain 0.8 (you can read its review here for those who have not already read it)
Combining a DILA with Celexon’s ALR screen is just magical, you’ll see below what I mean…
The Test
The N5 was set up opposite of the screen with three different 4K sources (media player, UHD player and computer) and the test started…
Of course first move was to update the N5 to the new V3.50 firmware. The process is extremely simple, you download it, you unzip it to a FAT32 usb stick, you place it on the usb port of the projector and after you go to the menu and you start the upgrade process. The whole process lasted about 20 minutes…
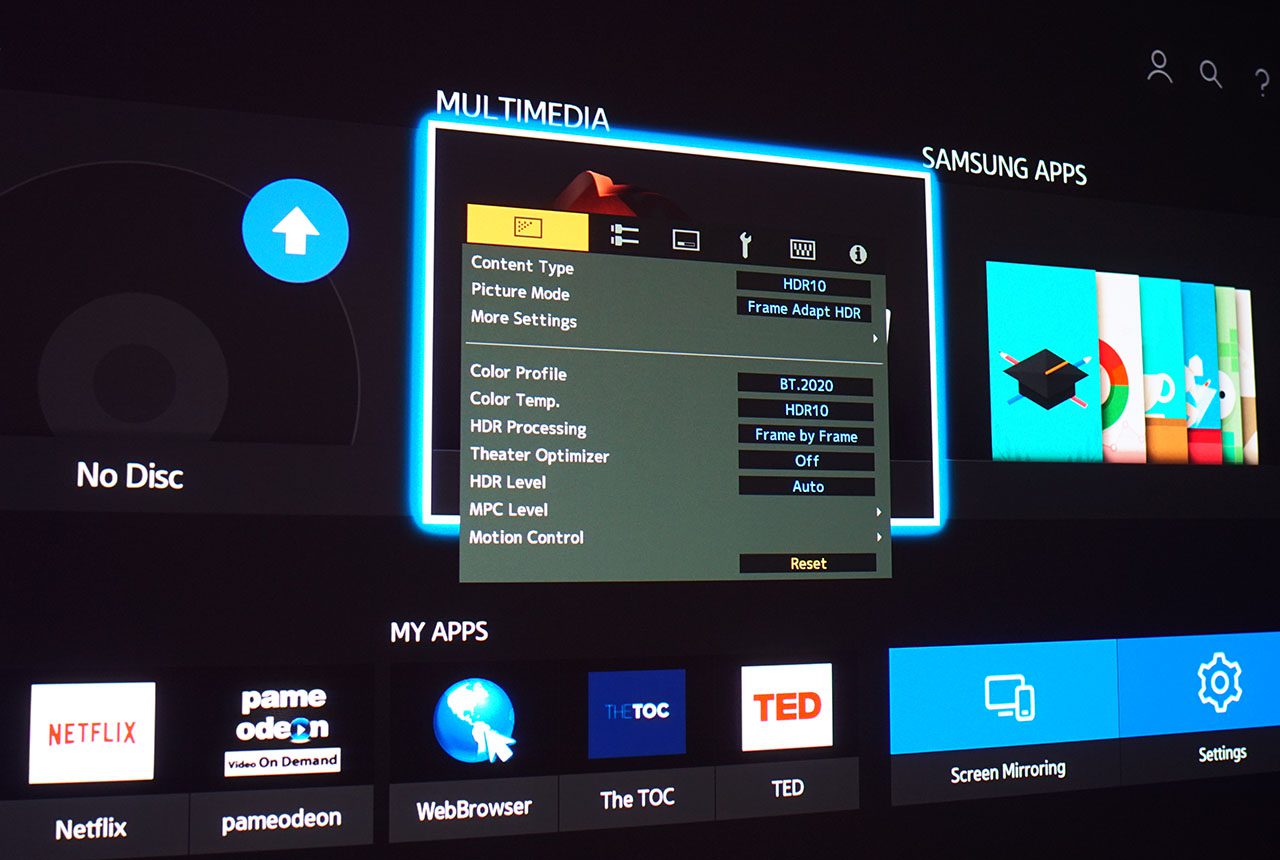
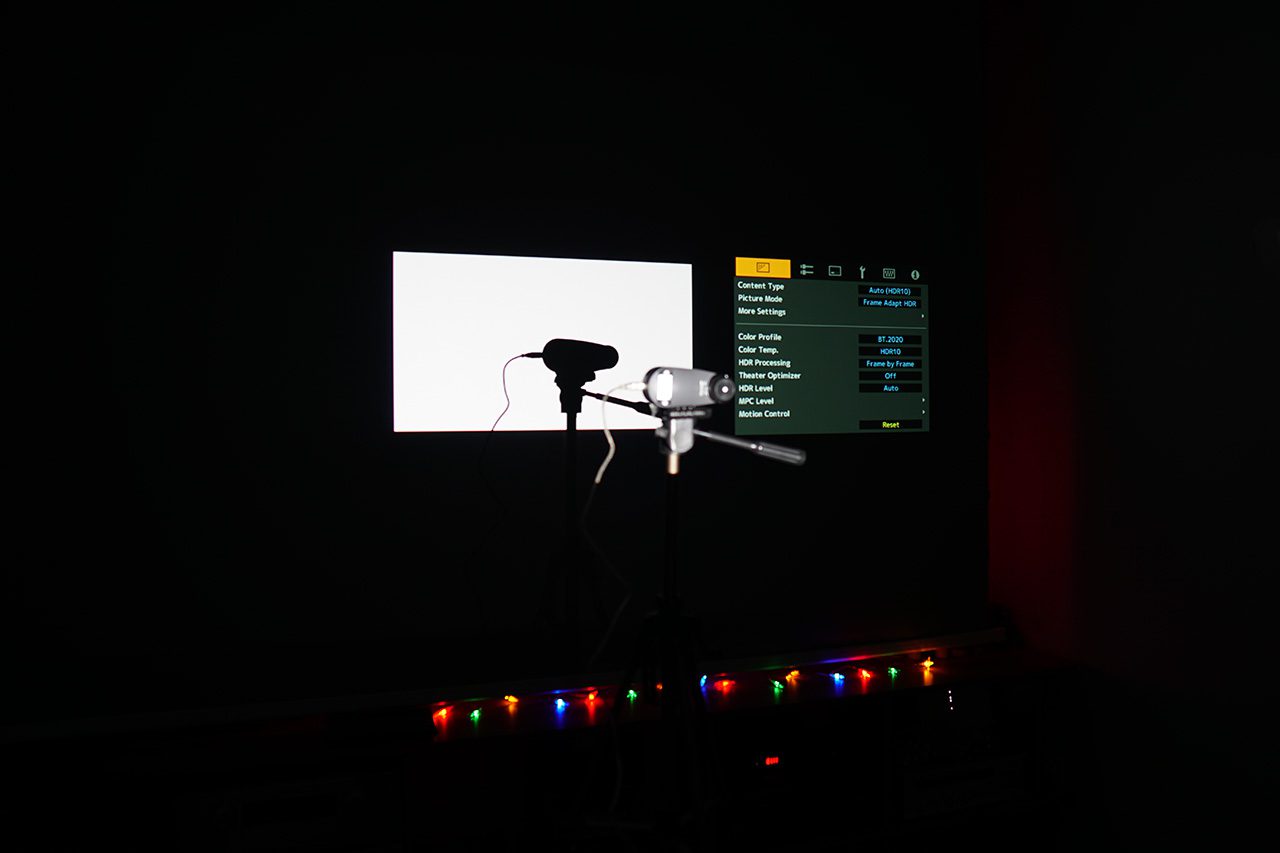
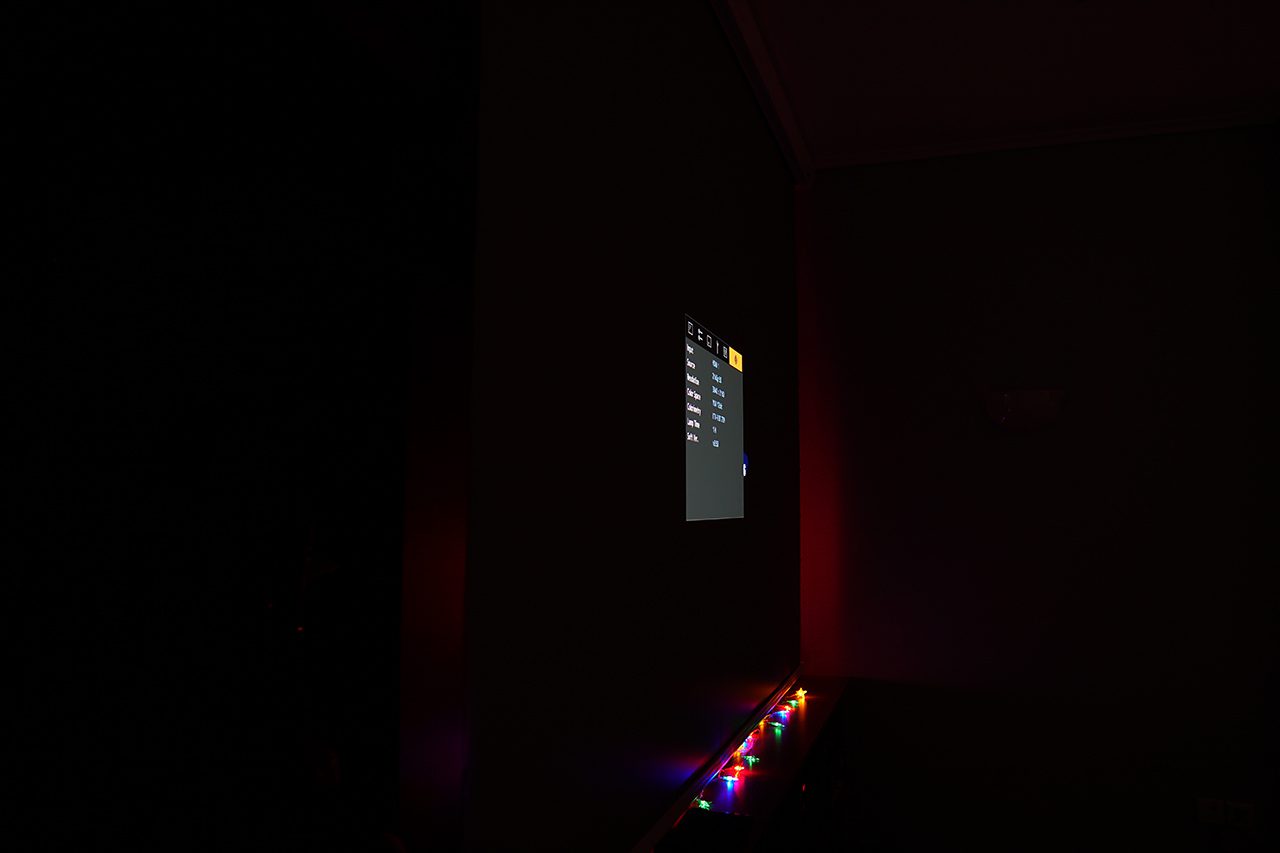
Let me start with a tour of the menu of N5 (which has now reached at very high levels in terms of the ability to adjust it gives to his owner) while explaining some basic concepts and functions (As simple and concise as I can).
(sorry for the somewhat low resolution photos but because of their large number I had to compress them enough, you can always of course click on them and grow them to see them better)
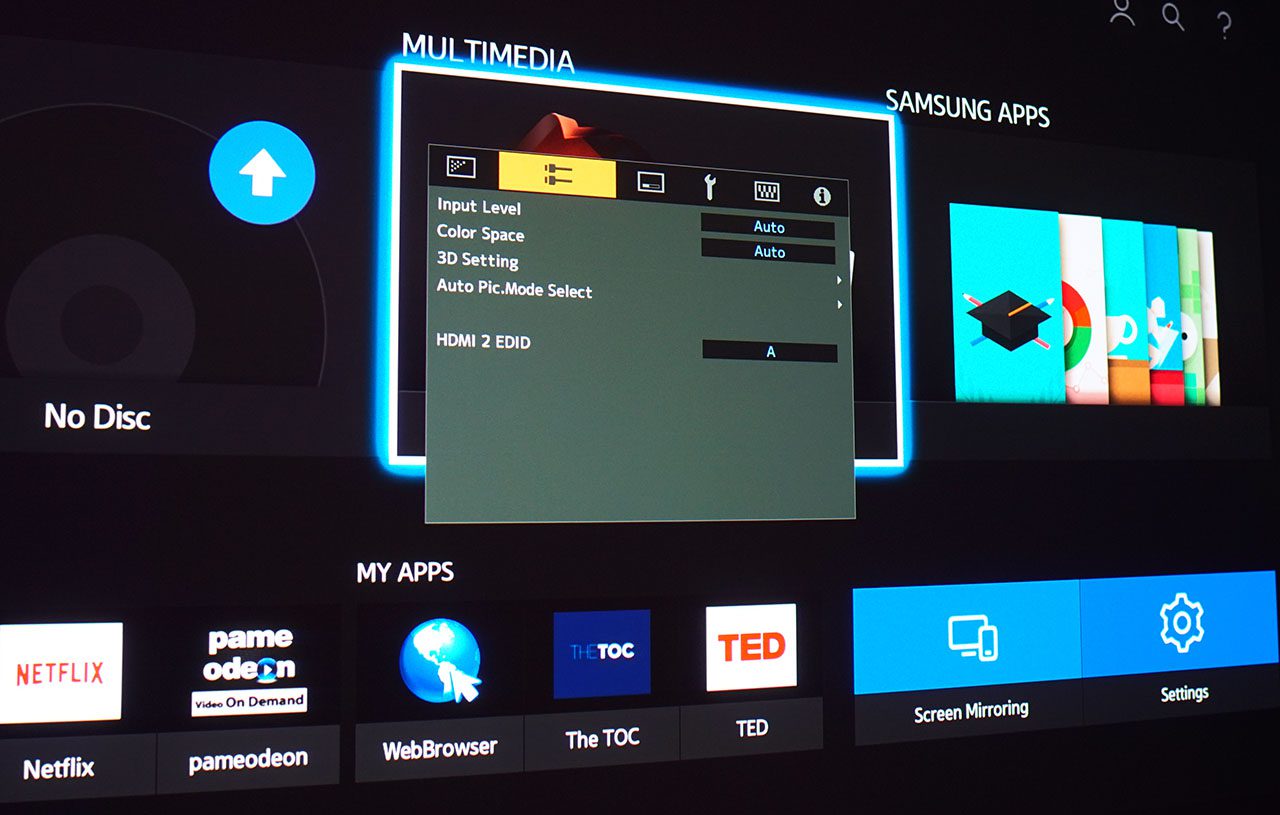
On the first tab we come across all the image sliders, this is the tab that we will see 99 out of 100 times we want to set something up on the N5.
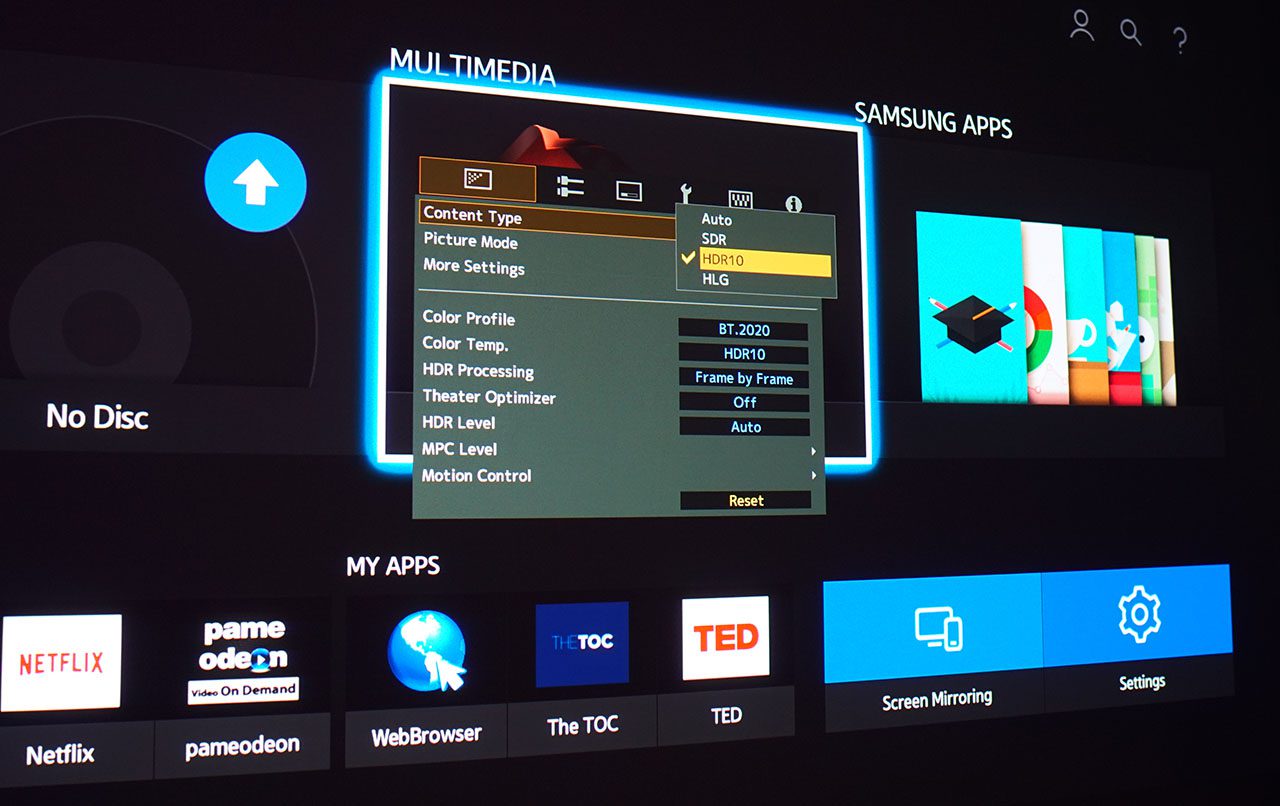
In Content Type we can choose from the three basic formats that currently exist, the SDR (Standard Dynamic Range) for 1080p or 4K hardware, HDR (High Dynamic Range) for 4K HDR10 hardware and HLG (Hybrid Log Gamma) for corresponding format hardware (HLG is essentially an HDR format that is commonly found on streaming services such as netflix or satellite packages and has the ability to play on non-HDR media as a simple SDR).
Of course we can leave it in Auto so that the projector automatically selects the appropriate setting depending on the material we are powering it.
In picture mode we can choose
if we have SDR Content Type the well-known Cinema kai Natural mode
if we have HLG Content Type the HLG mode
and if we have HDR10 Content Type then we have the following options in Picture mode
Frame Adapt HDR – essentially an algorithm that is run by the N5 CPU and automatically adjusts the tone mapping on each frame separately to HDR10 hardware by checking its average brightness per frame, regardless of whether or not there is meta data in the mastering.
HDR10 – there the N5 makes use of the maximum contrast and color gamut available in its arsenal according to the meta data of the HDR mastering
Pana_PQ – special mode for Panasonic UHD Players
Note, all these automatic settings are based on the mastering information that HDR carries with it and that has been placed there by the production team of this hardware.
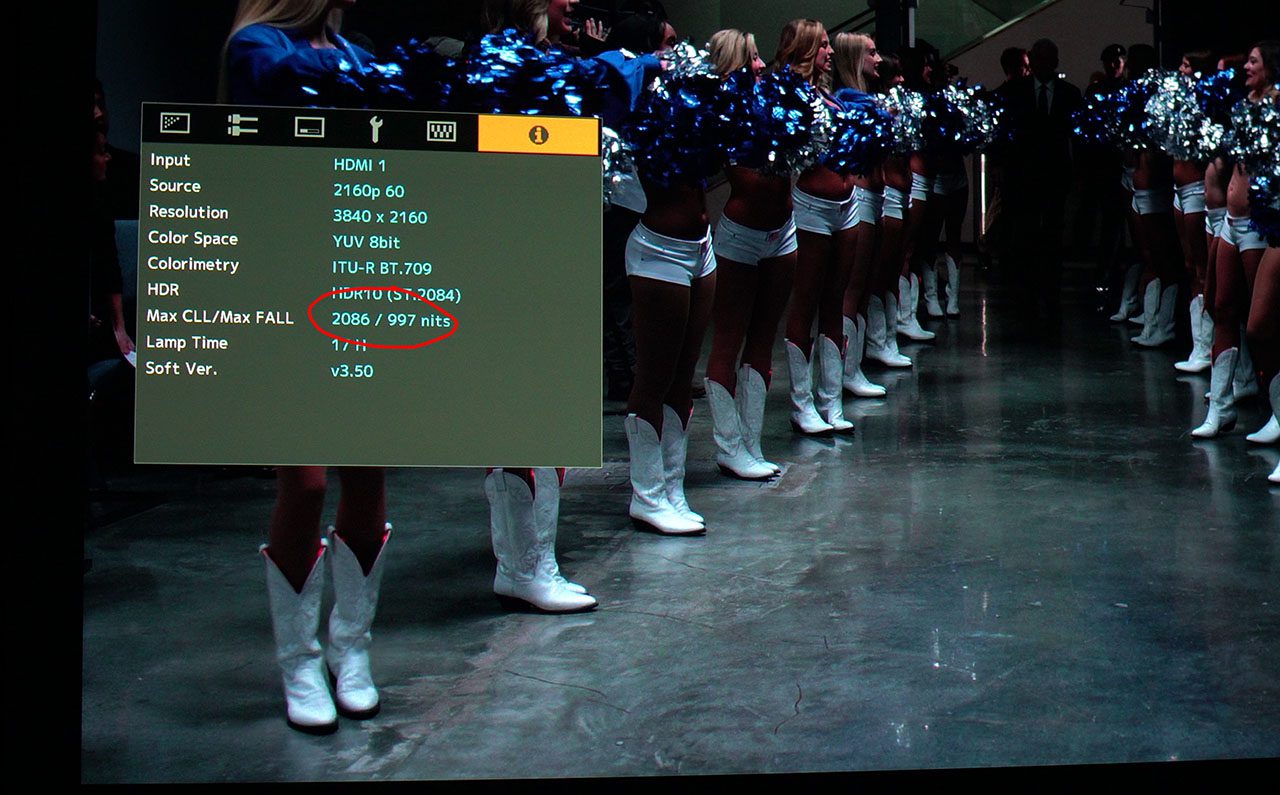
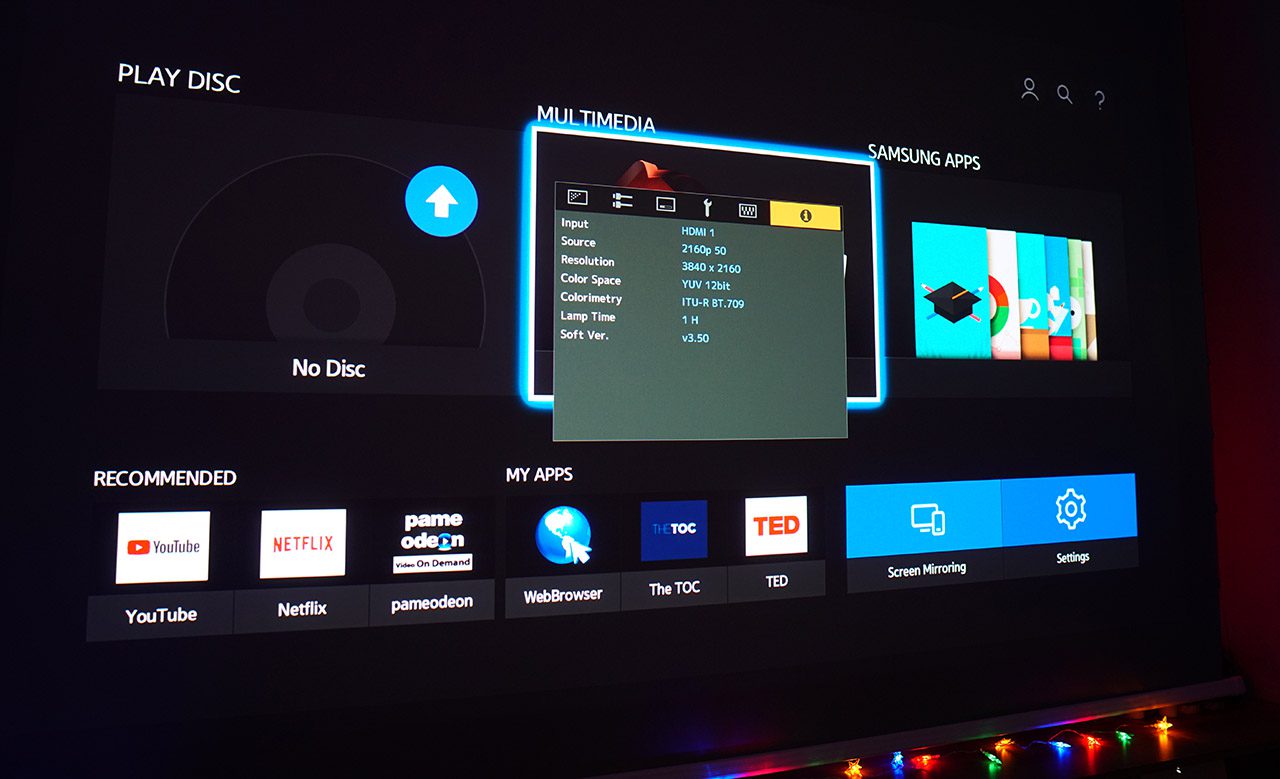
These are two, the meta data MaxCLL and MaxFALL and we can see their values in the last tab with the information when we play our HDR10 projector hardware.
MaxCLL ( Maximum Content Light Level ) – The maximum brightness in nits as unit of measurement that can take each of the pixels in the specific HDR material that we give to our projector.
MaxFALL ( Maximum Frame Average Light Level ) – The maximum average brightness in nits as unit of measurement of each frame of the specific HDR material that we give to our projector.
Both together show us the maximum brightness that each of the pixels in our image can individually within a frame to get (MaxCLL) and at the same time the maximum brightness that all pixels of the image can take as a whole as one frame (MaxFALL).
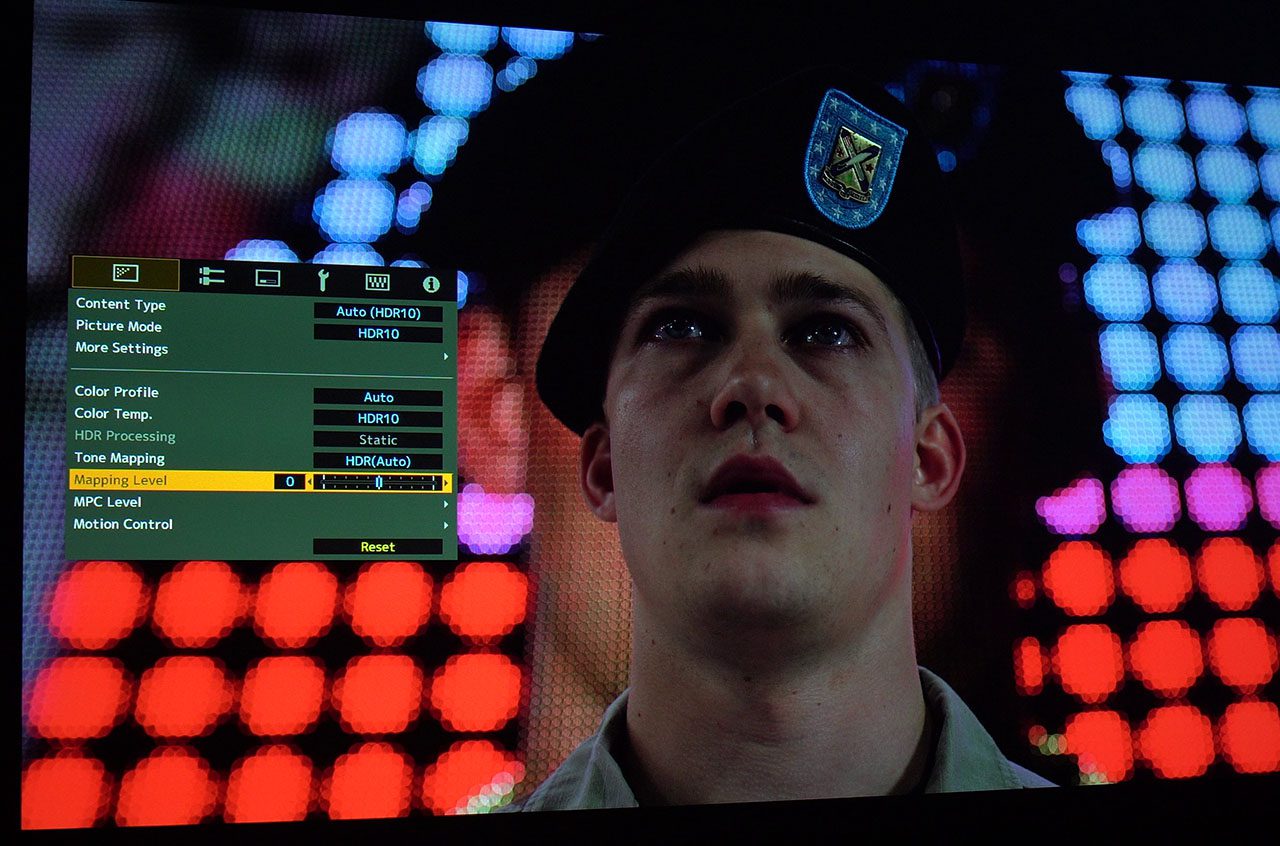
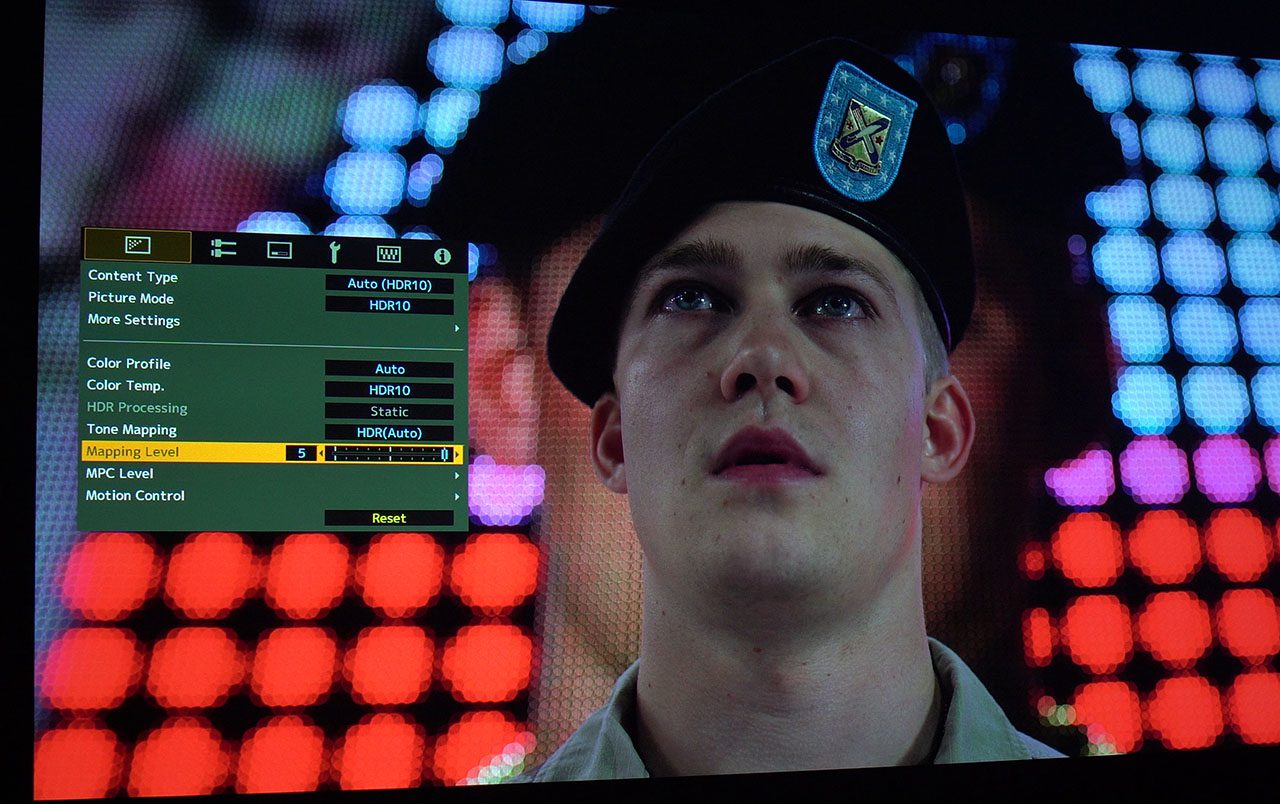
Now we will necessarily go a little further to the Mapping Level and Tone Mapping sliders which are directly related to the HDR sliders explained above but are only activated when we have HDR10 as Picture Mode and not frame adapt HDR which displays other sliders on the same tab.
Mapping Level – essentially the N5 with this slider enables us to intervene in the brightness that HDR Tone Mapping uses as a reference when it is in the auto position by increasing it or reducing it accordingly to our tastes.
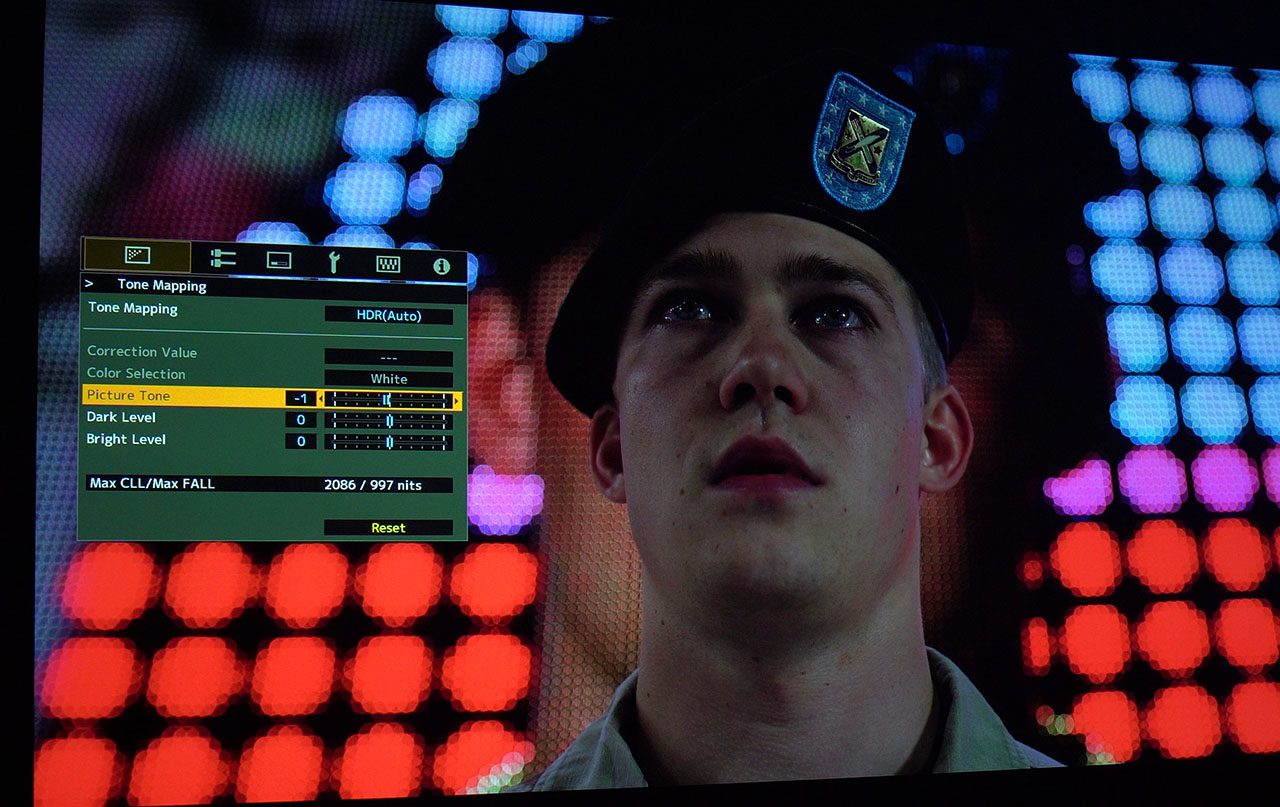
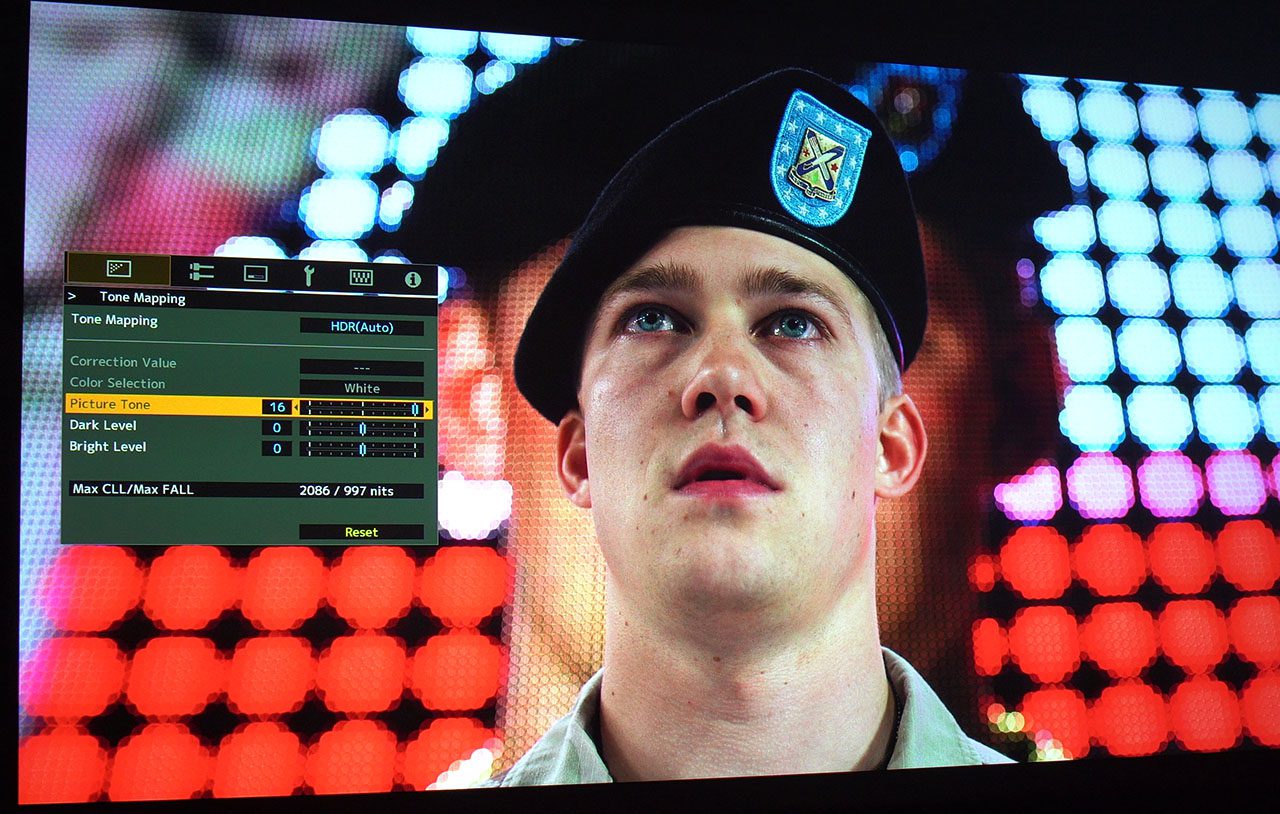
Tone Mapping
Within this N5 menu slider we find perhaps the most important HDR sliders in the projector, the following.
Picture Tone – increases the overall brightness of the image evenly without crashing specific areas of the gamma curve.
In essence we use it if 1) our image is darker or brighter 2)Meta data values are unusually low or high 3)Our screen is small or very large.
Dark Level – By increasing it we make the dark spots more visible, reducing it make the dark even darker thus increasing the contrast in our eyes but losing information.
Bright Level – Increases the brightness in the high lights of the frame, becomes more blinding or vice versa we reduce the brightness.
Generally with these sliders we bring the HDR image exactly where we like it and our space allows us to see, so simple (in essence we are dealing with gamma HDR sliders we would say).
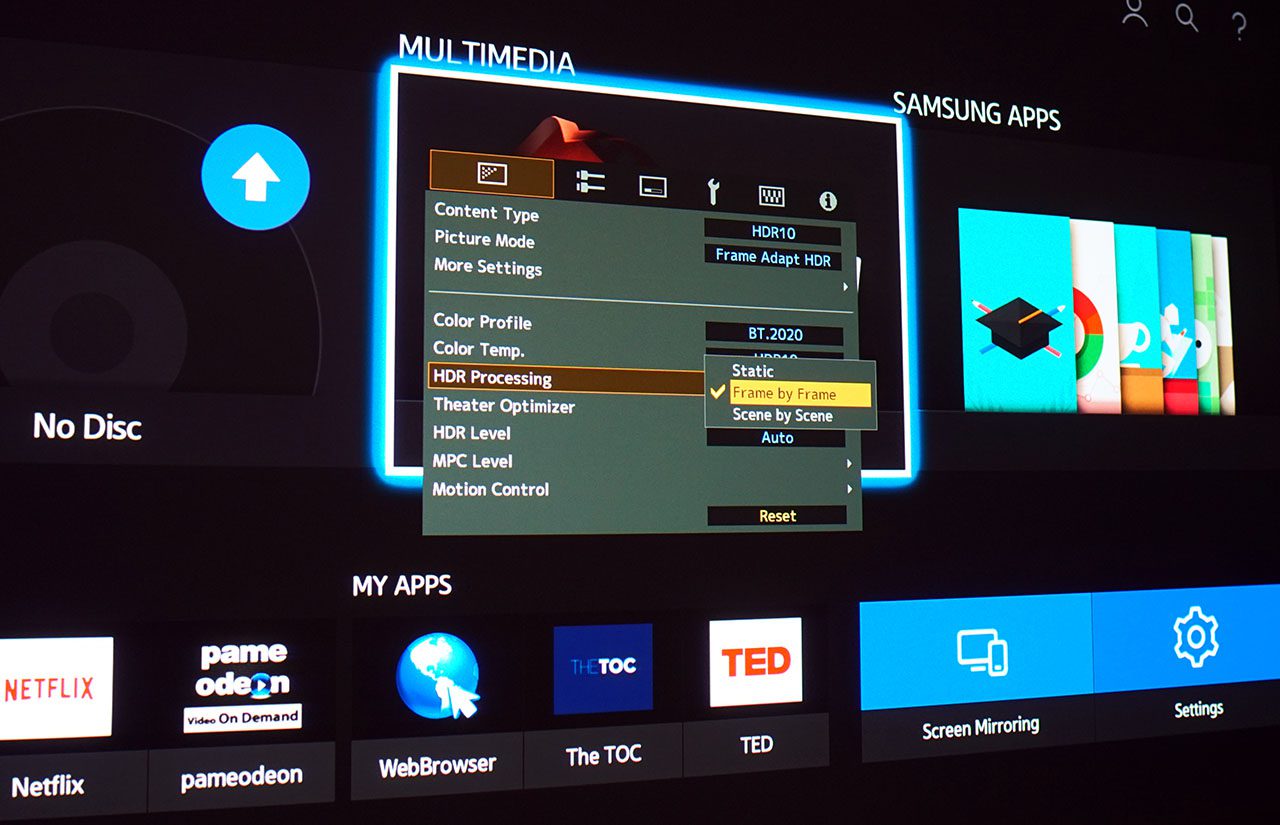
If in Picture Mode now we choose Frame Adapt HDR then our menu takes a completely different view with regard to the HDR sliders mentioned above
HDR Processing is activated and can manually get the following values
Static – Tone Mapping adjusts itself once according to the meta data of the hardware and finally with this setting we will see the entire hardware
Scene by Scene – N5 automatically adjusts Tone Mapping by analyzing with its algorithm (firmware V3.50) the maximum brightness of each scene
Frame by Frame – O N5 automatically adjusts Tone Mapping by analyzing with its algorithm (firmware V3.50) the maximum brightness in each frame separately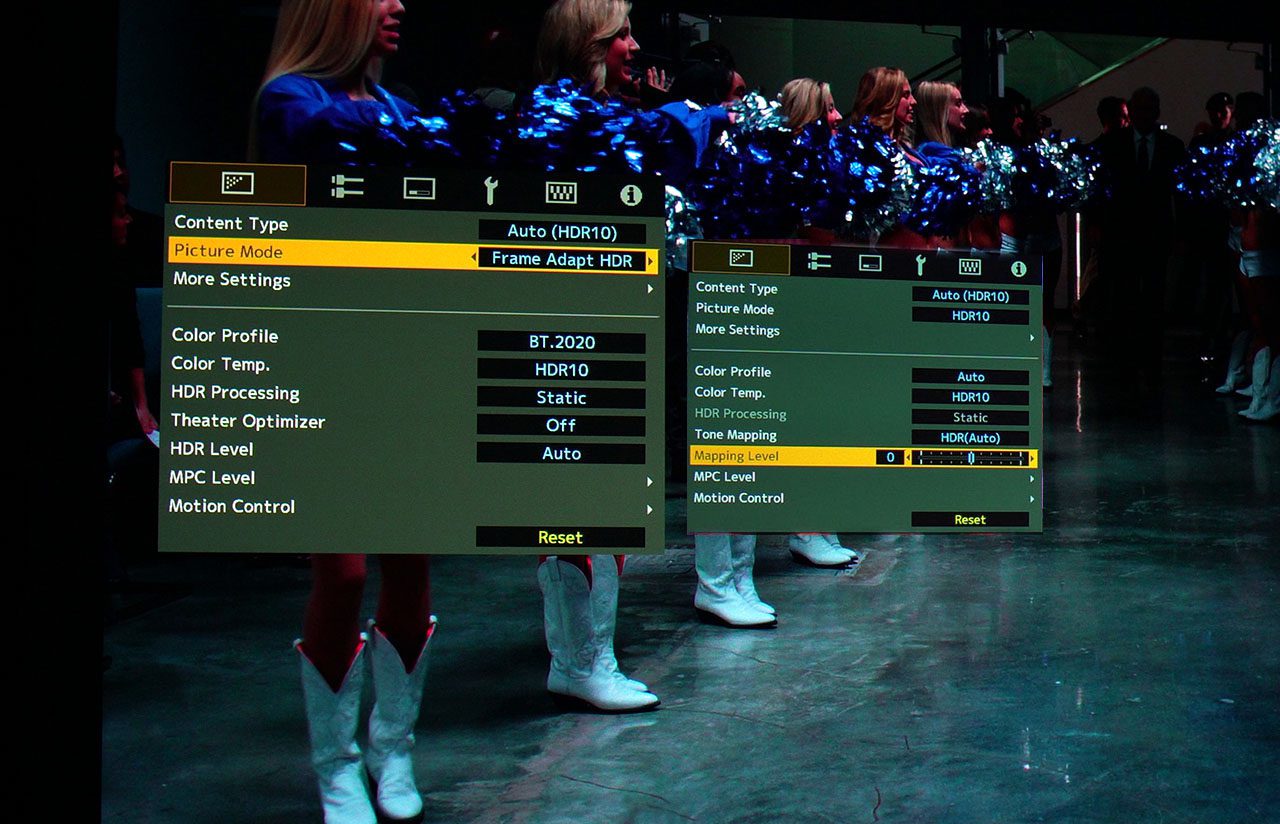
Also added is the HDR Level which can get auto values or from -2 to 2.
JVC gives the following values as a reference, we of course can make the setting we like…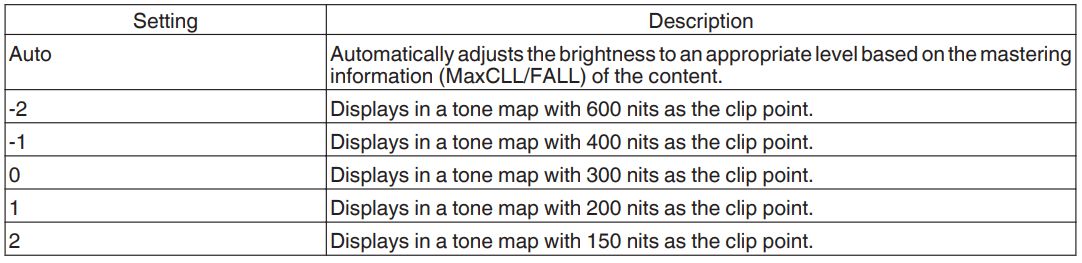

Finally the very nice Theater Optimizer, with this slider you give the N5 the elements of your screen such as size and gain, and adjusts tone mapping accordingly calculating the brightness that should reach the eyes of the viewer, and most importantly, it works!
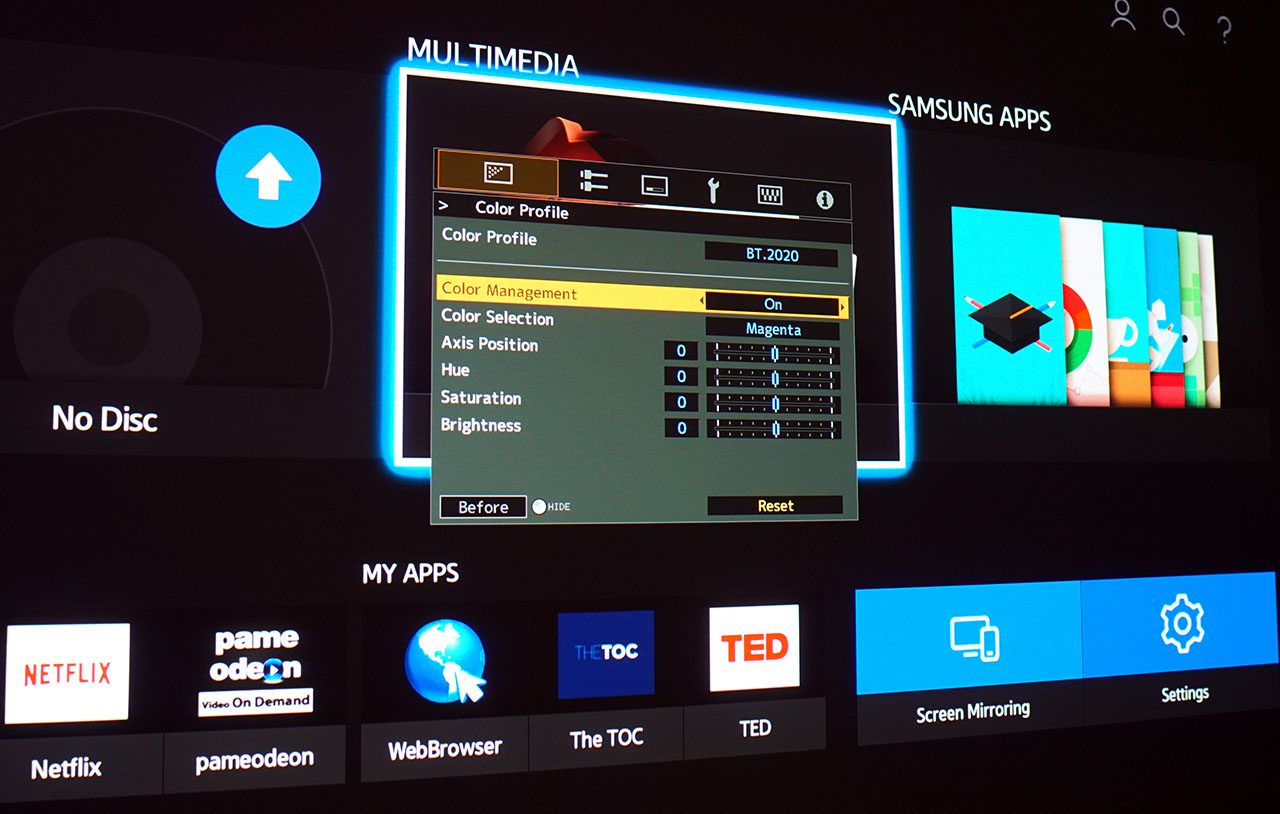
In Color Profile we can choose between different Color Spaces with the basics being REC.709, DCI , BT.2020 and of course the very nice Auto that the N5 automatically chooses the right color triangle depending on the material we put it to play.
Of course there is also full Color Management (CMS) for those who want to squeeze out the N5 and get the most out of the color theme, with 4 sliders even for each color!
Similarly, there is the full Color Temp slider, where we can adjust the temperature of the gray scale in detail and why not adjust our gamma. There is also an HDR10 value here to save any searching when playing 4K HDR10 hardware.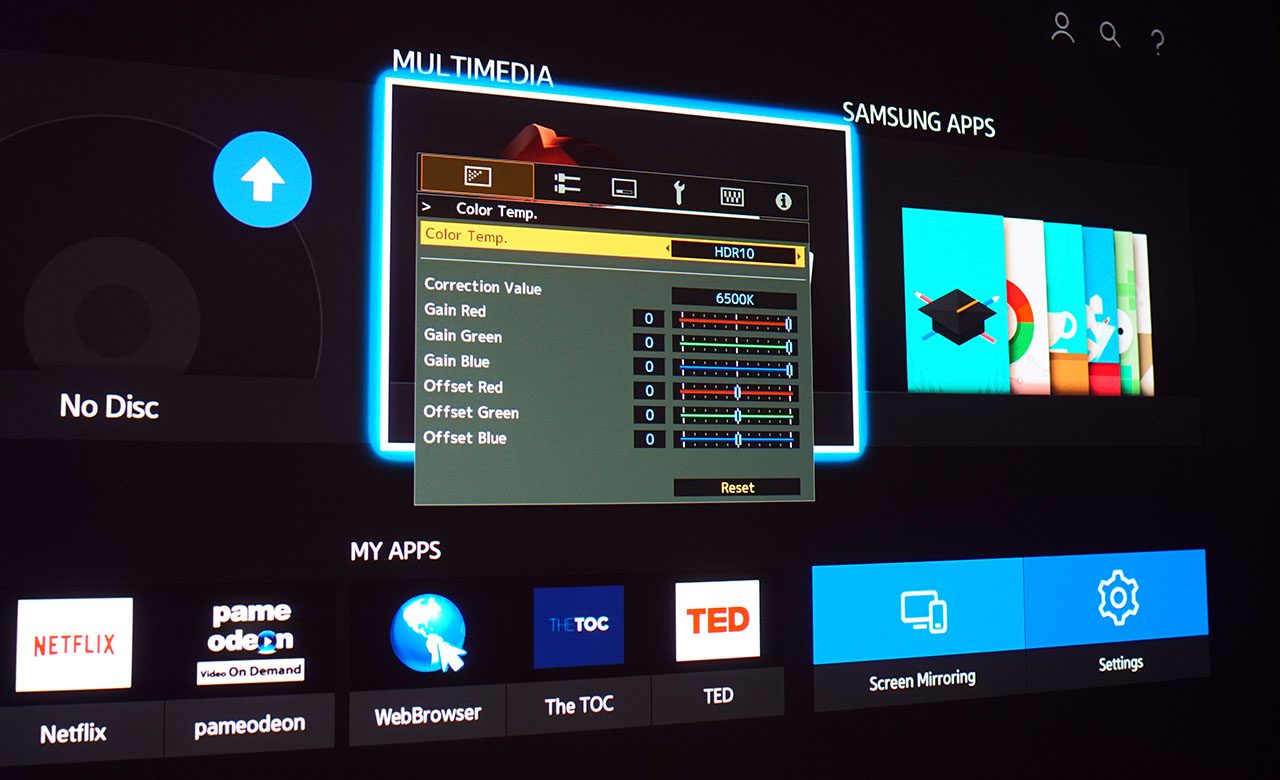
Next is the MPC Level
Here we have the following regulatory
Einhance – Slider to improve the sharpness of the image with a special algorithm
Smoothing – Slider to “soften” the image making it more cinematic, something like the opposite of Enhance imagine
NR – Slider to reduce digital image noise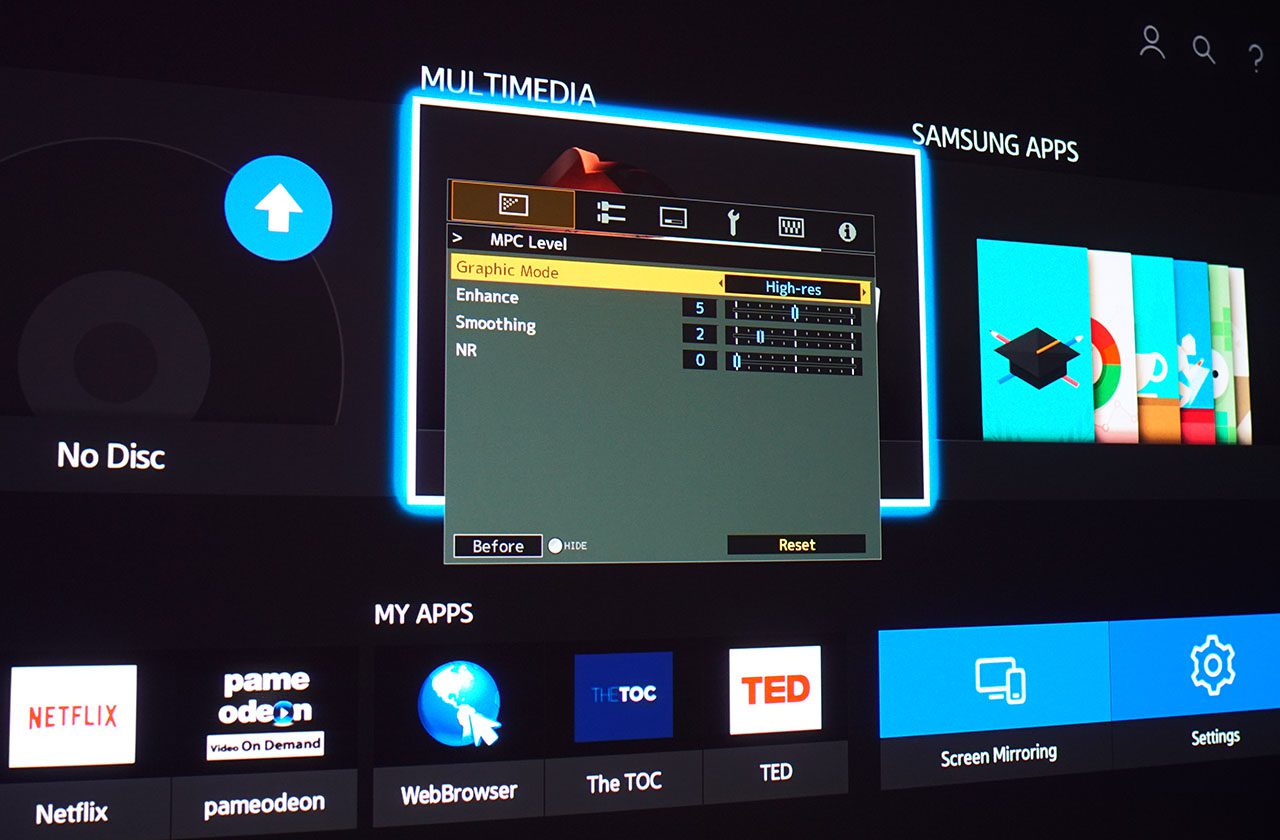
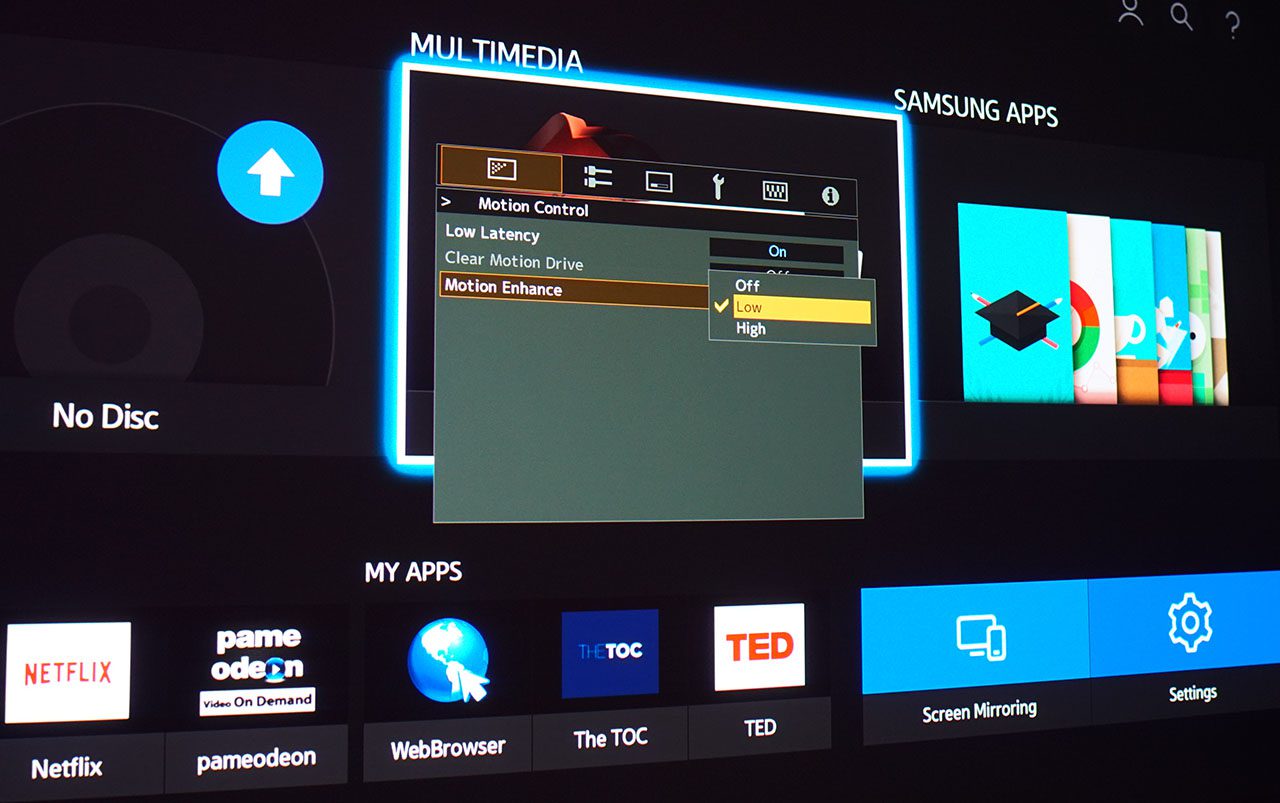
Next and most important slider is Motion Control which, as its name says, has to do with the motion in the image. Here we find the following sub categories.
Low Latency – enabled reduces the response time of panels, ideal for 4K gaming with PC or console.
Clear Motion Drive – The classic interpolation frame at its best with a powerful processor adding frames where needed to keep the motion in our image smooth. Set to Low and High, when we have Low Latency turned on it turns off since it doesn’t need to.
Motion Enhance – Reduces motion blur or blur on moving objects in our image.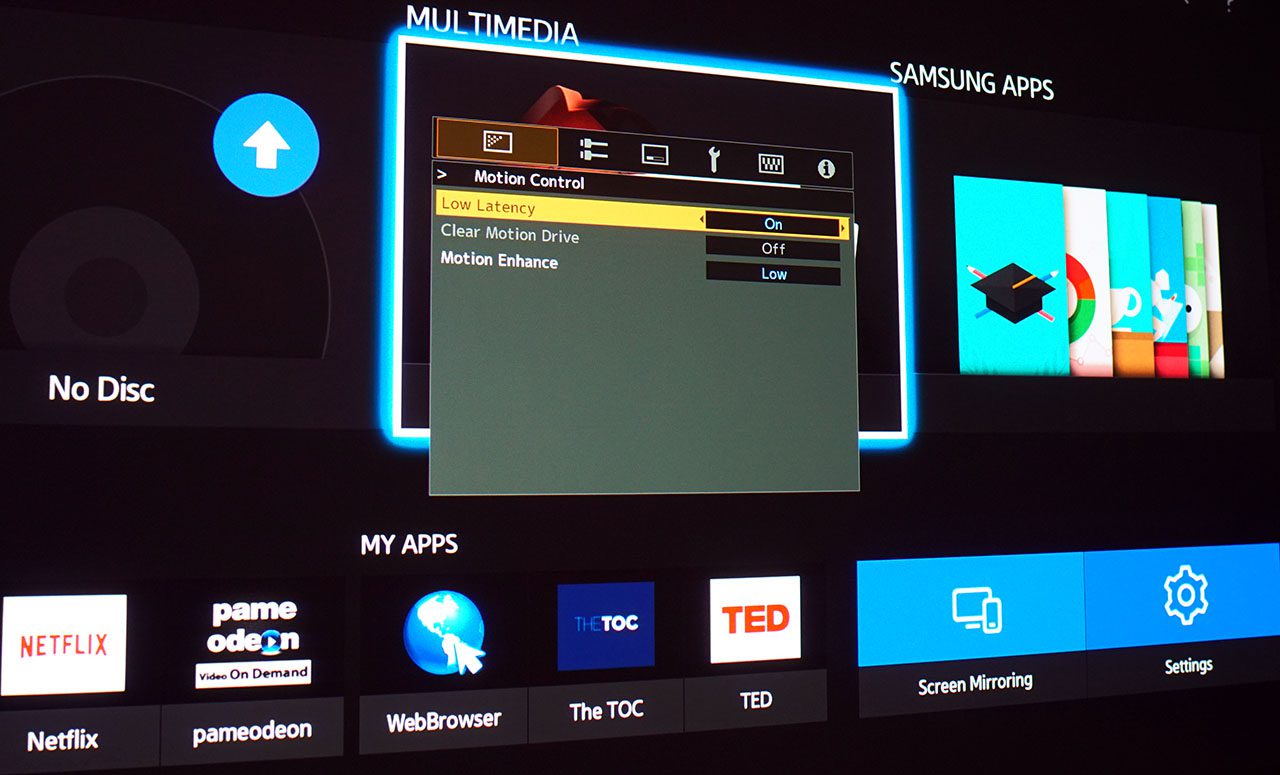
And we move on to the second tab where it contains some standard adjusts between them and the settings for 3D viewing.
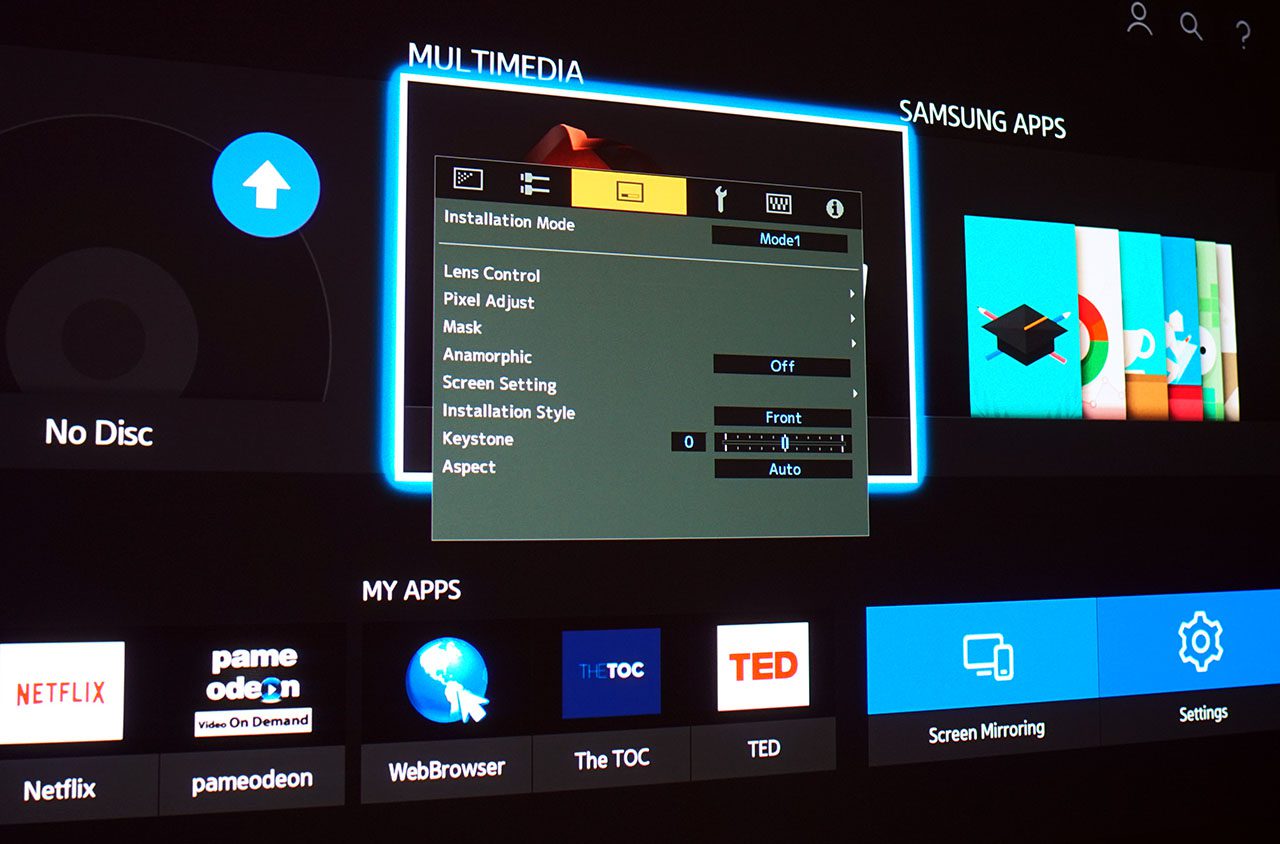
On the third tab we find several basic installation sliders such as the lens adjustment (zoom, focus, lens shift), the convergence setting (by 0.1 pixel and if necessary by regions) and various other useful sliders to make a perfect installation of the projector in our space.
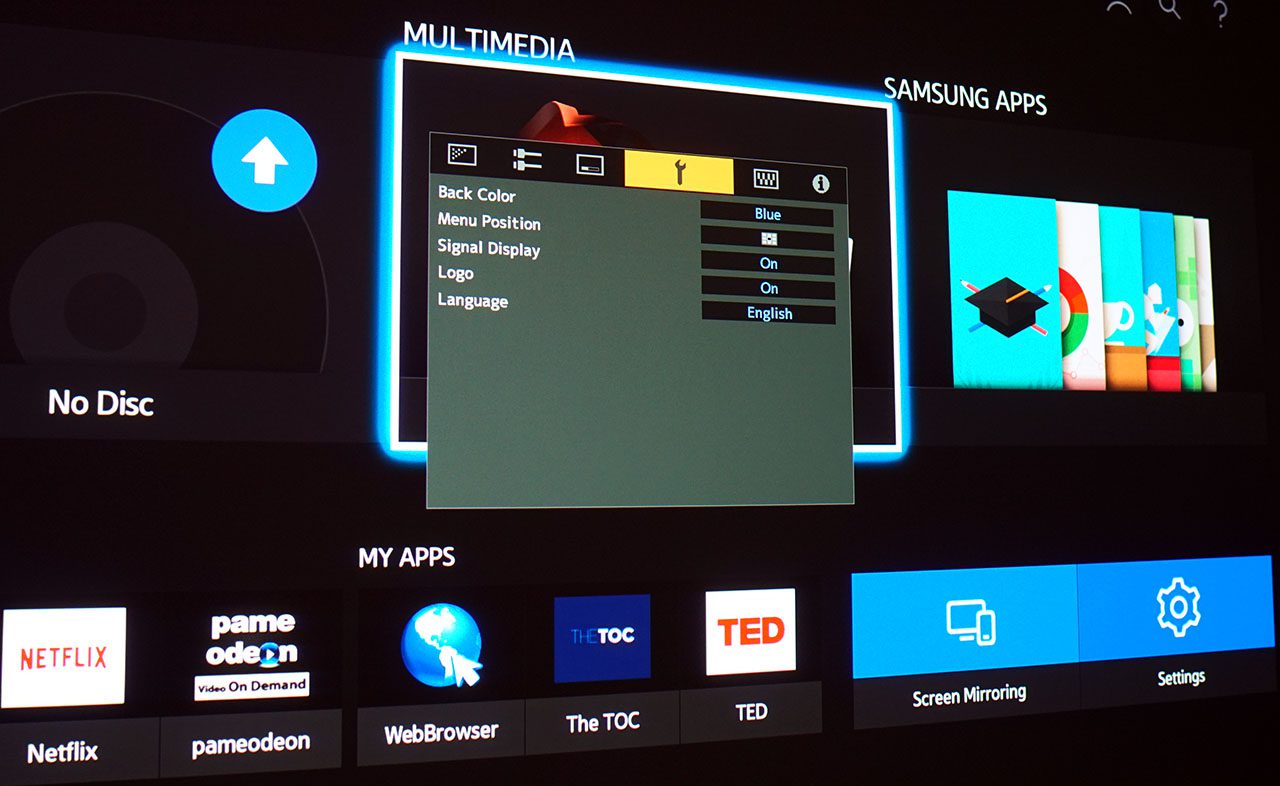
The fourth tab is also the most indifferent, it could exist as a submenu in another tab…
In the fifth we find settings such as activating the trigger port, zeroing the hours of the lamp (in case we change it), the factory reset that if we screw up firmly with the sliders will restore the projector to its factory settings and finally the slider through which we can make the firmware update (we put a stick on the usb, press “update” and finally the slider through which we can make the firmware update (we put a stick on the usb, press “update” and finally , for such a simple process we are talking…)

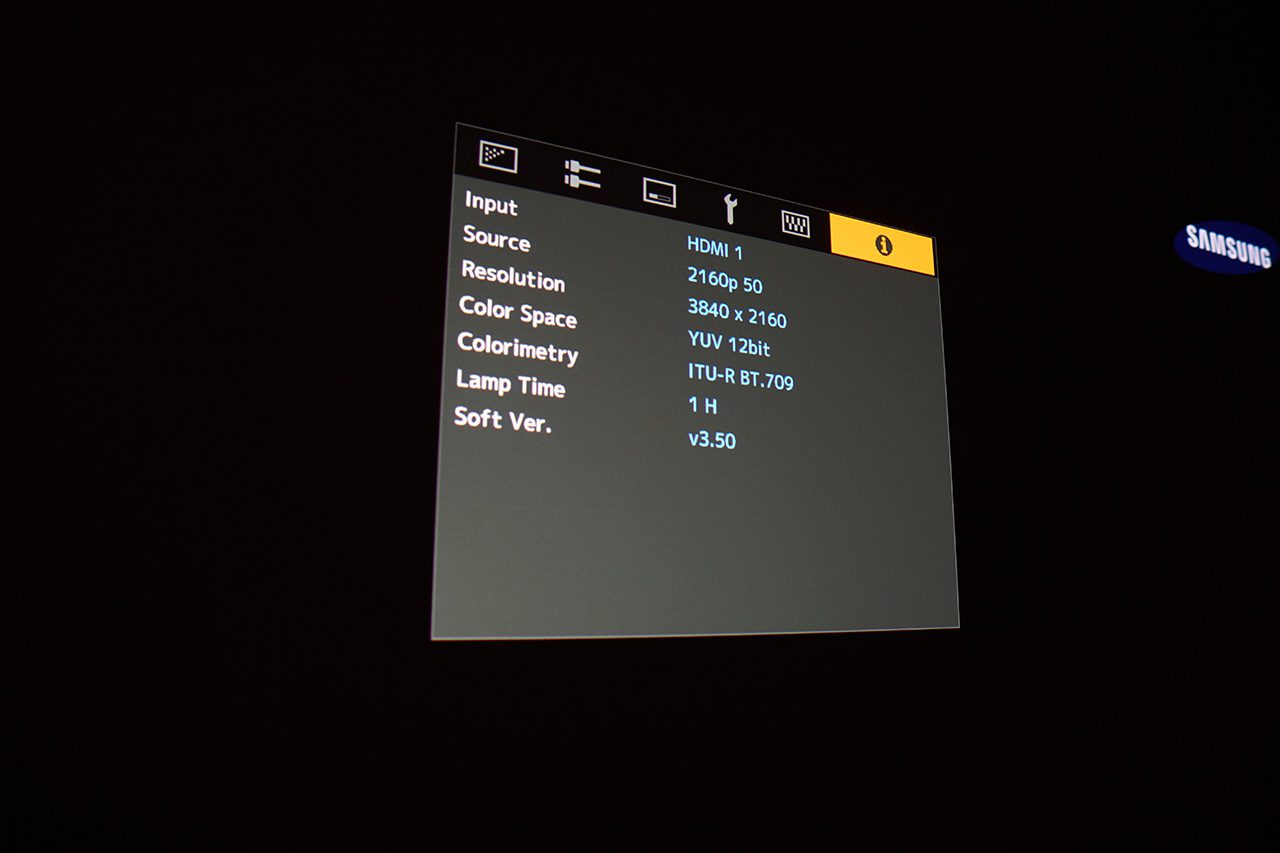
Finally we have the tab with the information…
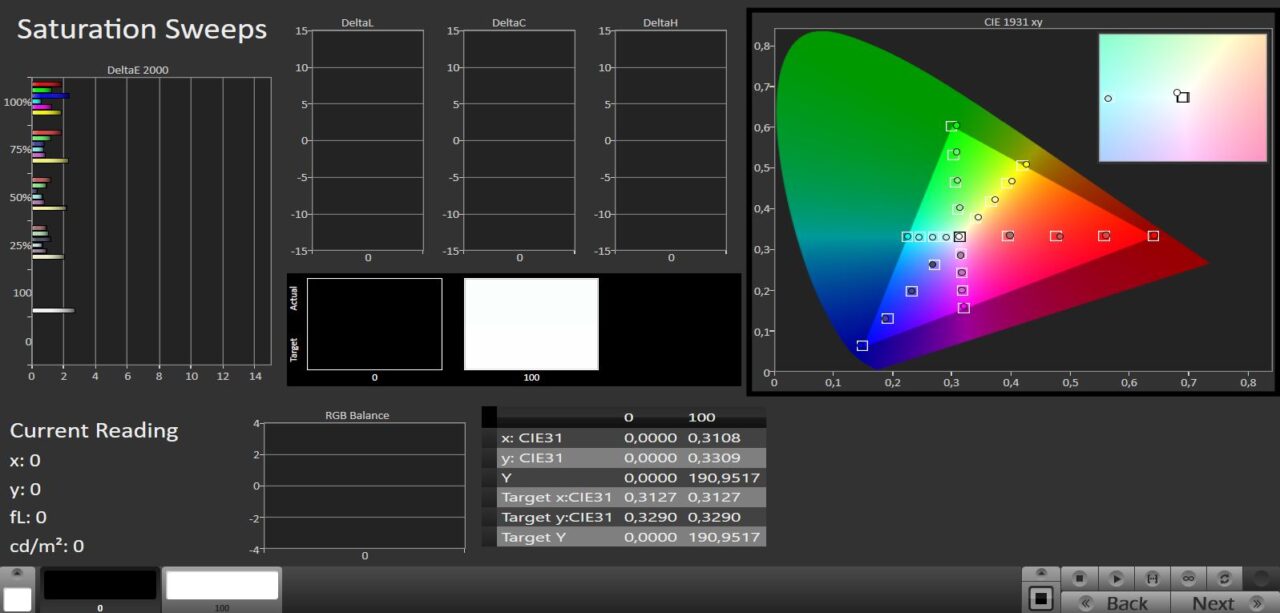
Measurements
Always when I try a JVC my anxiety is at what my photometer will show as a native contrast compares comfortably to that of a child waiting to open his gift under the Christmas tree.
So without making any adjustments, I set up my photometer and started successive measurements.
In his white…
And in his black.
So that I can accurately calculate their distance which as we know gives us the number on/off contrast. I took the following measurements
Lamp Low/Iris full close – on/off contrast 34.782:1
Lamp Low/Iris full open – on/off contrast 26.341:1
Lamp High/Iris full close – on/off contrast 35.362:1
Lamp High/Iris full open – on/off contrast 27.856:1
JVC announces native on/off contrast for the N5 40,000:1, a level that is very close to the one I measured confirming once again that it is probably the only company in the field that announces real numbers at the level of contrast.
I also got a set of measurements in SDR mode (in HDR there is no point in taking the slightest measurement since as you understood in the explanation of the “menu” things in HDR are fluid…)
These measurements are out of the box…

On brightness the N5 can give us from about 600 lumens to 1650 lumens depending on where we have it’s lamp (low/high) and it’s manual iris (full close/full open).
Black
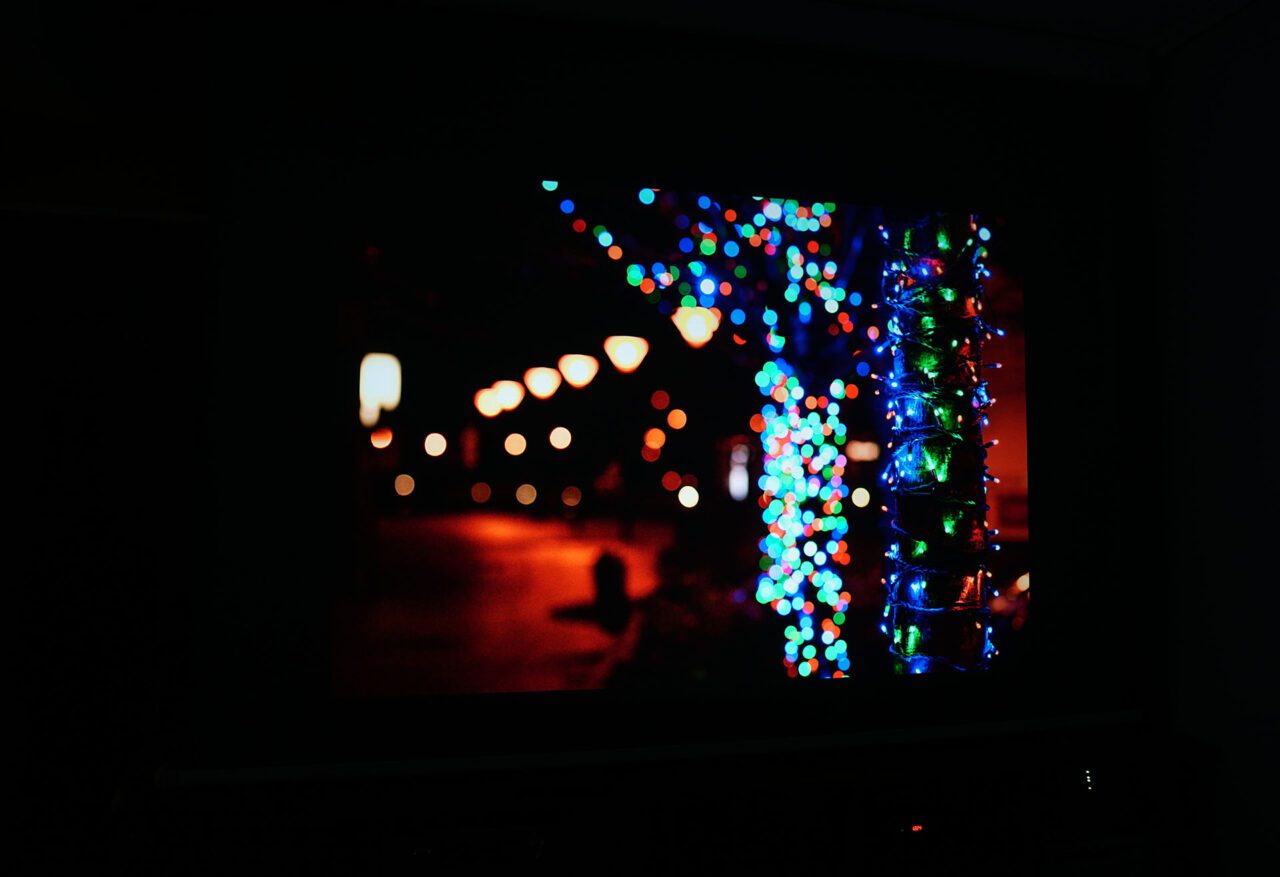
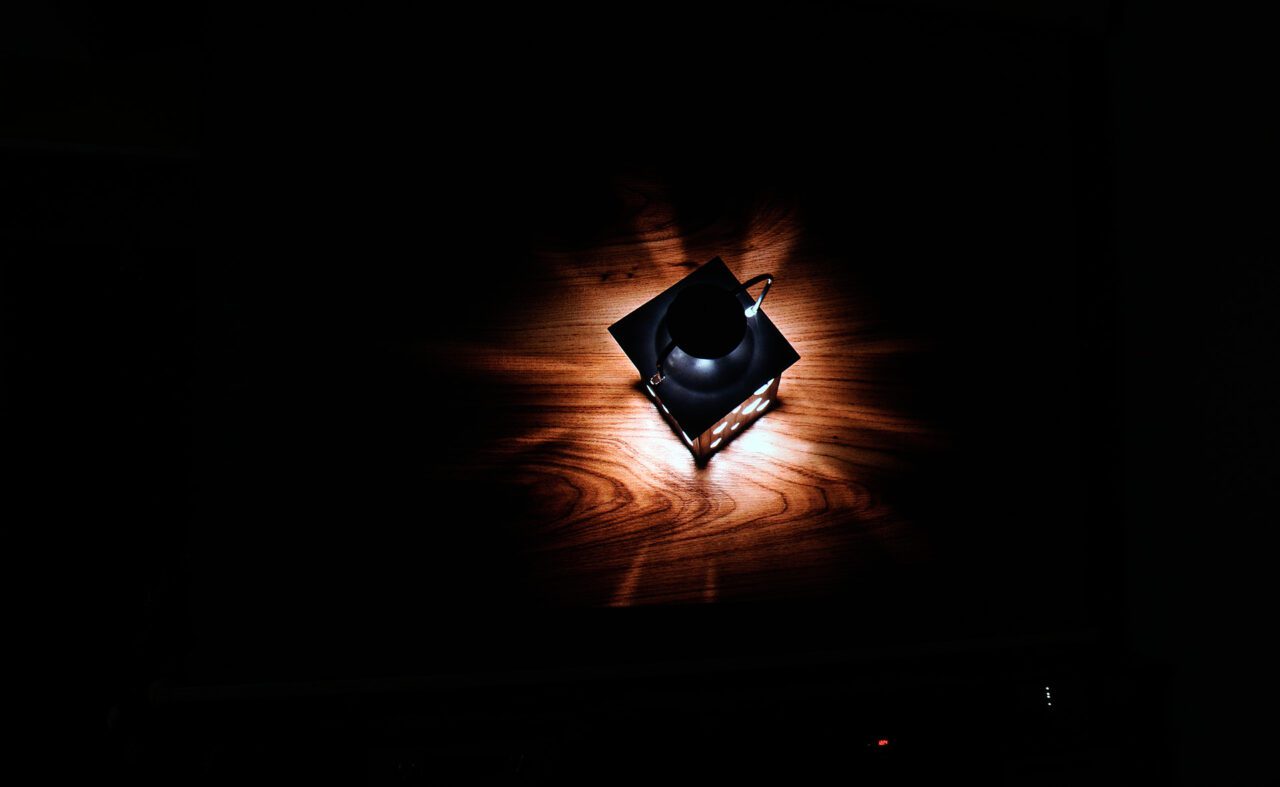
To test a JVC projector and not devote a paragraph to its performance in its dark scenes is like testing Swiss chocolate and not dedicating a paragraph to the sensation it leaves on the palate, it just can’t be done.
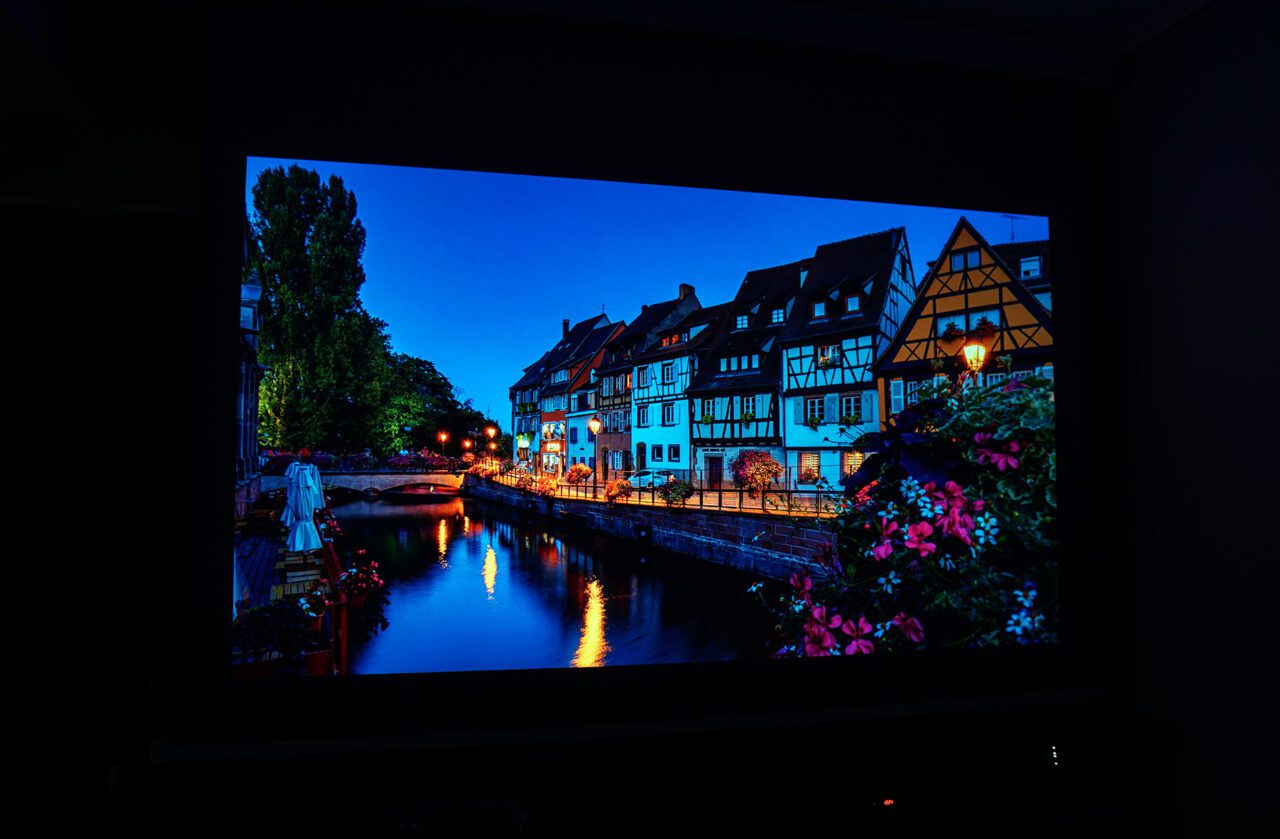
The black that the N5 attaches (especially in combination with the Celexon ALR) touches in the eyes of a viewer that of an OLED TV panel, I do not exaggerate, is exactly as I say. The photo below is exactly what my eyes saw, the projector menu is visible and around it the absolute darkness.. The abyss…
With 35,000:1 N5 already pulls out a deep enjoyable black, adding the excellent pull of ansi contrast added by Celexon ALR you can imagine the result…
In shots like the following, N5 is absolutely outstanding. The room is dark, you can’t see your nose and suddenly this picture pops out of the screen, it’s impressive any way you see it…
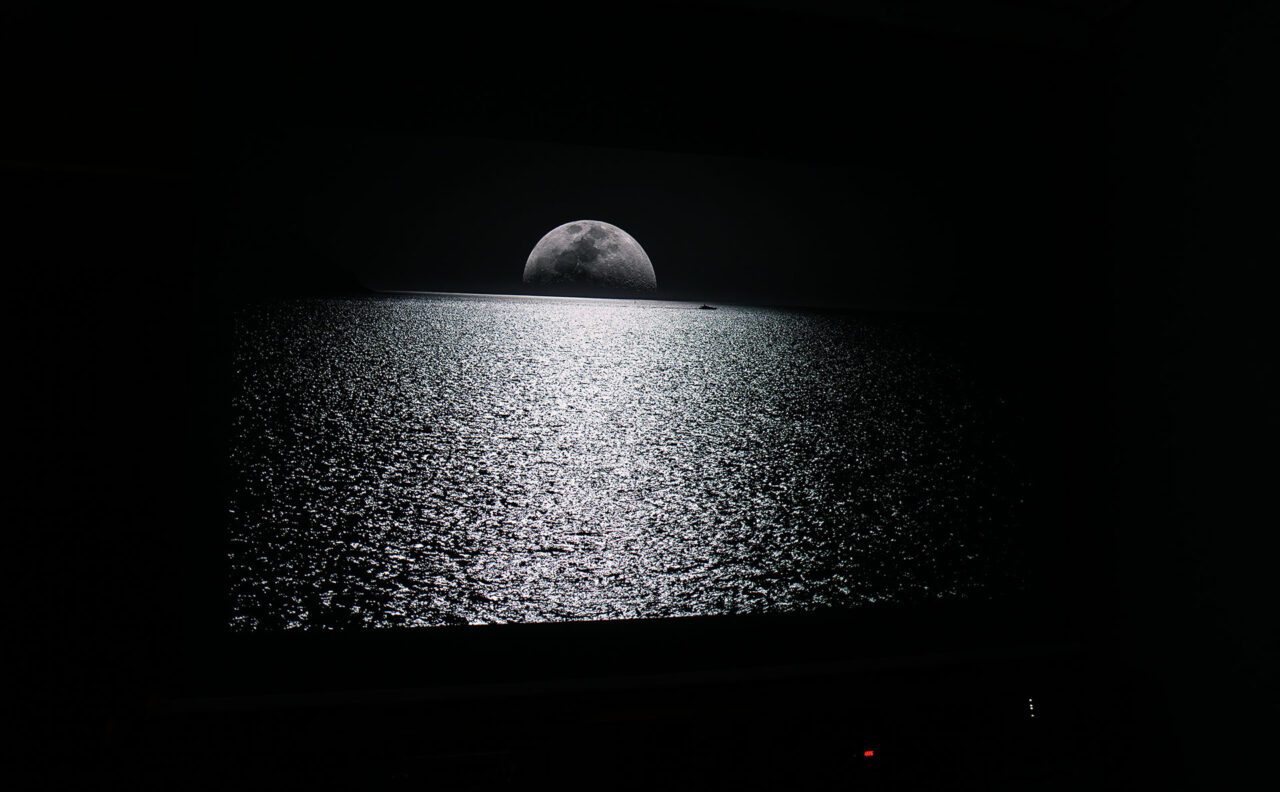
Enjoy some shots I took carefully as realistically as I could…

Impressions
HDR (Firmware V3.50)
Having seen several N5s (and N7-NX9s) I would say that with the new firmware the N series was perfected in all areas. Obviously the stay of a hardware for a long time in production allowed the people of JVC to devote themselves to the absolute improvement of the software and they succeeded.
There is no longer a flaw in the operation and performance of the N5 that I tried as much as I tried to find one. With certainty I can say that if someone wants to live the ultimate experience of 4K HDR in view he should see a JVC N5. The way N5 algorithms manage HDR content in frame adapt function is amazing.
In each scene your eye enjoys the great dynamic area that this management ensures and if you feel you need to intervene somewhere, this is done easily and correctly with all manual HDR settings unlocked and available to the user/viewer’s appetites.
It’s been a while since I’ve enjoyed both searching, teasing and exploring sliders in a spotlight.
Image
Ok with the good adjust sliders, ok with the impressive new firmware, but the important for me is the viewing experience offered by a projector, this matters to me more than anything else.
The isolation of people due to social media, the modern lifestyle and now the covid19 situation , to being able to have a beautiful escape experience (so I now call every experience that offers us “escape” from harsh reality) is the main thing.
So this experience N5 launches it at its highest levels, as long as you place in the player a good UHD disc the N5 will reward you accordingly.
Filming the footage for the video you will see below I caught myself MANY times just to have forgotten and watch as a mere viewer my screen. I ruined a lot of footage because I was getting in front of the camera to get a better look, etc.
Why can N5 deliver the top HDR10 performance Nick? Could someone ask…
HDR as it says its name is High Dynamic Range. In order for an instrument to deliver HDR, it must therefore have this wide dynamic range in its specifications. And I come to answer, N5 has a native contrast of 35,000:1, i.e. hypothetically its black is 1, its white is 35,000. A 4K DLP projector for example has native real contrast about 1000:1, i.e. if its black is 1, then its white is 1000.
Do you understand the difference? If in a shot in total darkness a strong light is lit for example in HDR the N5 will play it 35,000 and the DLP 1,000 (the example is not realistic, I just mention it in this way so that everyone understands the importance of the inherent dynamic range of each projector).
This example just to understand that the more dynamic range our media has, the more impressive and brighter (in our eyes) will be a 4K HDR shot
For the most searched, things are not exactly as simple because in the “how much” dynamic range our projector keeps playing a role the ADL (Average Display Luminance) of each frame so the differences are not as chaotic as the ADL goes up and at some high prices the differences evaporate to be precise, I just did not want to confuse you with more complex concepts. (Basically to make the differences clear to everybody, the light will be close in the two projectors, but the dark area of the frame will be 35 times brighter in a DLP projector than the JVC N5).
And we’re coming to N5..
The brightness of this projector is huge, leave what the numbers say, in the case of N5 they can’t describe what we’re seeing.
On a 110 inch screen with 0.8 gain he painted on bright shots even on SDR material with the lamp at low and the iris completely closed, funny things.
I cannot have an objective judgment on the ansi contrast available to N5 since throughout this review I used it on The Celexon ALR which perfectly reins in the diffusions of light so it is very difficult to know what the projector is doing on its own. In the future I intend to hang a white screen with gain 1 simply for the needs of such tests.
Sharpness/Detail in 4K HDR
If there is a reason for having the 4K HDR in a living room (my most detailed view to analyze it in a separate article I am preparing) then this is definitely about the size of the image.
The bigger the picture, the more enjoyable and detailed the result.
The 8 million pixels of native 4K resolution even over 110 inches continue to add information rather than remove. If with this resolution at 65 inches you get say 20% more information and sharpness (because the rest you can not collect it because of small size), at 110 inches you think you see a window into the outside world since in these sizes the twisted millions of pixels find the necessary space to show us clearly the information they carry and we distinguish them. I don’t know if I can put it more clearly…
The N5 powered by good HDR10 material on a 100″+ screen and having properly adjusted its HDR gamma (Tone Mapping) pushes our eyes to their limits by unfolding every detail of the image that we might never have noticed under other conditions and in another medium.


And of course have fan with a small video i created for you!

Epilogue
The 5,999 euros that N5 asks its new owner to decorate his personal home cinema is a very large amount nowadays, but N5 justifies them up to the last penny. The image it offers is the best human eyes can see in a projector in 2020 (except the bigger brothers of N5, the N7 & NX9), especially if one likes to view UHD HDR material.
Ultra-light, yawning even with screens larger than the standard 100″-120″, high contrast that offers deep black expanding the dynamic area in the image, equipped well to deliver all the latest technologies such as HDR10+ and HLG just as it should.
I don’t know of any other projector that has so many quality setups in the difficult technical part of the 4K HDR. The N5 allows the user to set up his personal home cinema and to set it up in the area to the needs of the space as well as to his personal tastes.
Well done JVC…
Stay all safe!
Nikos Tsolas
After I run the calculation software with the spyder x from JVC, the picture looks awesome, but when I turn the projector off the picture looks crap again
MY HOBBY