Everyone of us has his own character, with the quirks, flaws and assets. I belong to the category of people who like everything around them to be neat and in their proper place. So, could not be exempted from this rule the instruments I use to kalimprarw, all the more so, since they belong to the category of “my favourite toys” and is one of the items I’m watching “as my eyes”.
So, I was thinking that I had to create a “gown of calibrator”, in which all our bodies need for calibration will be arranged and (most importantly) safe, both for storage and transport. So in this article I present my first implementation, merely trying to convey the main idea, you can of course be aytoschediasete, using different materials and scoring probably still better than my own.
Here we go to “cook” the US case. The materials I used in order: a. A carrying case for Dell’s laptops, for screen sizes up the 15.5 inches. I particular, why offer me enough space to fit several instruments, but also because it has many extra compartments in which I could fit into many of the items needed for the calibration. I think any carrying case for laptops from 15.5 up to 18 inches will accommodate you just fine if you attempt something similar.
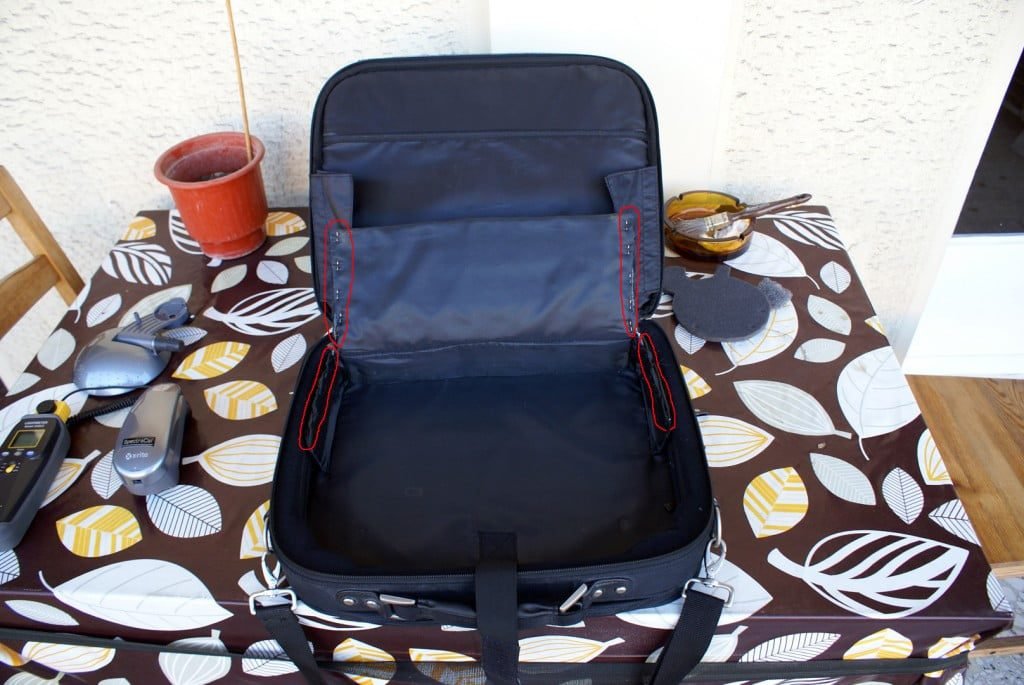
Here you see the suitcase of Dell open. This bag features a second compartment in which normally enters the laptop. I originally wanted to remove and completely xilwsw, but after thought I can and get my serves as extra security organ holds in place, so I simply cut with scissors to the points I have highlighted in red. Located internally in the cutting points black insulating tape to skepasw the white foam that existed by means, for better aesthetic results. Finally, with stapler “I’ve sewed” cutting points. At this point, I’ll try later to use (if you find) black Staples for tacking, for better aesthetic result.
(B). Here you see the foam to fill the suitcase, rather that remained of it. The original piece was 50 x 32 x 5 cm height. Ordering from English ebay and this is the link.
http://www.ebay.co.uk/itm/370933735920?ssPageName=STRK:MEWNX:IT&_trksid=p3984.m1497.l2649
It cost 10 euros altogether. Pay attention to the dimensions of foamed material. Have the piece you order to overpower the interior dimensions of your suitcase, while five inches in height, is the minimum that you will need.
(C). Here you see the secondary foam I used (optional). Would you serve if you want to change internal height in some of the cases of institutions. And this of course from English ebay, don’t sit now find them in Greek shops. The height (thickness) is a centimeter. It cost about 8 euros, and this is the link.
http://www.ebay.co.uk/itm/121067512874?ssPageName=STRK:MEWNX:IT&_trksid=p3984.m1497.l2649
(D). You will need a utility knife, cut foam easily. But because it cuts on irregularly, for better aesthetic result, I used scalpel (idea of Nikos Tswla). Find them in pharmacies and are dirt cheap, costing as little as 40 minutes. Cut the foam as if it was butter, but will rather have had even greater cutting surface, the result would be even better.
(E). White cardboard, in any thickness to draw the “patterns” of organs. I have not even bought, I used a white cardboard sleeve, from 45ari tray for the jukebox that came from ebay. So we are ready to start our construction. The first step is to draw the pattern of organs in white cardboard. Easy process, be sure to be as accurate as it is in design and pattern cutting, for better aesthetic result. Here you can see the three patterns, from a i1 Pro, accessory the ballasts on the tripod, and the CA813 luminometer.
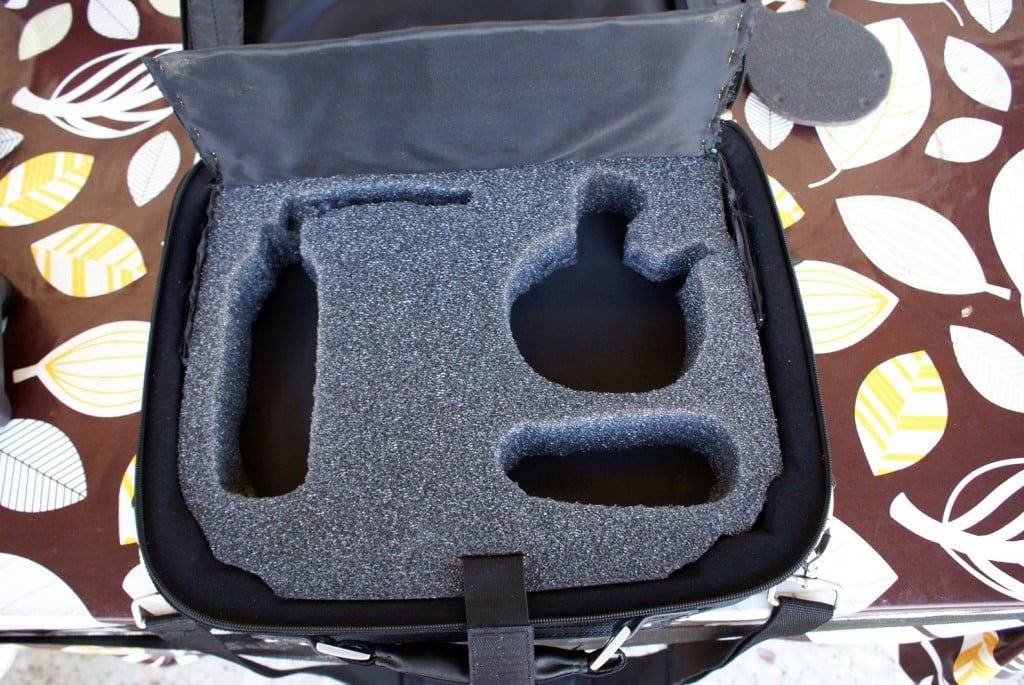
The next step is to cut the piece of foamed material, either with the sword or with the scalpel, in desired shape inside the suitcase. Attention here. The piece should be at least 1-2 cm bigger around the inner dimensions of suitcase. The foam should be sandwiched i.e. to fit in suitcase. You must do this, because later, as cutting material to form pockets of organs, the foam weakens (becomes less compact). Here you see the foam cut and tucked into a suitcase.
Next step is to decide on the spatial dimension of the organs inside the suitcase. Also needs a lot of attention at this stage. If you do not place the patterns as you really want, cut and then regret it, it will be too late, and you will need to order new foam piece.
After you have cut the foam with the sword or the scalpel in the shape of the patterns. Holding it with one hand and pressed patterns stabilized onto the foam material, and with the other hand cut circumferentially around the depth of the material. Make sure you have placed underneath an old magazine, because the scalpel not joking, and you will easily scratch any material located under the foam. It is understood that should be cut out of the suitcase, otherwise risk of doing harm to the material of the plate.
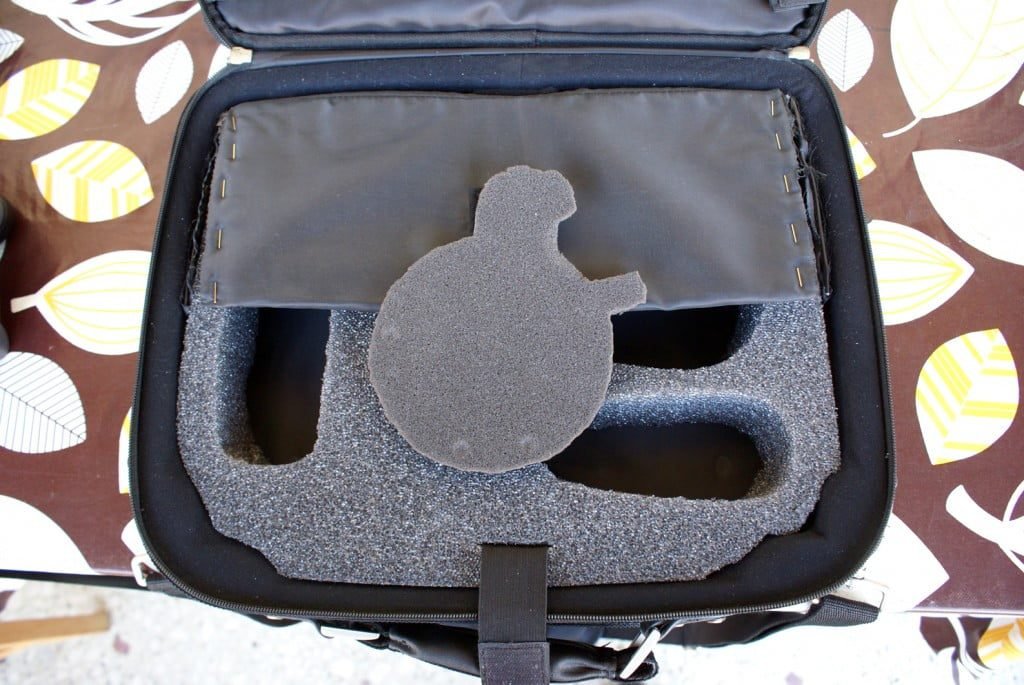
In my own case, I found that the tripod holder of the i1 pro that had less height than the CA813 and the i1 pro chwnotan very deep into the foam. So I wanted to limit the depth of the case from 5 cm in 4. Here I had the secondary foam. So I cut a second pattern of tripod holder.
And here now the second stencil holder tripod mounted in the Pocket in the suitcase.
And here now have rewarded our labours. Our three institutions-parts mounted in the suitcase.
And here you see and the cover of the second internal compartment downloaded and insured.
With closed the suitcase, the bodies remain stabilized and secure in their cases. Anapodogyrisa the suitcase and I nodded several times. When I opened my GPS again, the bodies were all in their seats, were not moving nor thousandth! Mission accomplished!
Here I have my friends, my own solution for the “gown of calibrator”. You can of course use the solution of John Hadjigeorgiou or of Nikos Tswla, who are achaireytoi and tsapatsoylides. Carry your organs i.e. in bulk … plastic bags of Sklavenitis! …
The gown of the calibrator, part two, adding 6-12-2013 …
A few days ago the i1 Display Pro returned to Athens by John Hadjigeorgiou, so I said to proceed to completion (for now at least), the first “suitcase of calibrator” by projectorjunkies. Will follow and a second gown later, who will prepare with the same procedure, to use John Hadjigeorgiou.
The first thing we had to do, was to design the patterns of the i1 Pro Display. The process seemed simple game, and now I was used to. After I cut and I decided on the location of the i1 Pro Display in the gown, I cut the foam of suitcase in all its depth (five inches tall) in the shape of the patterns. After I placed the sensor in the holder, I found what I expected that would happen. The i1 Pro Display with three and something that has depth in cm, chwnotan very deep in foam, resulting in aesthetic piece you don’t like me, but to me it creates difficulty in what I had planned, and you will see below.
So I cut a pattern from the secondary foam, which has a height of one centimetre, and I put the sheath of the sensor, limiting the height of the tray by five centimeters to four. Things were better now, but still the i1 Pro Display chwnotan in the Pocket more than I would like. So I cut a second pattern from foam. Here in the photo you see the cardboard stencil Display i1 Pro, and two pattern from foam. As you can see, designed in a cardboard pattern and the USB connection cable of the sensor is joined with the main trunk.
With two patterns of foam mounted in case of sensor, the i1 Pro Display came exactly at the height I wanted, and now slightly protrudes mm from the surface of the foam. The aesthetic result is very good in my humble opinion, and most importantly, as you can see, all the connection cable of the i1 Pro Display, which is integrated in the sensor, wrapped and placed under the tripod holder of the i1 Pro, making it completely invisible!
You see that there is enough space in the foam of suitcase under i1 Display Pro for placing even more accessories. Here in the photo you can see now in development, the entire contents of the suitcase. In the top part you see the white balance card of X-Rite (I will refer to this later in a separate article). Up of a disc Blu-ray with reference paternakia, and below you see the flat screen holder of the i1 Pro, an extension to USB sensors (attention, under normal circumstances, avoid it like the devil frankincense, because it may affect your measurements), the original connection cable of the i1 Pro, color and filtrakia, as well as the organs of suitcase.
With this content, plus of course the laptop and a tripod, you can do everything relating to the calibration, anywhere. The suitcase of Dell has places that you can’t even imagine, many other components will fit in comfort!
Panagiotis Vogiatzakis


