Anker Nebula X1In‑depth Review
About three months ago, a company called Anker reached out to me. They asked if they could send me a new projector model they were planning to release soon, so I could test it and write a review.
I made it clear from the start that Projectorjunkies does not do sponsored reviews, and that I would not accept any restrictions on what I can write or say. Anker fully respected these conditions, which is exactly why you are able to read this review today. We agreed that they would simply send me the projector to test freely, for as long as needed, so I could give you a detailed and fully objective review.
The fact that Anker accepted my terms was a very positive sign, and it made me confident that they genuinely believed in their product. On top of that, the specifications they sent me were truly impressive, it almost felt like they came straight from the future!
So, grab your favorite drink, get comfortable, and enjoy reading my detailed review of Anker’s exciting new projector, the Nebula X1! This is the DLP projector that breaks a seemingly unbreakable record, one I dare to say that has stood untouched since 1996, when the very first DLP projector was introduced to the market. Enjoy!
Anker
Anker Innovations is a fast-growing technology company founded in China in 2011 by Steven Yang, a former Google engineer. The company first became well known for its high-quality charging accessories, such as power banks and USB chargers, and quickly built a strong reputation for reliability and innovation.

In 2017, Anker expanded into the home entertainment market by launching Nebula, a brand dedicated to smart and portable projectors. Since then, Nebula has gained global attention for offering compact, all-in-one projectors with built-in streaming apps, wireless connectivity, and user-friendly design. These projectors are popular with casual users, but with every new release, Nebula is taking steps closer to the performance levels expected by serious home cinema fans.
Today, Anker operates worldwide and continues to develop smart technology across several product categories, but the Nebula line stands out as one of the most interesting and fast-evolving areas of their work. The Nebula X1 is the latest addition, and in my opinion, the best projector Anker has ever built.
The Nebula X1
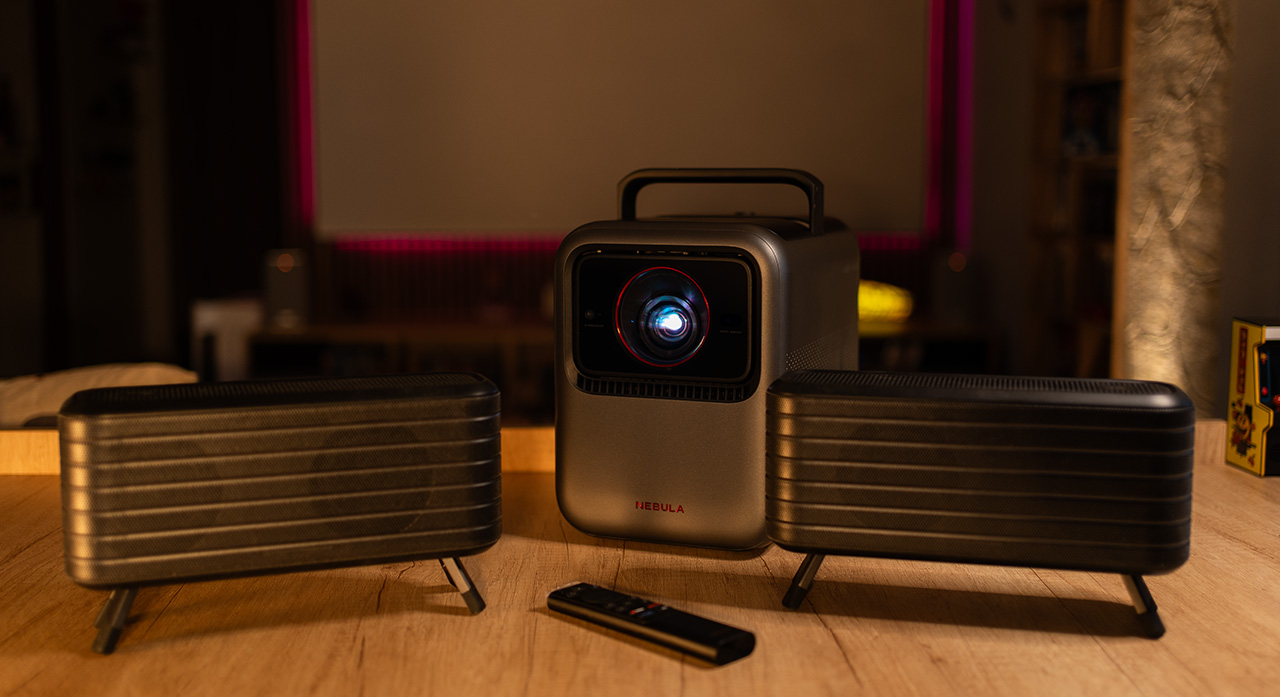
The first thing that struck me when unboxing the Nebula X1 was its incredible build quality. Having seen and handled almost every projector model released in the past two years, I would confidently place the X1 among the top three (if not at the very top) when it comes to build quality.
It’s not just the combination of plastic and aluminum used, every small detail on the device reflects high quality and smart design.
On top of the Nebula X1, we find illuminated touch buttons and a control pad, allowing us to operate the projector without the need for the remote control. Particularly impressive is the red lighting, which changes shape depending on the tilt angle of the gimbal/lens. What’s truly striking is that the light source itself is invisible, it looks as if the chassis is glowing from within, that’s so impressive!
The remote is made of plastic and follows the classic Google TV Bluetooth design, similar to what we find on most lifestyle projectors or even Android TV boxes. Nothing particularly special. But… this is Anker, and of course they added their own touch! The remote features motion-activated backlit buttons that light up as soon as you pick it up from the table. It’s not just cool, it’s also incredibly useful.
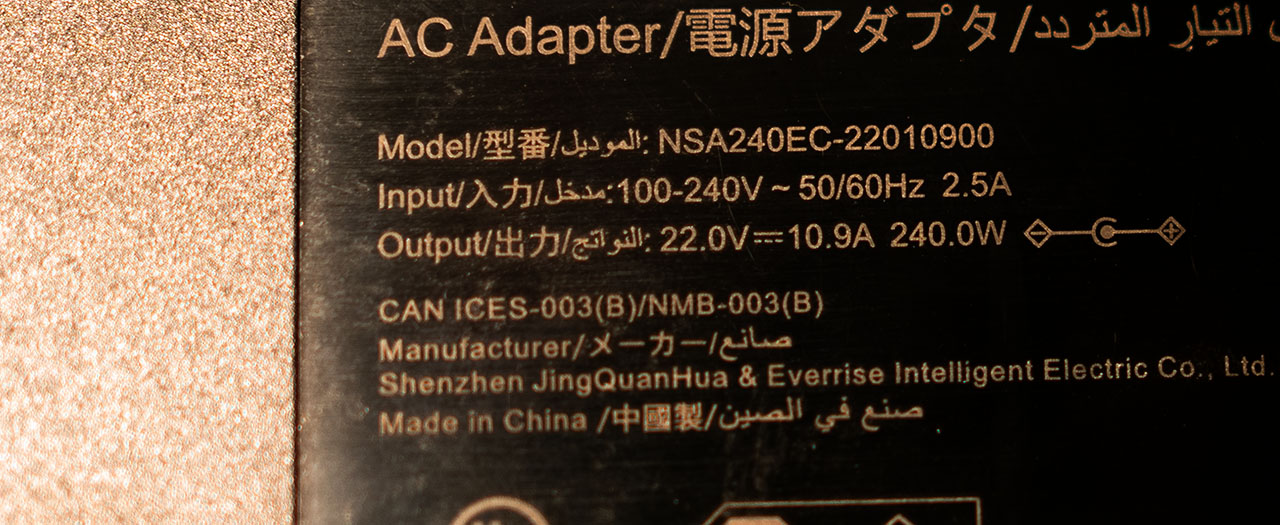
On the back, we find two HDMI 2.1 ports (one of which supports eARC) alongside the power input for the external power supply, a combined audio and optical output, and two USB ports, one of which is USB-C.

If you purchase the version that includes the two wireless speakers, you’ll immediately notice that they’re built like tanks—solid, heavy, and extremely well-made from the moment you hold them in your hands. We’ll take a closer look at their performance later on.
The Nebula X1 Specs
The specs of the Nebula X1 are truly top-notch by today’s standards, impressive across the board and, in my opinion, ticking all the boxes for any home cinema enthusiast. Here they are:

The Technology Behind
The Nebula X1 is not just another model from Anker, it’s a technological breakthrough and a completely new platform that the company has been secretly developing for quite some time. Let’s take a closer look at the key elements I’d like to highlight, so you can better understand the level of innovation and engineering hidden beneath the compact shell with the handle on top that you see in the photos.
LaserForge™ 2.0
The Nebula X1 uses the industry’s first patented U-shaped pure RGB 4K LaserForge™ 2.0 laser engine, featuring a groundbreaking dual-pass speckle diffuser wheel.
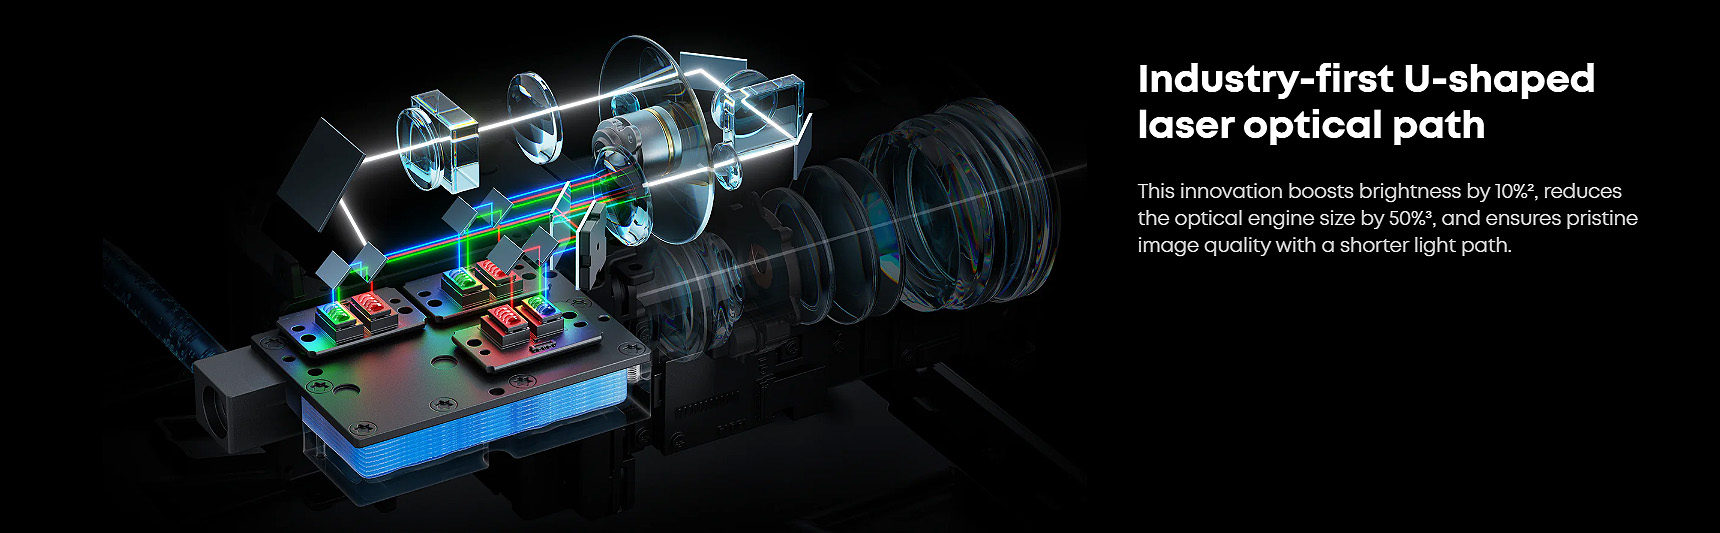
This engine delivers 3500 ANSI lumens of brightness, exceptional color accuracy (△E<0.8), and covers 110% of the Rec.2020 color space while significantly reducing laser speckle and the engine size by 50%.
Liquid Cooling System & Internal Lens Gimbal
The Nebula X1 is the first projector in its class to feature a liquid cooling system, offering 15% higher efficiency, quieter operation, and a design that is up to 30% more compact compared to competitors.
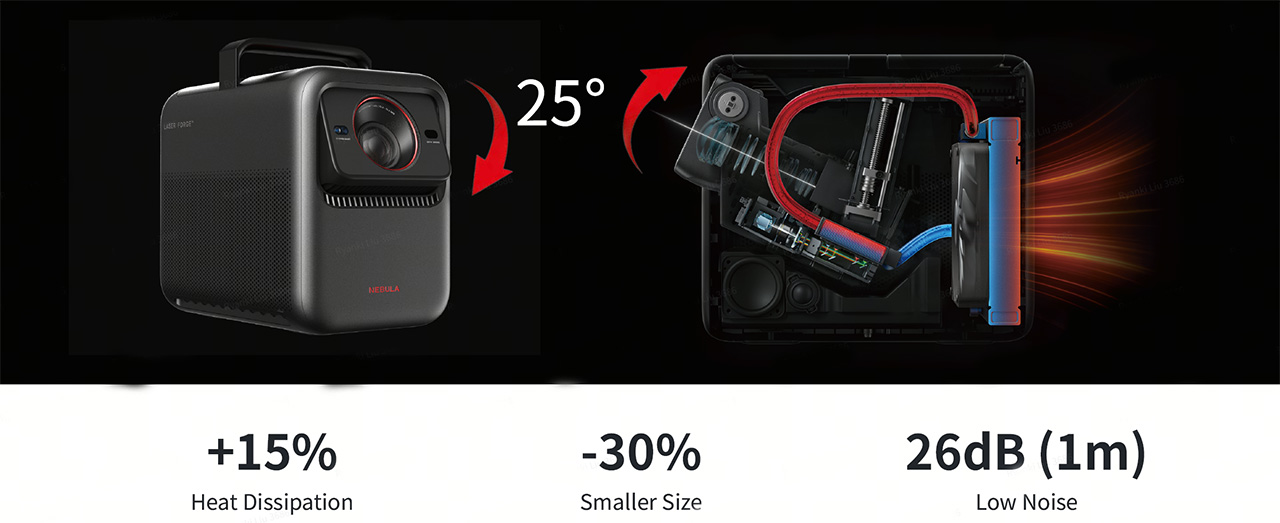
This design also allowed Anker’s engineers to develop the world’s first internal lens gimbal with a 25-degree range, something never seen before on any projector for home use.
Glass Zoom Lens with Manual IRIS
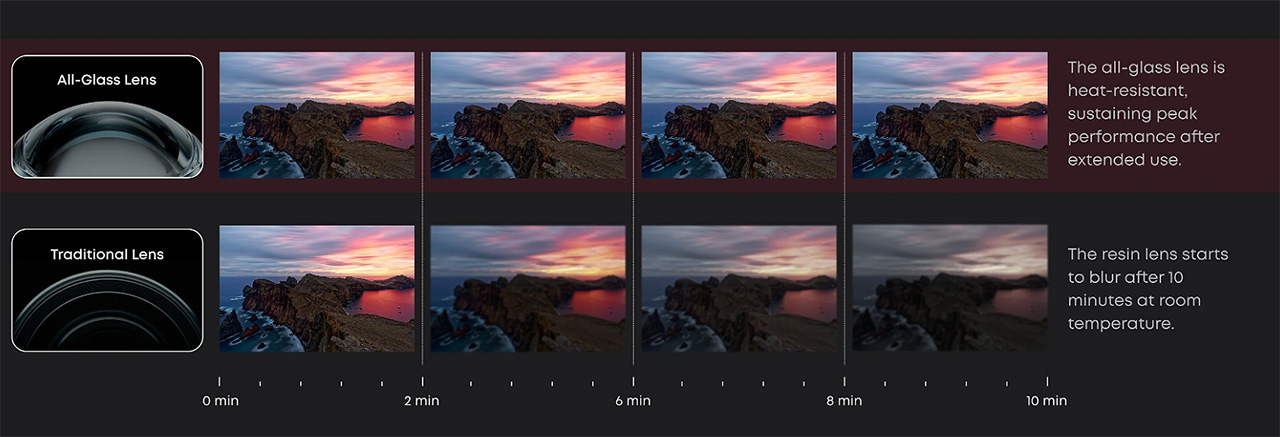
Another point worth highlighting is the stunning cinema-grade 14-element all-glass lens with MotionZoom™ technology , paired with a 6-blade stepped iris integrated directly into the lens assembly.
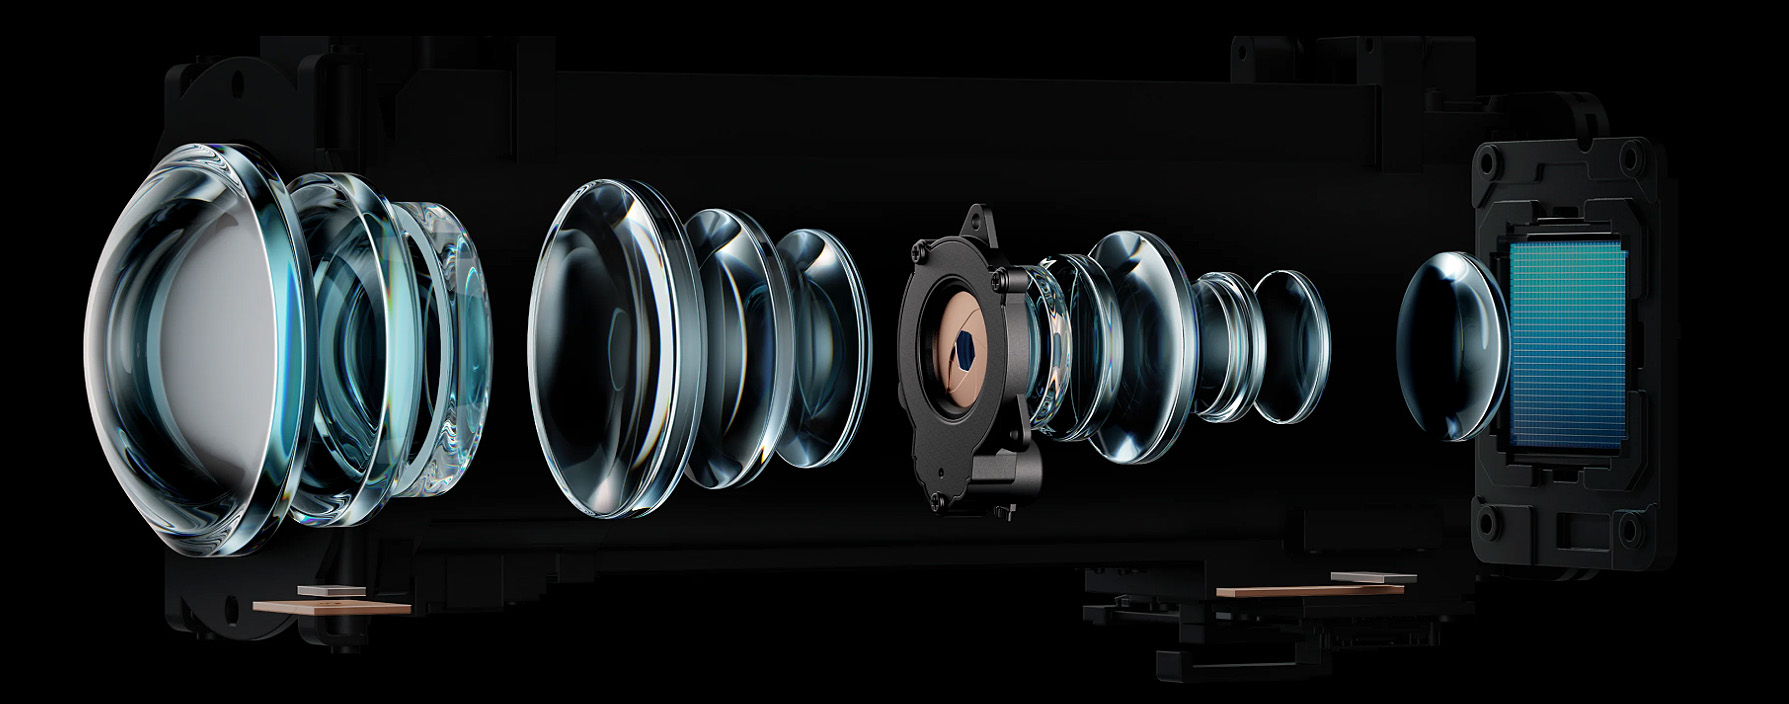
It’s the first time, as far as I know, that a full glass lens is used on a lifestyle DLP projector offering superior clarity, thermal stability, and long-lasting focus.
The glass lens maintains perfect focus exactly as initially set, without being affected by thermal expansion or contraction, unlike mixed resin-glass lenses, which are more susceptible to temperature fluctuations during operation.
At the same time, the integrated adjustable iris pushes the native contrast ratio beyond 5,000:1, higher than anything we’ve ever measured on any other DLP projector, while MotionZoom™ supports a wide throw ratio range from 0.9:1 to 1.5:1 (1.67x optical zoom) . Nice.
NebulaMaster 2.0™ Image Engine
Anker’s innovation goes beyond hardware, they’ve also developed their own image processing engine, the NebulaMaster 2.0™. This engine features an advanced AI-driven HDR tone-mapping algorithm that dynamically adjusts the high dynamic range input signal based on our screen size and the ambient lighting conditions.
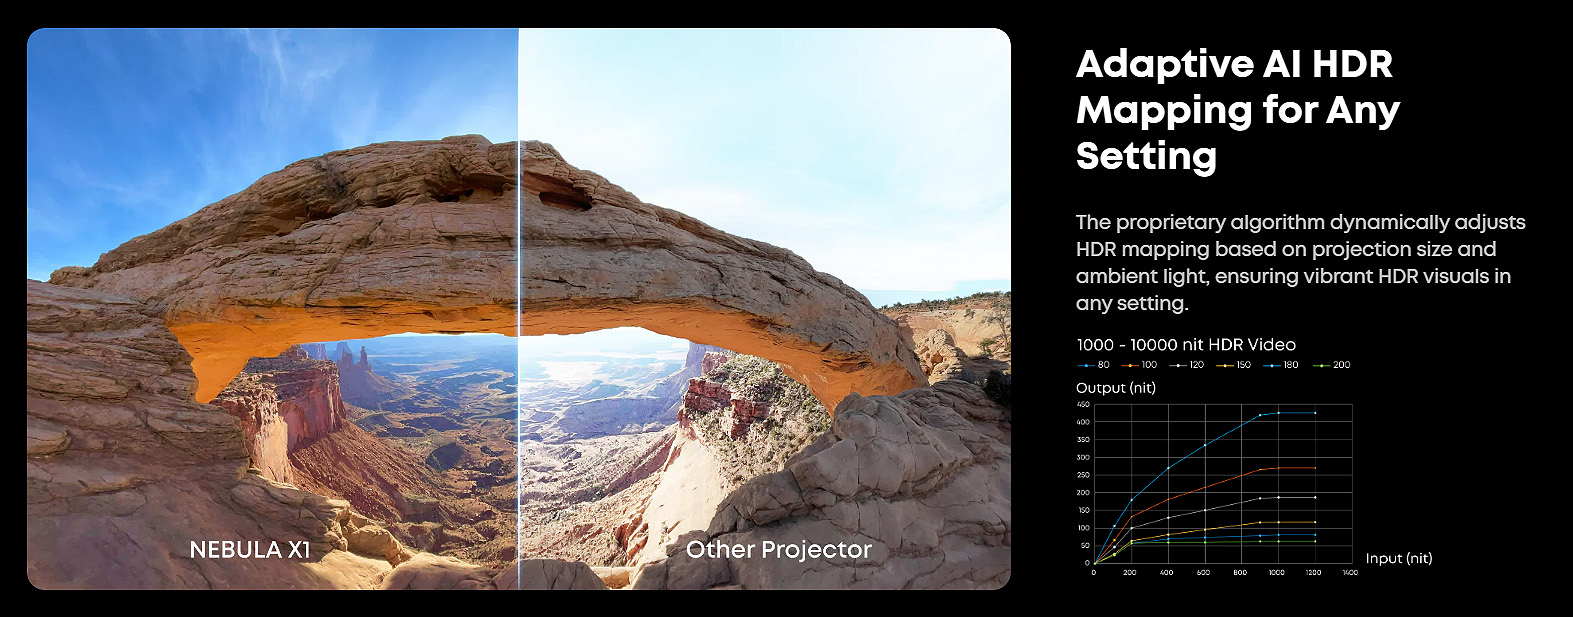
The NebulaMaster 2.0™ Image Engine doesn’t stop at HDR tone mapping. It’s a comprehensive suite of algorithms, developed exclusively by Anker’s engineers, designed to process and enhance the image on the fly across multiple areas. One example is the integrated de-contouring algorithm
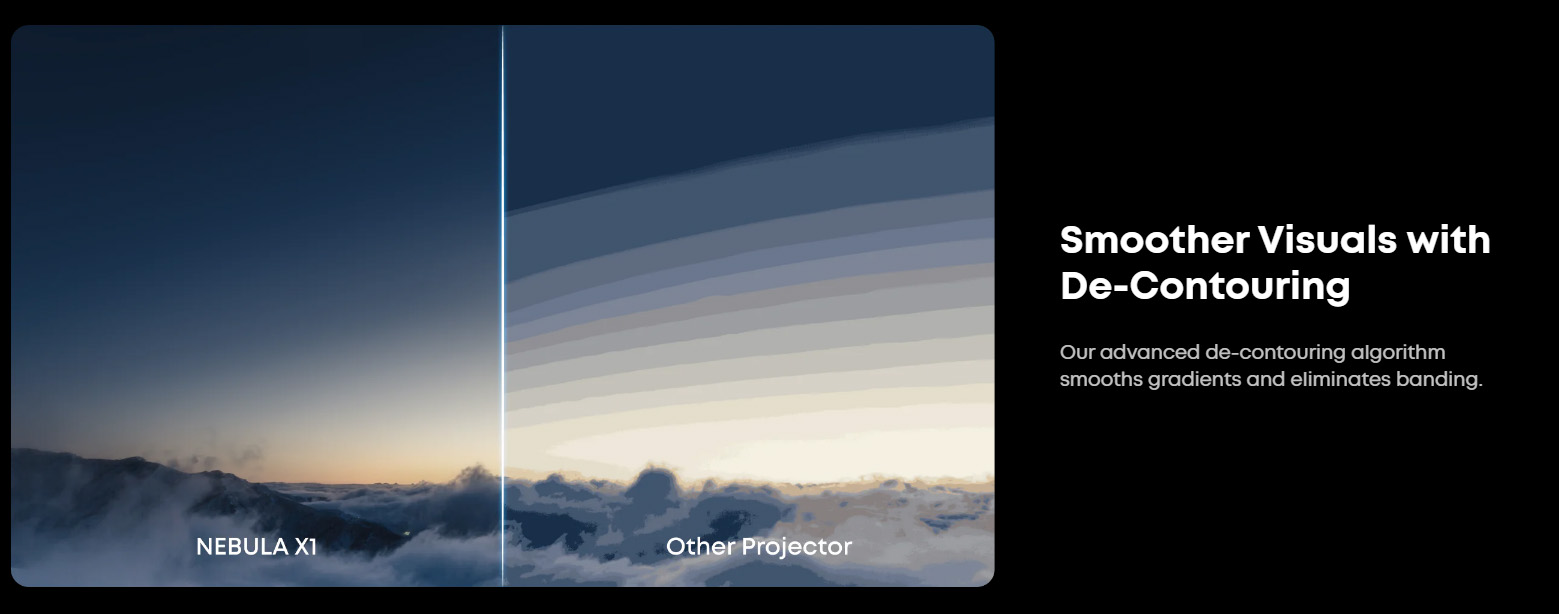
This algorithm is responsible for smoothing gradients and eliminating the well-known image banding effect.
Menu & Smart Interface
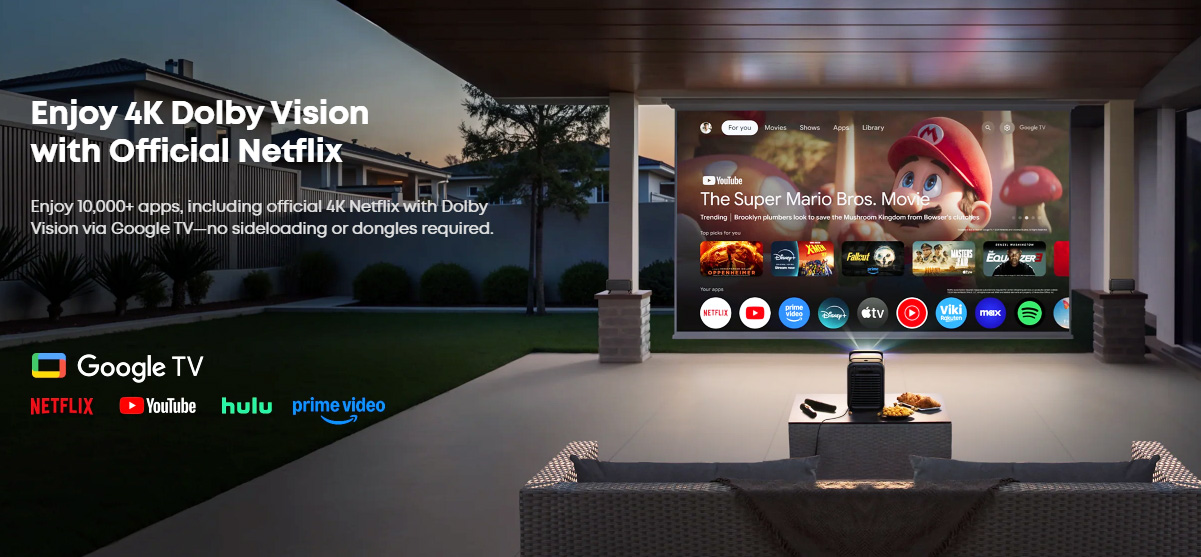
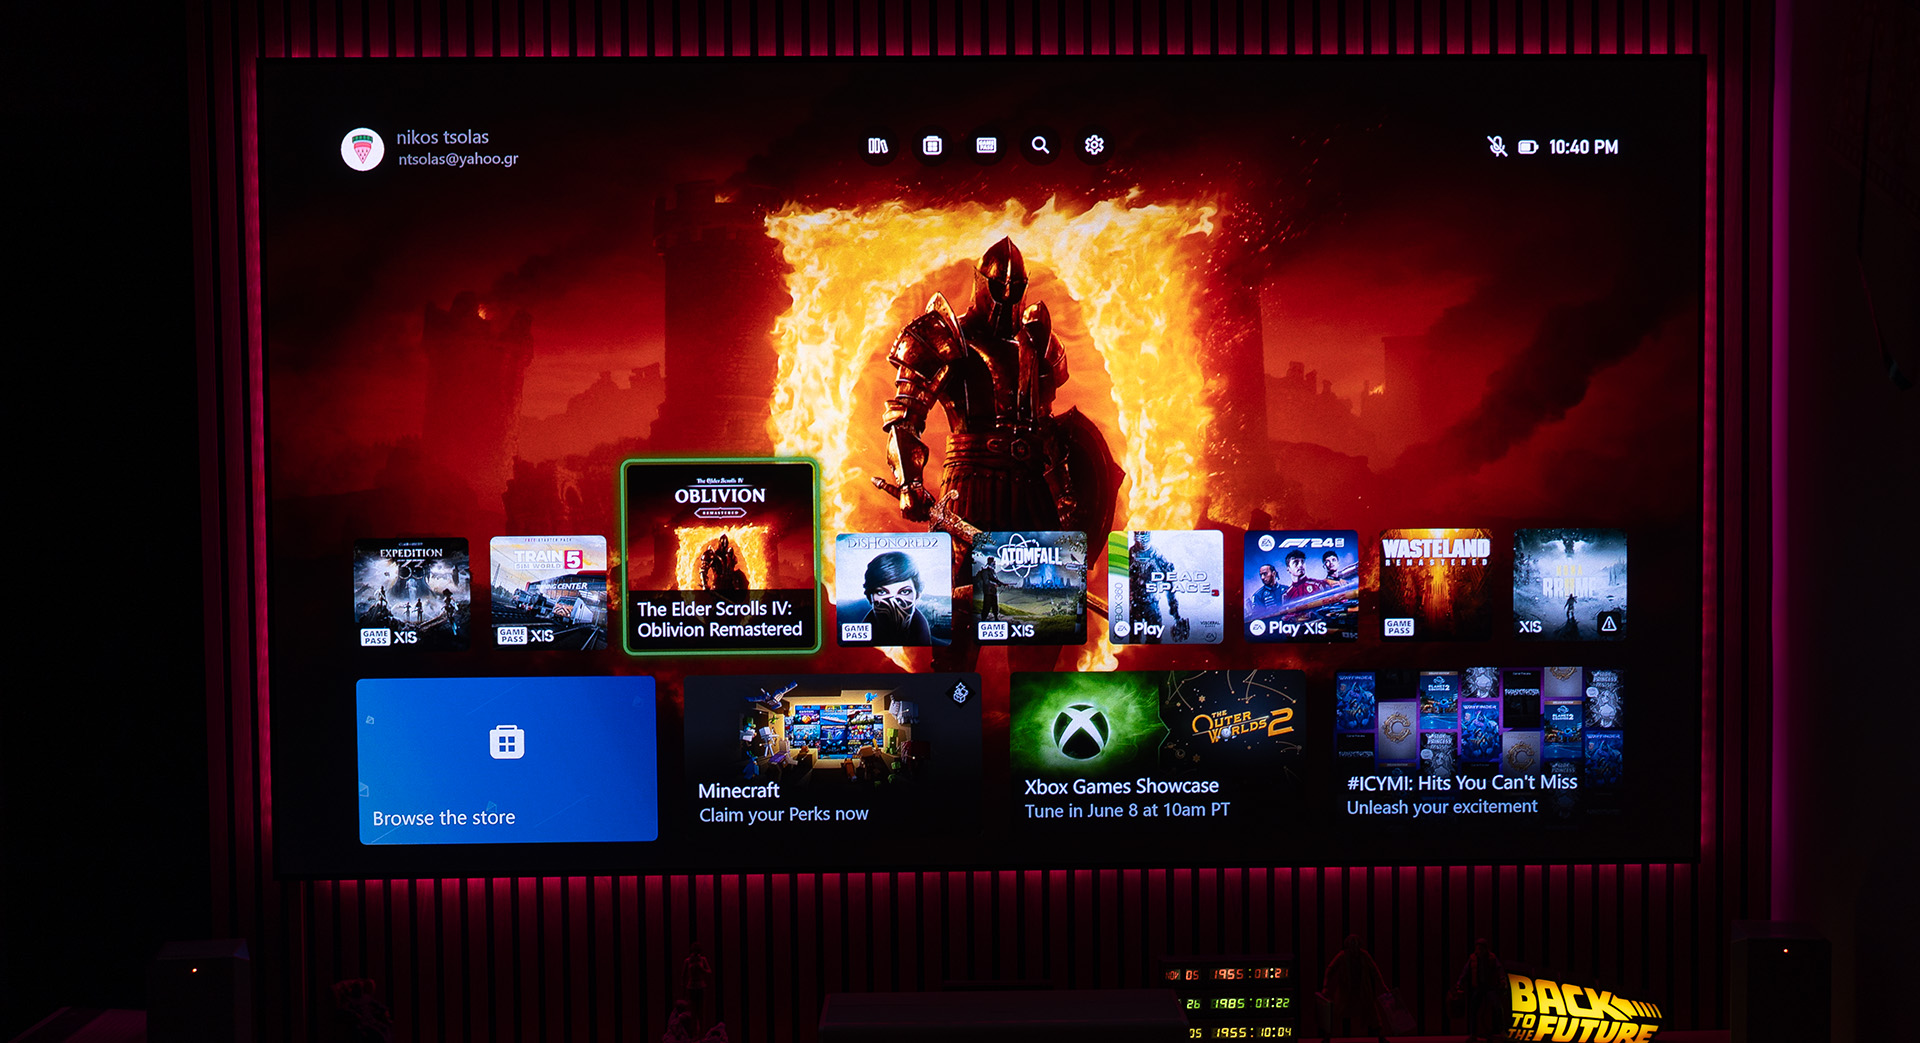
The interface of the Nebula X1 is based on the well-known Google TV platform. In addition to all the popular streaming apps like Netflix, Amazon Prime, Apple TV, Disney+, etc., the projector’s own settings menu is also part of Google TV.
The menu of the Nebula X1 can be divided into two main categories, one related to projector setup and the other to image settings. I’ll walk you through the most important aspects of each in the following lines.
In the setup menu Anker has done an excellent job, everything is neatly organized and easy for the user to understand. It includes virtually everything you might need to set up your projector, with one standout feature being the ‘Spatial Adaptation’ function. When activated, the projector scans the surface in front of it and automatically adjusts the image to deliver the best possible result, not just in terms of size and geometry, but also by avoiding any obstacles in the projection area. It works flawlessly.
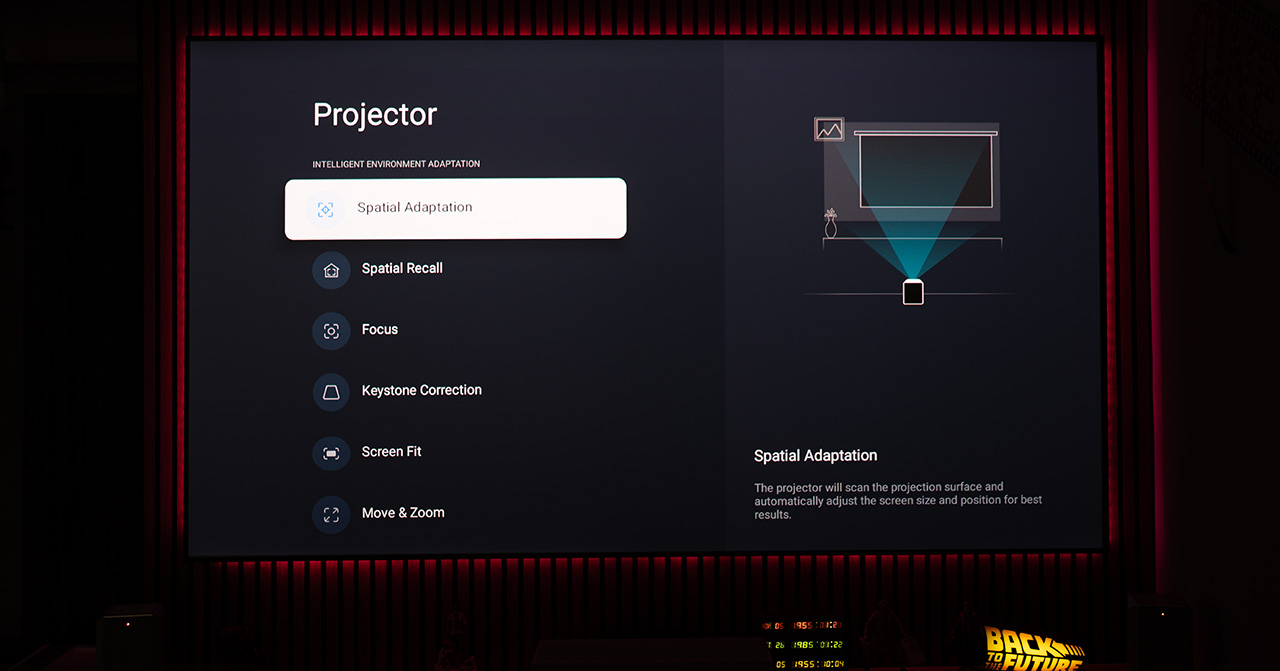
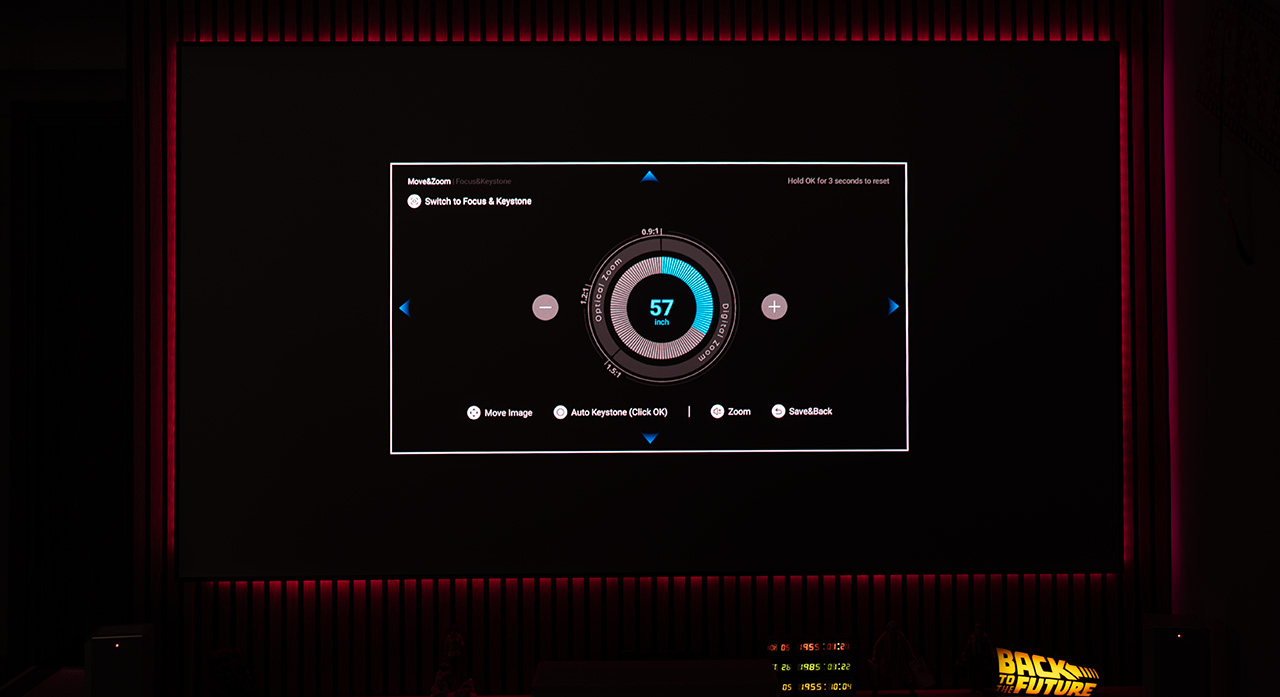
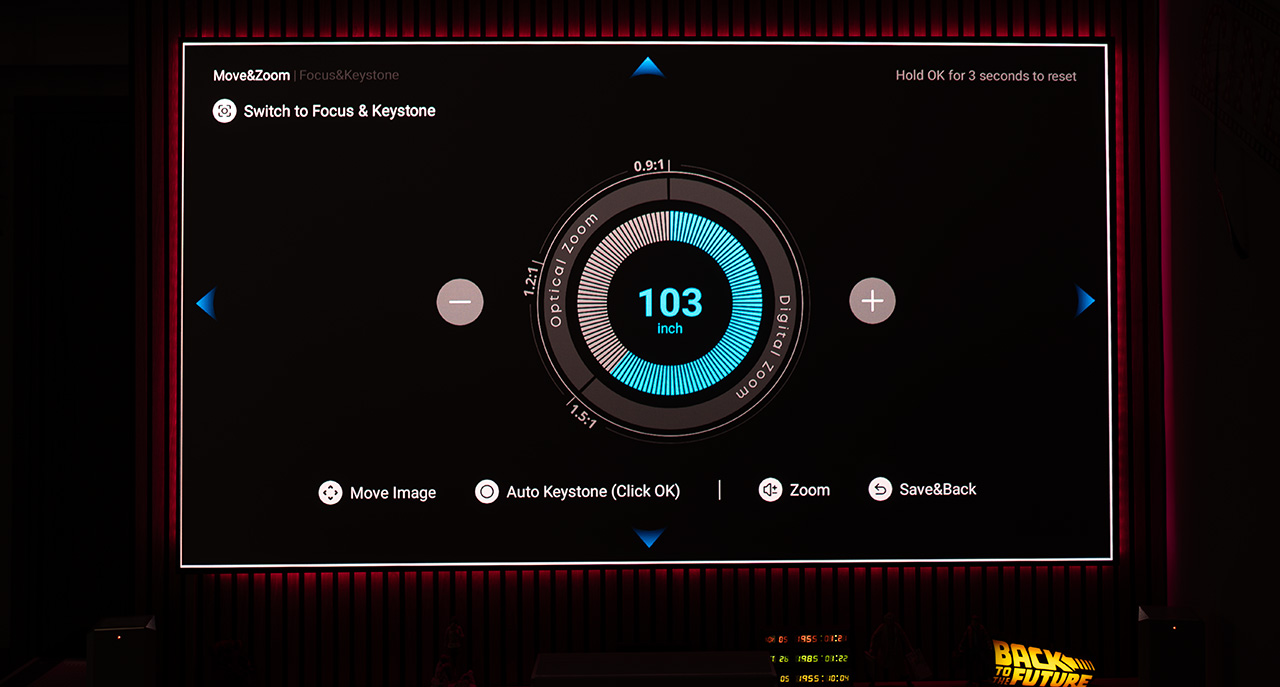
In the ‘Move & Zoom’ menu, you can enlarge or shrink the image either using the lens’s optical zoom or, if that maxes out, through digital zoom. What’s particularly interesting is that the X1 displays the exact screen size in inches directly on the screen! It’s the first time I’ve seen something like this on a projector, and it’s so useful.
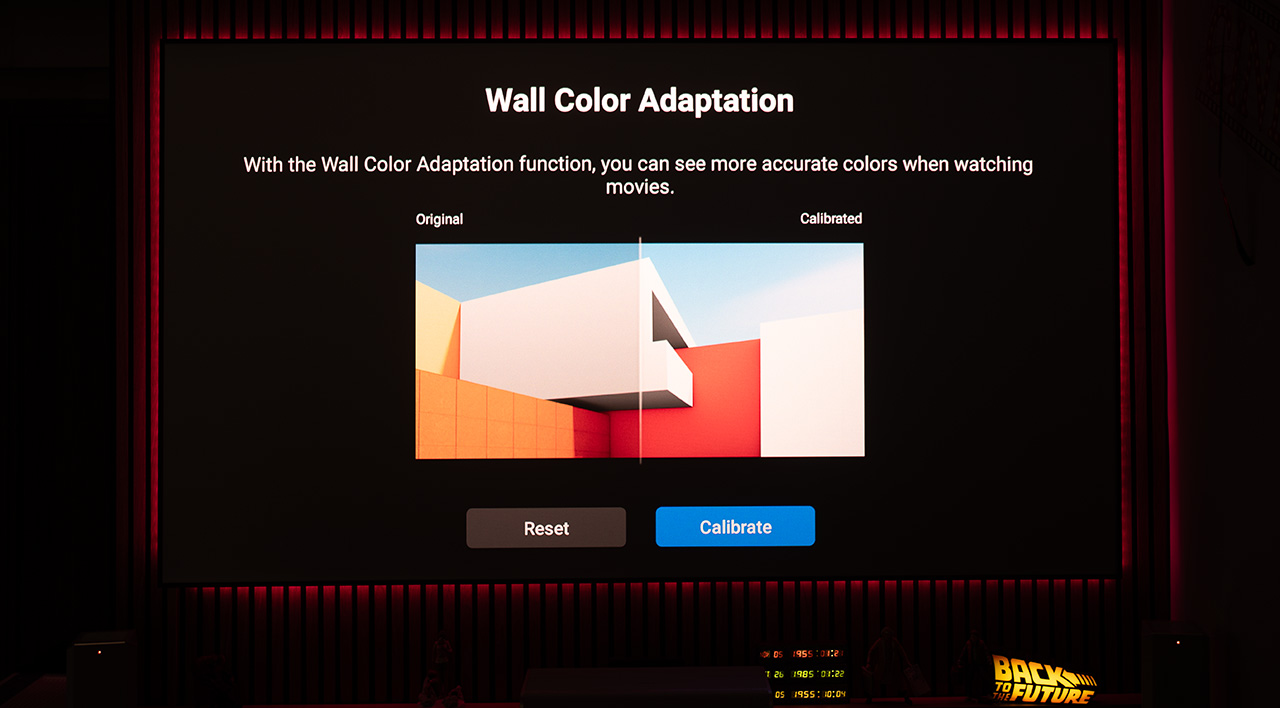
If you want to project onto a wall in your home that isn’t perfectly white, no problem. The Nebula X1 uses its built-in camera and ToF sensor to detect the color of the projection surface and automatically adjusts the image to maintain neutral color accuracy, regardless of the wall’s color shade.
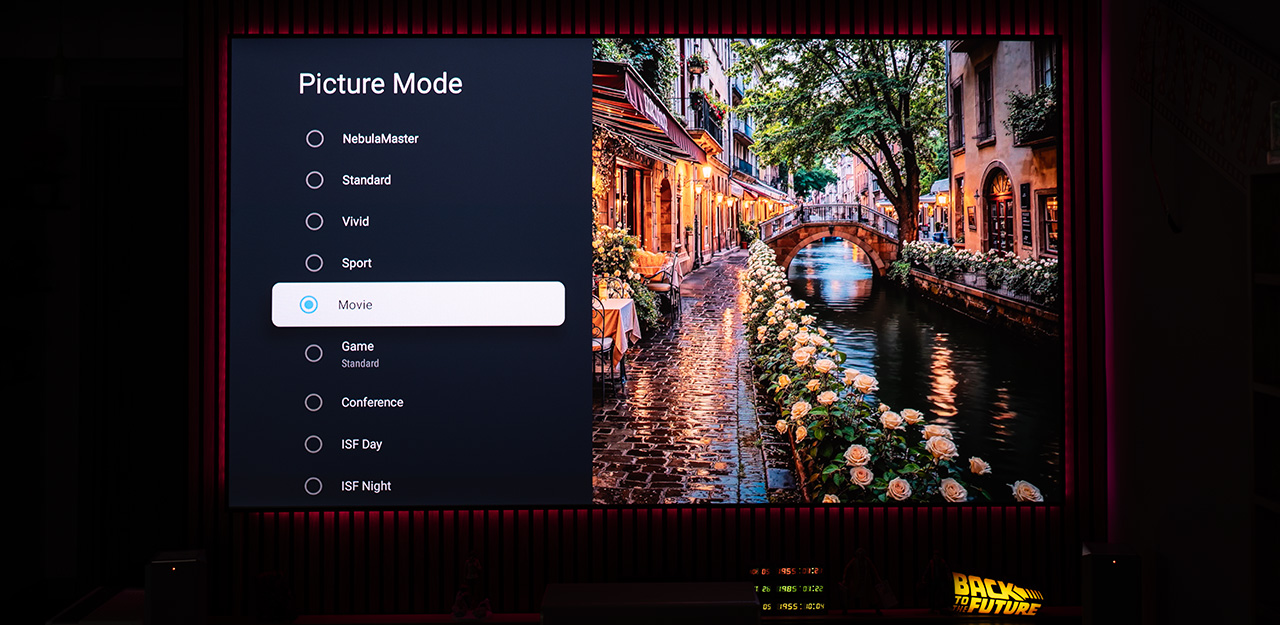
The Nebula X1 doesn’t give you just one or two picture modes, nope, it throws nine at you. Yes, nine. Oh dear. If that sounds overwhelming, don’t worry, there’s a mode called ‘Nebula Master’ that’s basically the ‘sit back and relax’ option. Just select it and let the projector figure everything out for you, adjusting the image automatically based on whatever you’re watching.
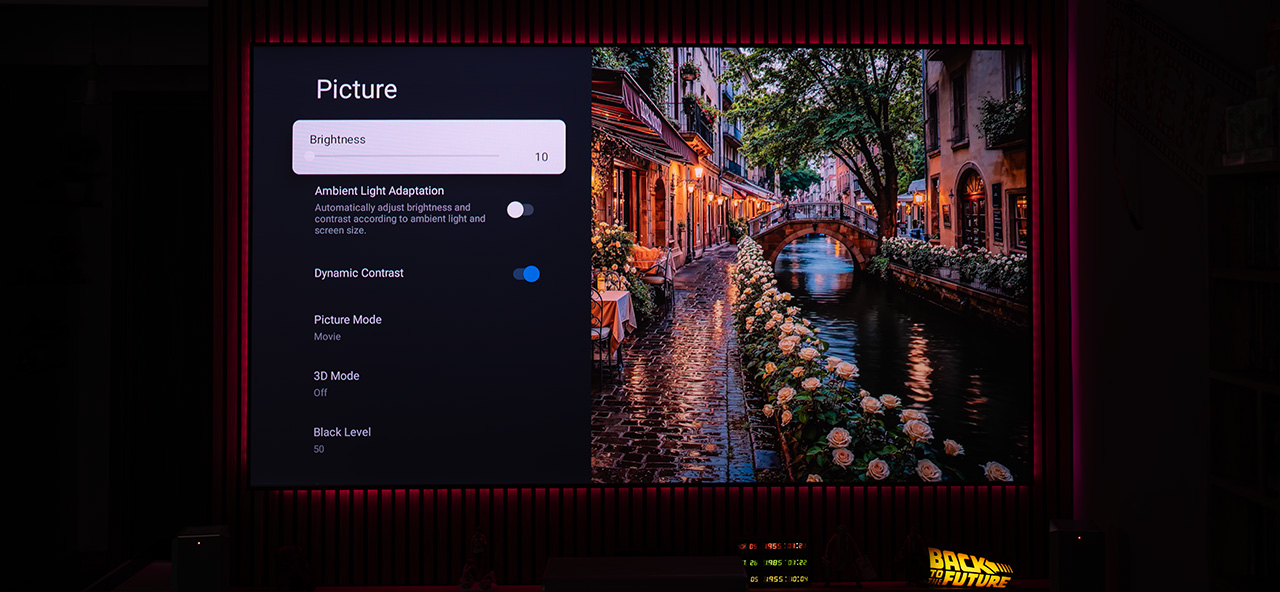
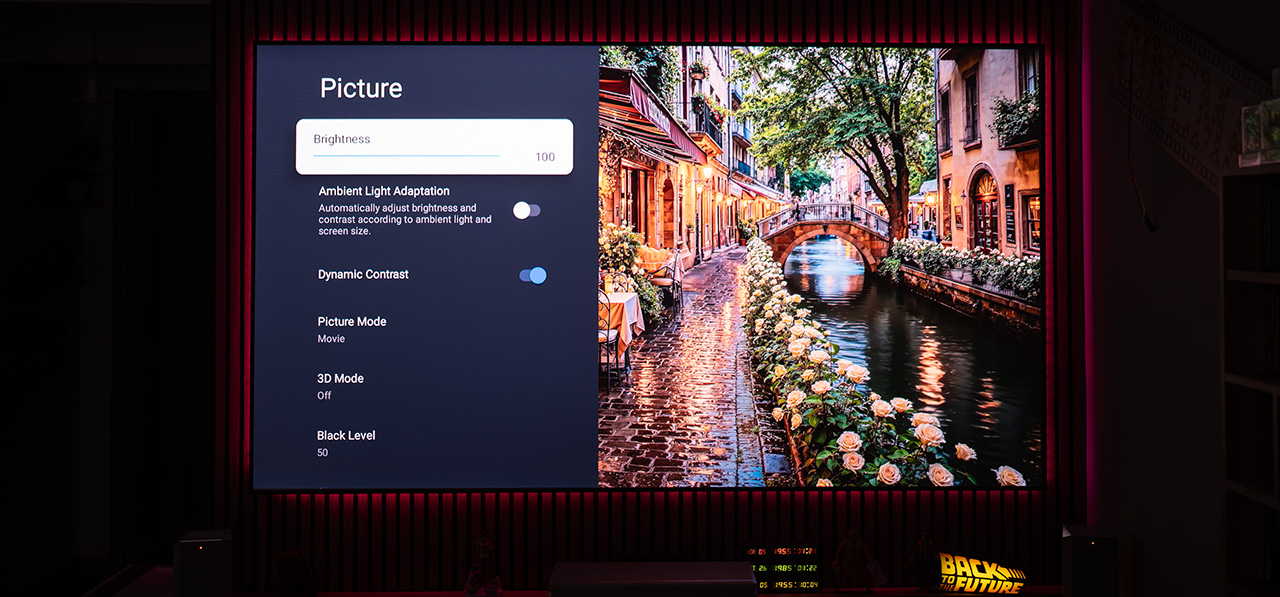
In the main ‘Picture’ menu, one of the most important settings is laser power, which the Nebula X1 simply calls ‘Brightness’. It can be adjusted from 10 to 100 in single-unit increments, allowing for extremely precise tuning to find the ideal brightness level for your room and screen. The difference in brightness between the maximum and minimum setting can be seen in the two screenshots below.
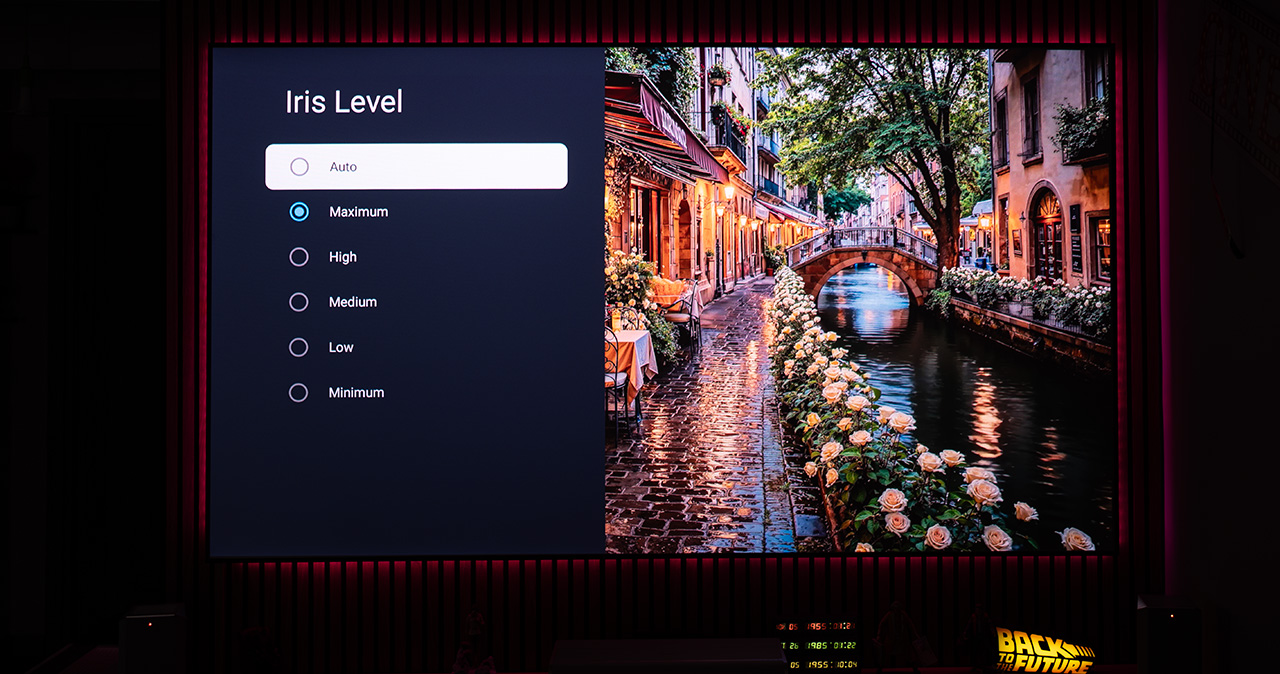
And now we come to what might be the most important setting of all, the adjustment of the stepped iris on the Nebula X1, which is integrated into the projector’s lens.
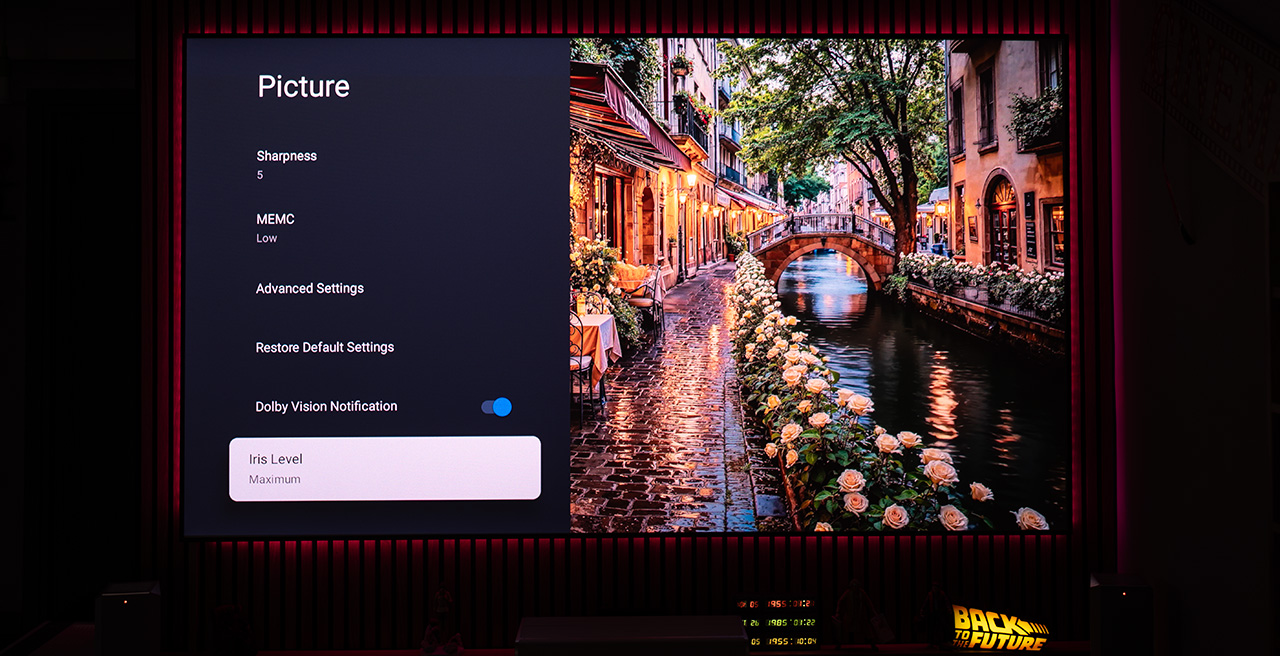
There are six available iris positions, one ‘Auto’ mode, where the projector automatically adjusts the iris position depending on the content, and five manual options that allow the user to choose the iris position that best suits their preferences. Just how dramatic the impact of this iris can be on image quality is something you’ll discover soon, if you keep reading of course..
In the advanced picture settings, the Nebula X1 hides all the specialized image controls that a professional calibrator, or even a curious user who loves to explore their projector’s full potential, might need.
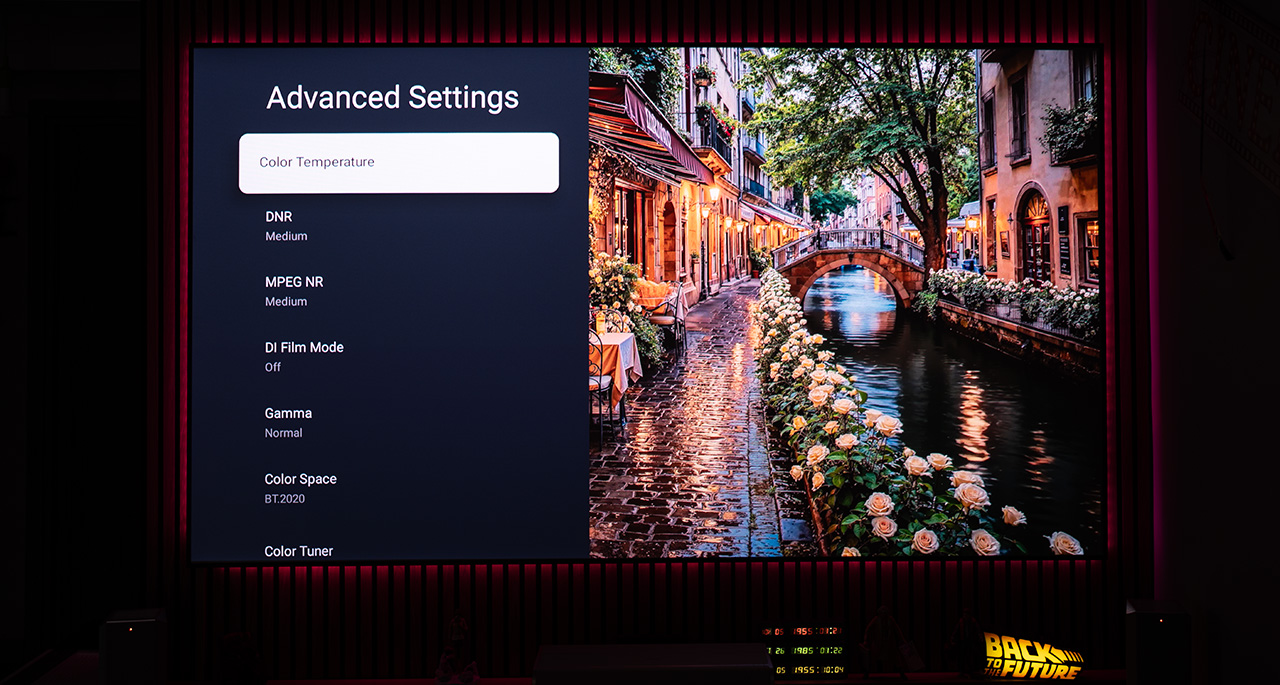
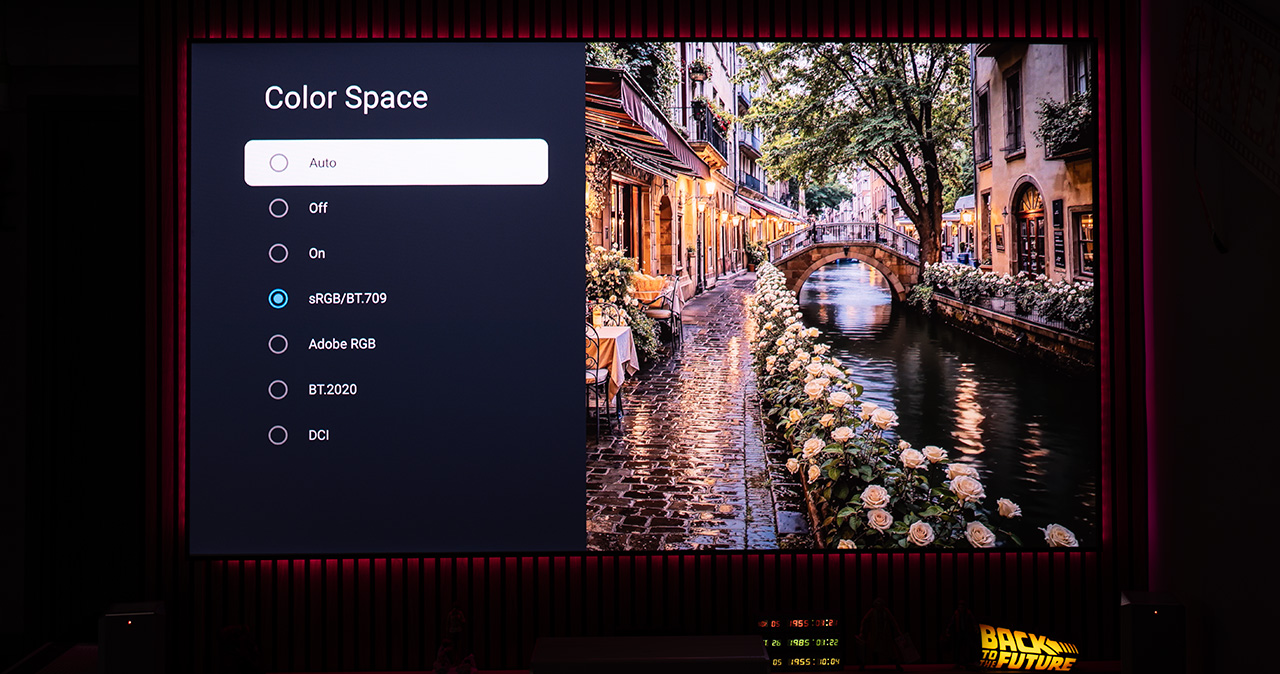
The Nebula X1 allows the user to manually select the desired color space, regardless of the content being played. For example, you can choose the ultra-wide BT.2020 color space even when watching SDR 1080p material instead of 4K HDR. Of course, there’s also an ‘Auto’ option, where the projector automatically selects the appropriate color space based on the content.
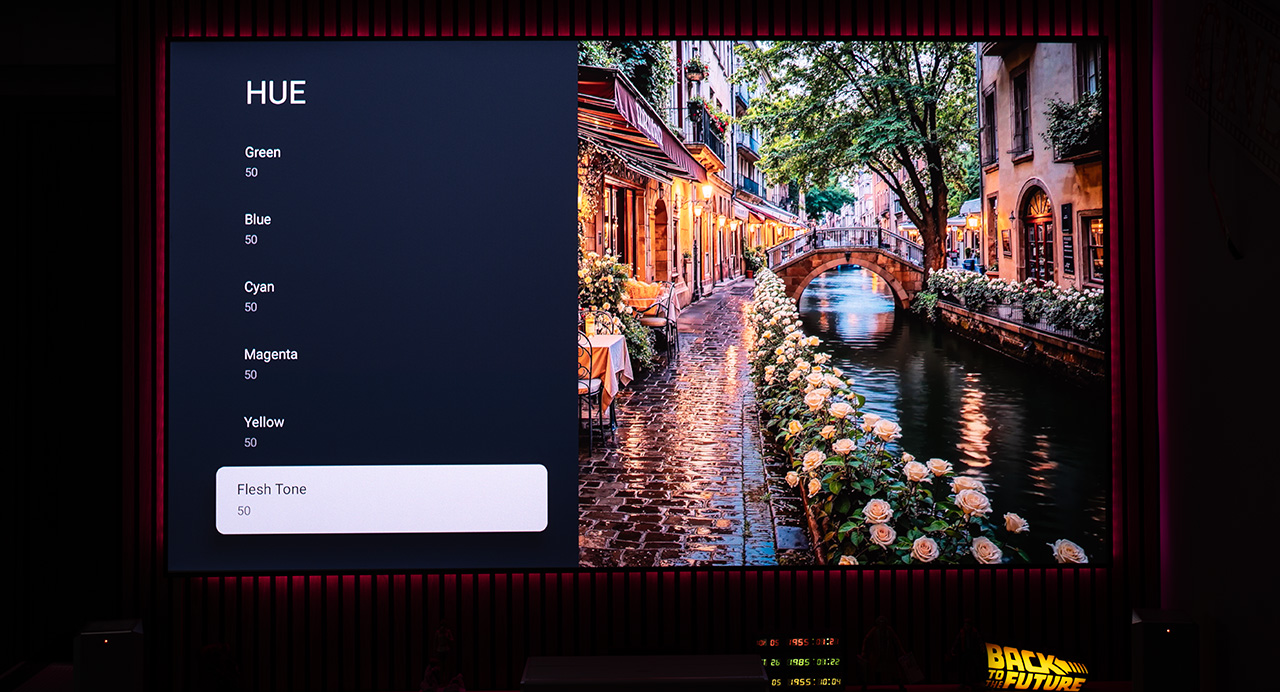
Naturally, the X1 features a full CMS (Color Management System), allowing you to fine-tune the hue, saturation, and brightness of both primary (red, green, blue) and secondary (yellow, cyan, magenta) colors. It even includes a dedicated skin tone (Flesh Tone) adjustment!
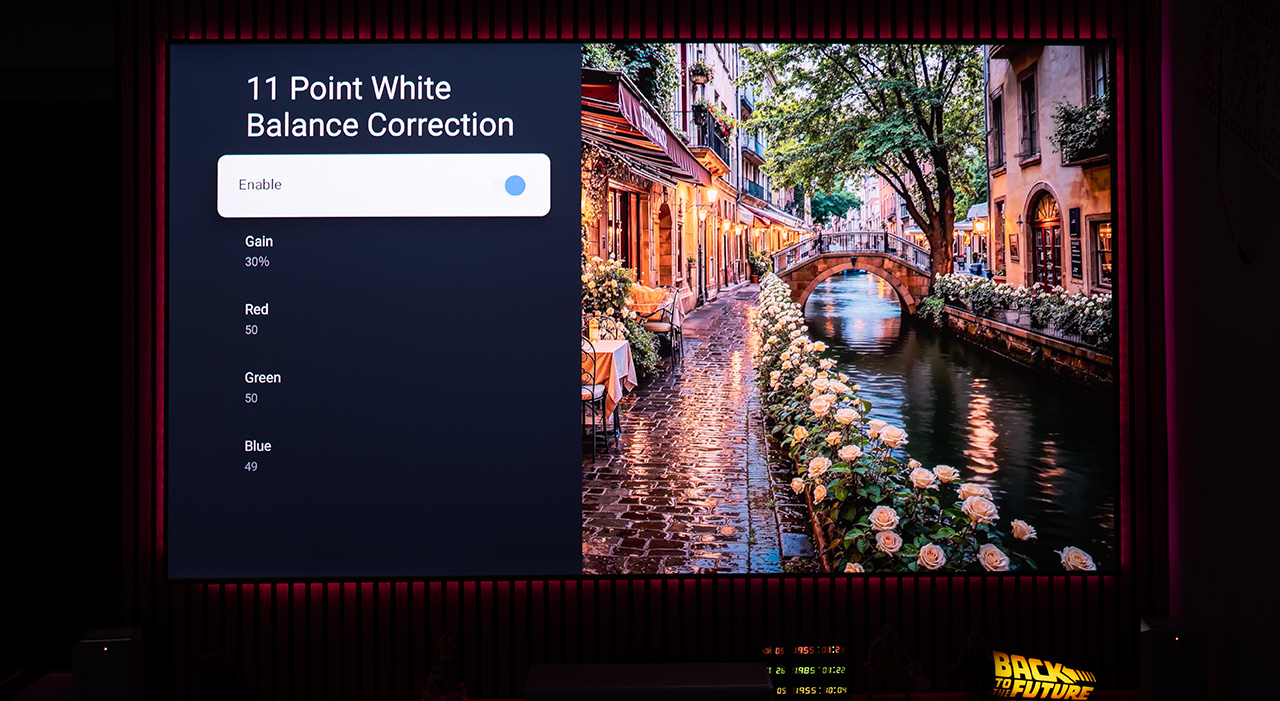
When it comes to grayscale (white balance) adjustment, the Nebula X1 offers a wide range of controls. It includes several factory presets like Cool, Standard, and Warm, as well as full gain and offset controls for each of the three primary colors (Red Green Blue) that make up the grayscale from black to all the way up to pure white. What’s even more impressive is the inclusion of an 11-point adjustment system, allowing separate RGB tuning for every 10 IRE step, essentially giving you independent control over each 10% segment of the grayscale. Incredibly useful for image calibration junkies like myself.
The Nebula X1’s menu is one of the most complete I’ve come across in a lifestyle home projector. I could easily spend hours going over the countless adjustment options it offers. It truly gives the user the ability to fine-tune the X1 to their exact preferences, unlocking settings that are factory-fixed in most other models on the market.
In conclusion, the Nebula X1’s menu is highly detailed and well-designed, within the limits of the Android environment, of course. In many cases, it leans toward overkill, especially with the excessive number of picture modes, many of which I personally find unnecessary. On the other hand, it offers a wide range of settings that allow users to fine-tune the X1 exactly the way they want.
Google TV includes all the well-known streaming apps, and every additional app I installed, such as VLC Player and PLEX, worked flawlessly. My only concern after checking all the streaming apps is that Apple TV content looks noticeably soft to my eyes, almost as if it’s playing in 1080p rather than 4K. I haven’t confirmed this, so it’s just an observation for now.
Its only real drawback is the lag I experienced during navigation. Menu responsiveness isn’t nearly as smooth or fast as what you’d get with a Valerion, for example. I know this might sound like a minor issue, but in practice, it became quite frustrating, especially when calibrating the X1, where you constantly need to jump back and forth between menus. In those cases, it truly becomes tiring. I’m confident this is something that can and will be improved with future firmware updates.
Almost forgot, there is also something I noticed that is worth mentioning. You can play content directly on the Nebula X1 from a USB stick or by streaming from a PC using VLC or any other player.
In this case, I discovered that during playback, navigating through the projector’s menus becomes very slow and unresponsive. It feels as if the internal processor is not powerful enough to handle all tasks at once. Additionally, the projector struggled with heavy 4K files that have a high bitrate. In some cases, it could not play them at all, you would get sound, but no image.
Nebula Connect Android & iOS App
Anker has developed an excellent app for remotely controlling the X1 from your smartphone. Simply connect the Nebula X1 to the app via Wi-Fi, and you can control the projector entirely from your phone.
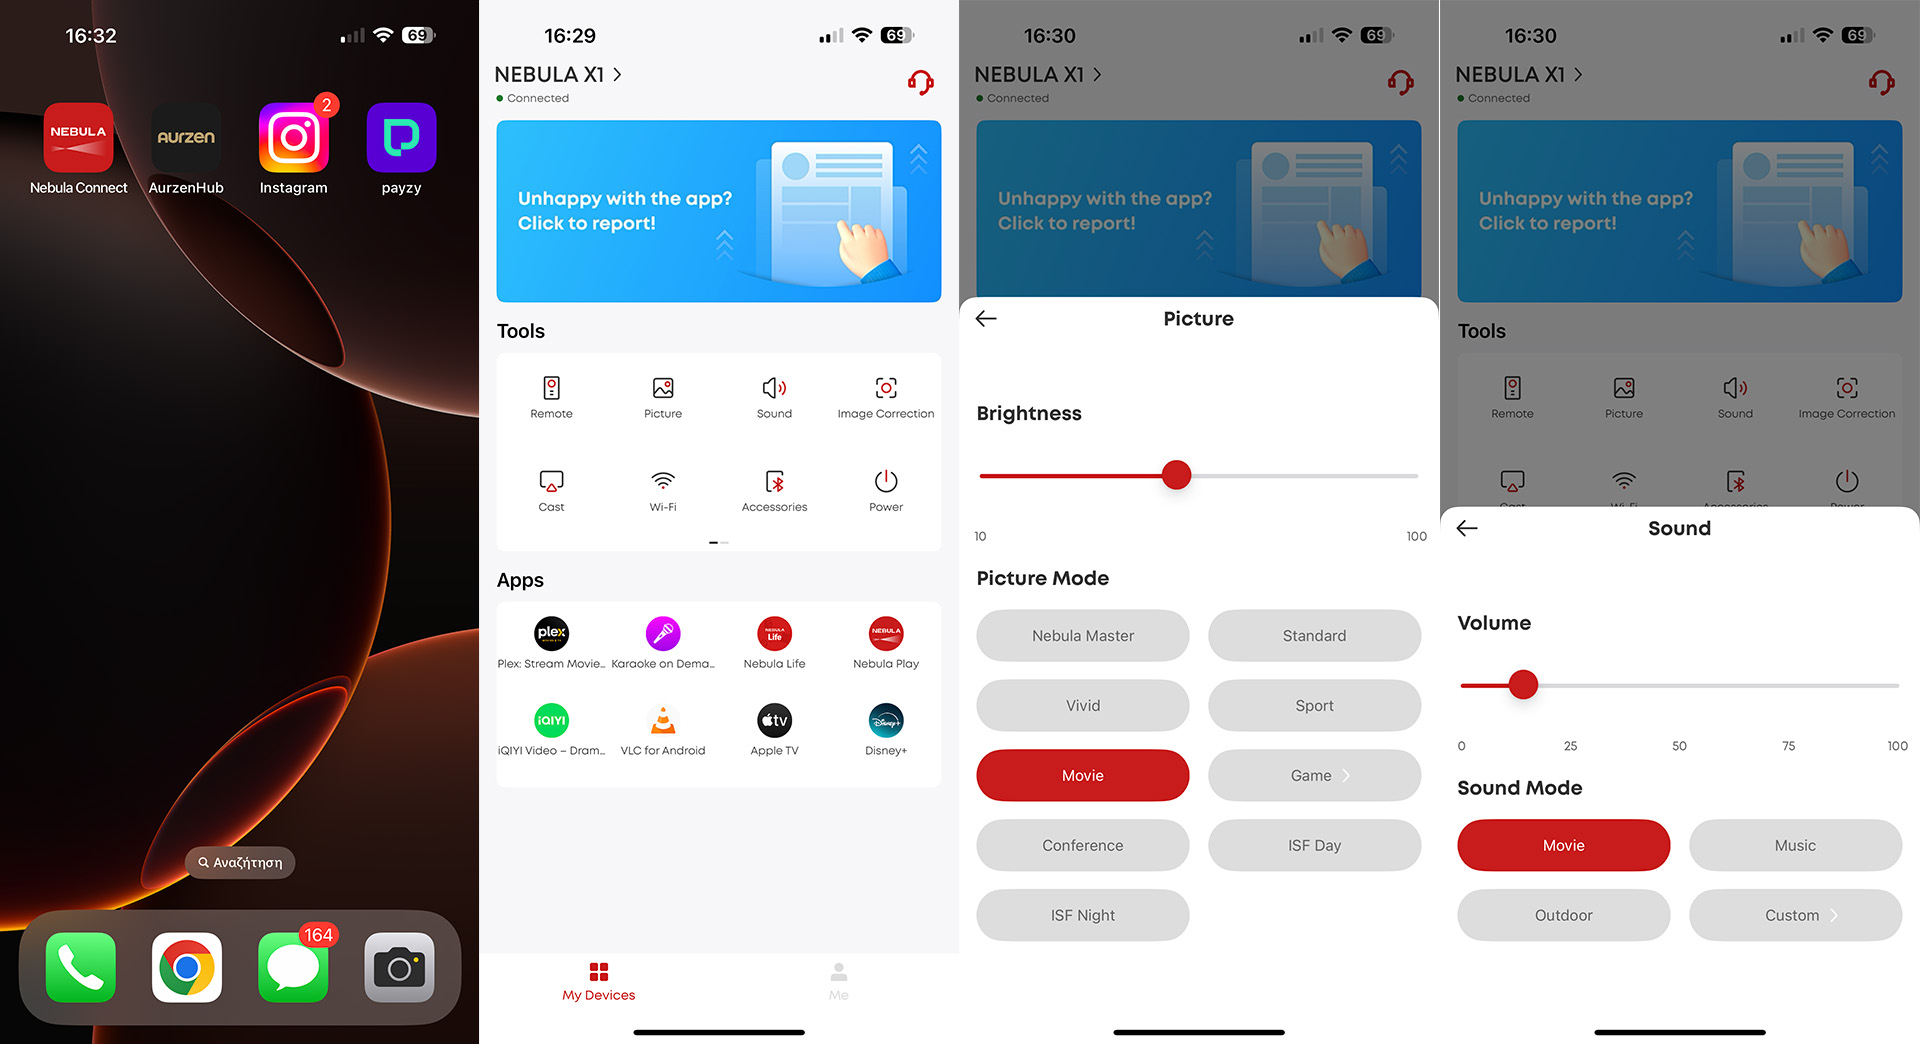
Ever since I installed the app, I haven’t used the remote control again. The reason is simple: with the app on your phone, you can instantly access key functions like Picture Mode selection, laser brightness adjustment, and much more, directly through handy shortcuts!
Surprisingly, it also works faster and more reliably than the actual remote control. There’s none of the lag I mentioned earlier when navigating with the remote. In fact, if I said the menu navigation speed is ten times faster, I might actually be understating it!
The app even includes a dedicated tab where your phone screen turns into a touchpad, allowing you to control the X1 with such speed and ease that I personally have no intention of going back to the traditional remote.
Nebula Connect isn’t a typical, hastily-made projector control app like those I’ve seen from other companies in the past. It’s a well-designed, full- features application with no missing functions and settings, and most importand it works flawlessly.
Nebula Apps
On the main interface, you’ll find three official Nebula apps, two pre-installed and one available for download. The apps are NebulaCast, Nebula Life and Nebula Play. Let’s break down what each of these apps does in the section below.
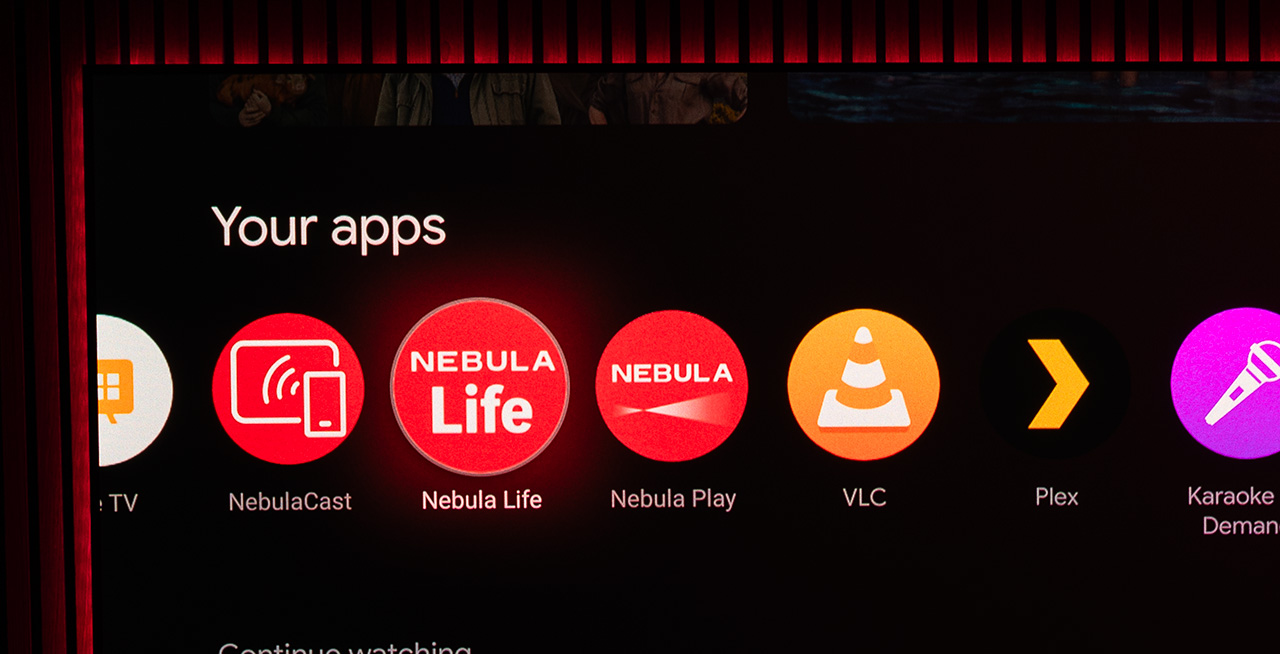
NebulaCast
With this app, you can wirelessly connect your mobile device whether it’s Android or Apple in just a few seconds.
On an iPhone, for example, all you need to do is select the X1 via AirPlay.
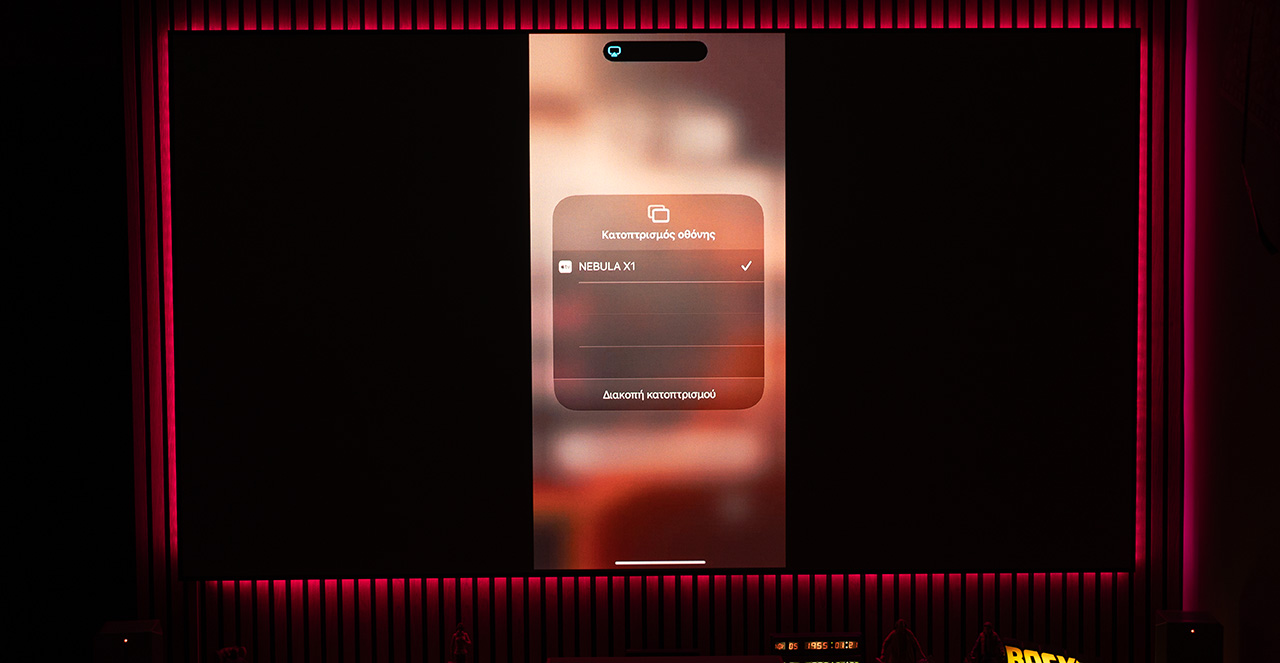
And just like that, you’ll see your phone’s screen mirrored directly onto the projection display.
If you play a video, it will automatically switch to 16:9 format and fill the entire screen. I didn’t notice any lag at all, as the connection runs over high-speed Wi-Fi, and the image quality was excellent even when streaming 4K content from my phone.
The only issue I encountered was a connection failure that was resolved only after restarting the projector. I’d easily give it an 8 out of 10 for doing what it promises.
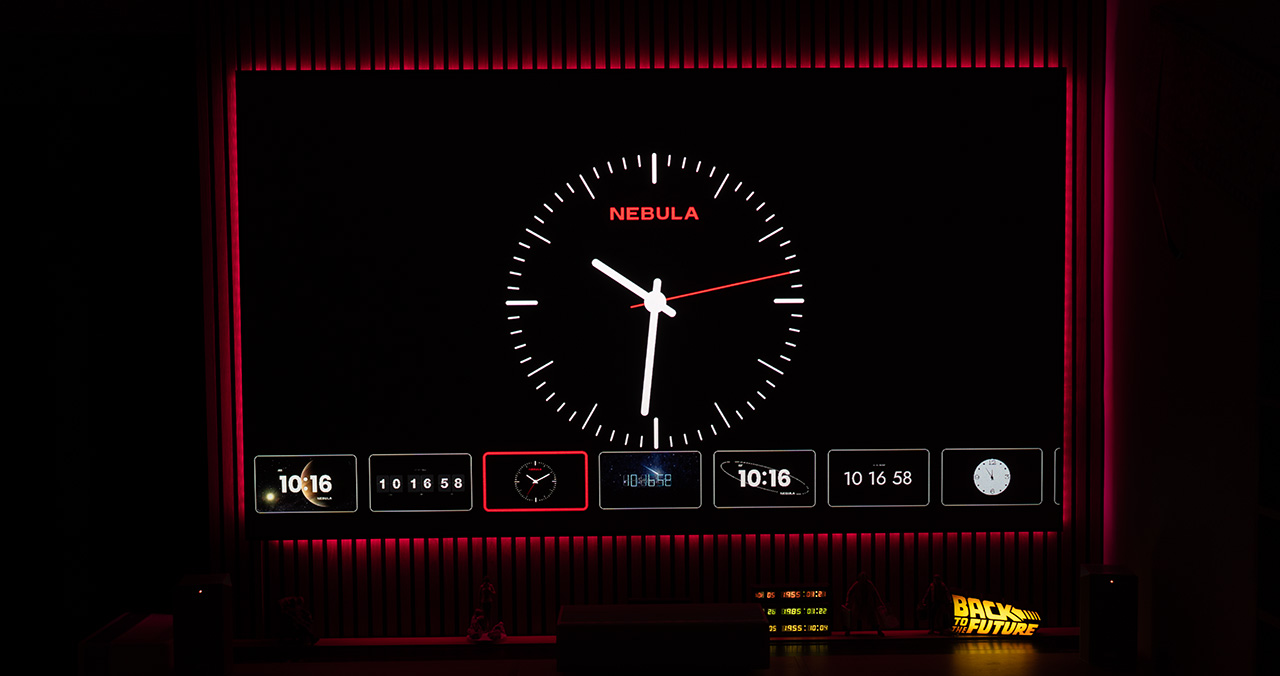
Nebula Life
This app gives us the option to use the X1 a bit differently by turning it into a “decorative” projector and projecting a wallpaper or a wall-mounted-style clock onto our wall.
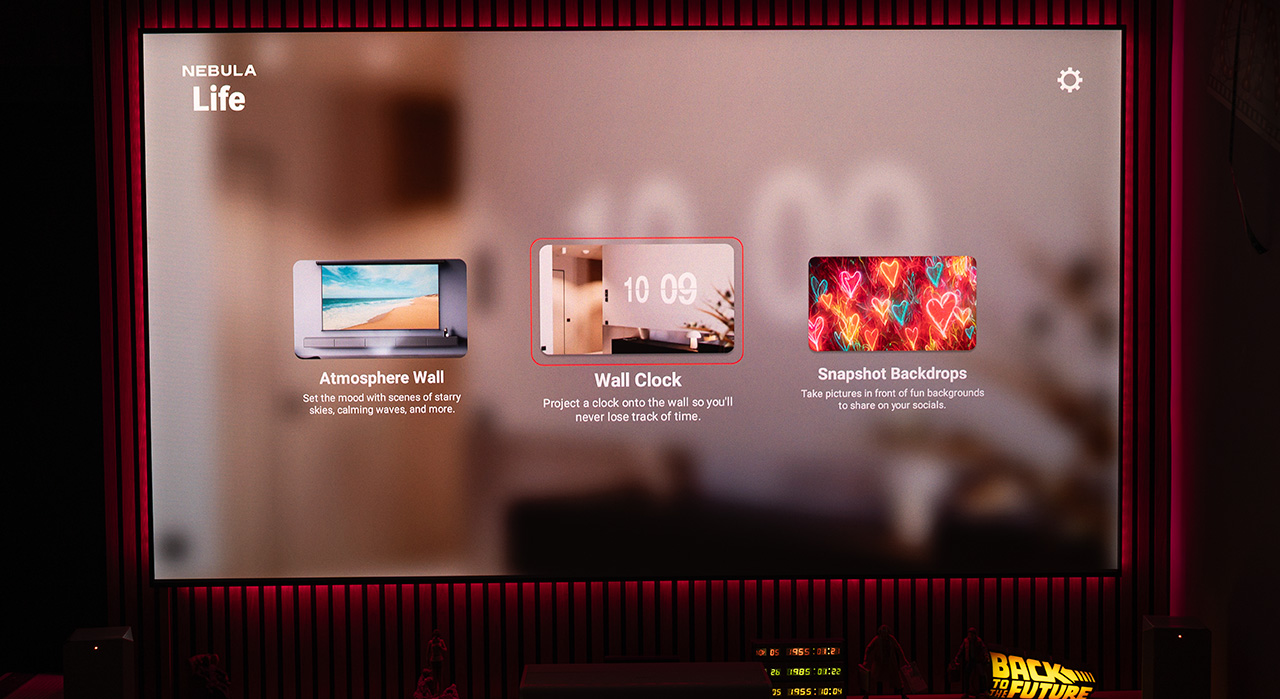
Now, who on earth would actually want to project a clock onto their wall using the Nebula X1? I honestly have no answer to that, maybe there are people out there with unusual tastes. Who knows?
Overall, the Nebula Life app is a decent attempt by Anker to offer this kind of functionality to X1 owners. However, I found it quite limited in both features and the variety of wallpapers available for decoration. It doesn’t even come close to the impressive design and rich selection offered by XGIMI’s equivalent app on the Horizon S Max, for example.
I’d give it a basic 3 out of 10, just for existing.
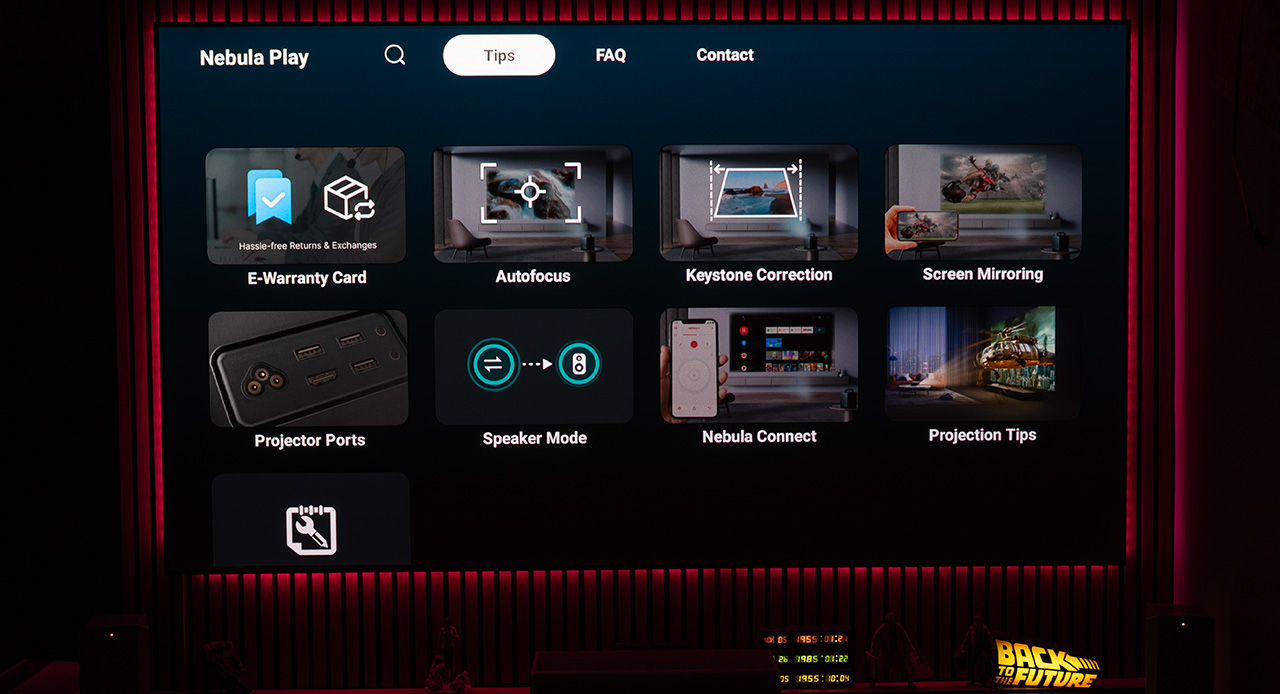
Nebula Play
This app is simply fantastic. Anker has created a dedicated section with tips and FAQs, where users can browse and find videos and guides for many of the projector’s features. For example, I actually discovered the NebulaCast app, which I presented earlier, while exploring Nebula Play!
Measurements
Let’s dive straight into the deep end. Time to get to what I believe is the most interesting part of this review, and probably for you as well.
The measurements of the Nebula X1.
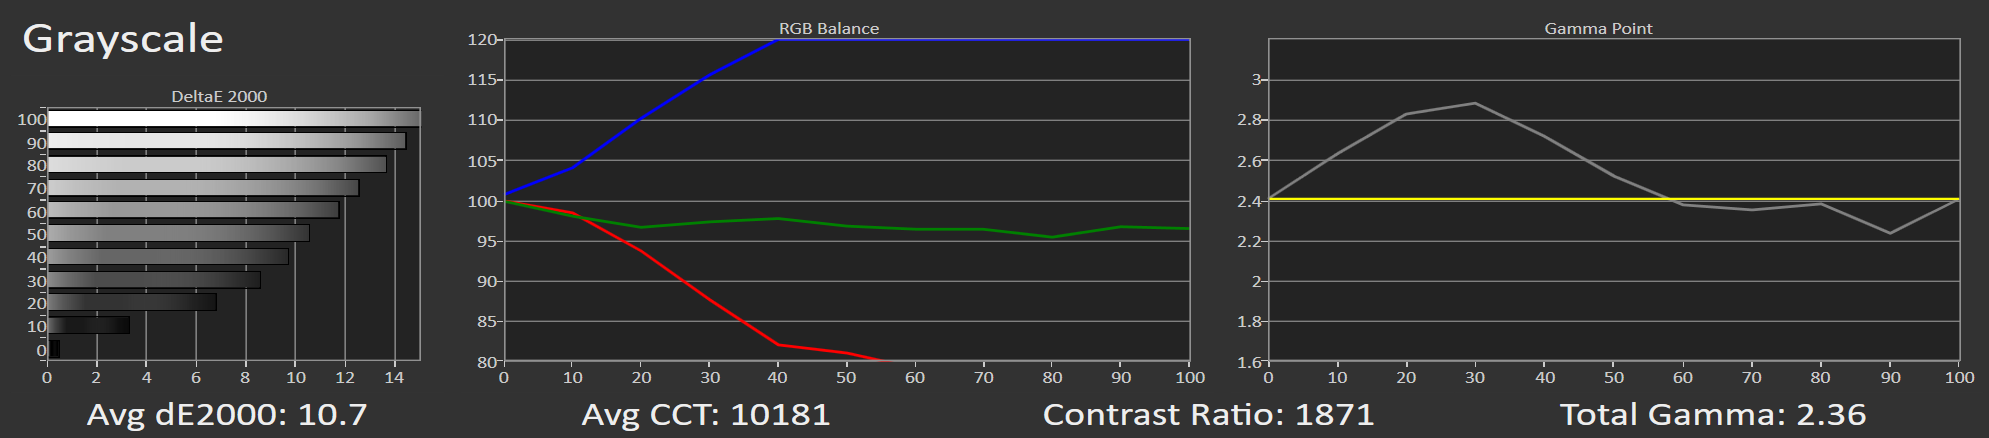
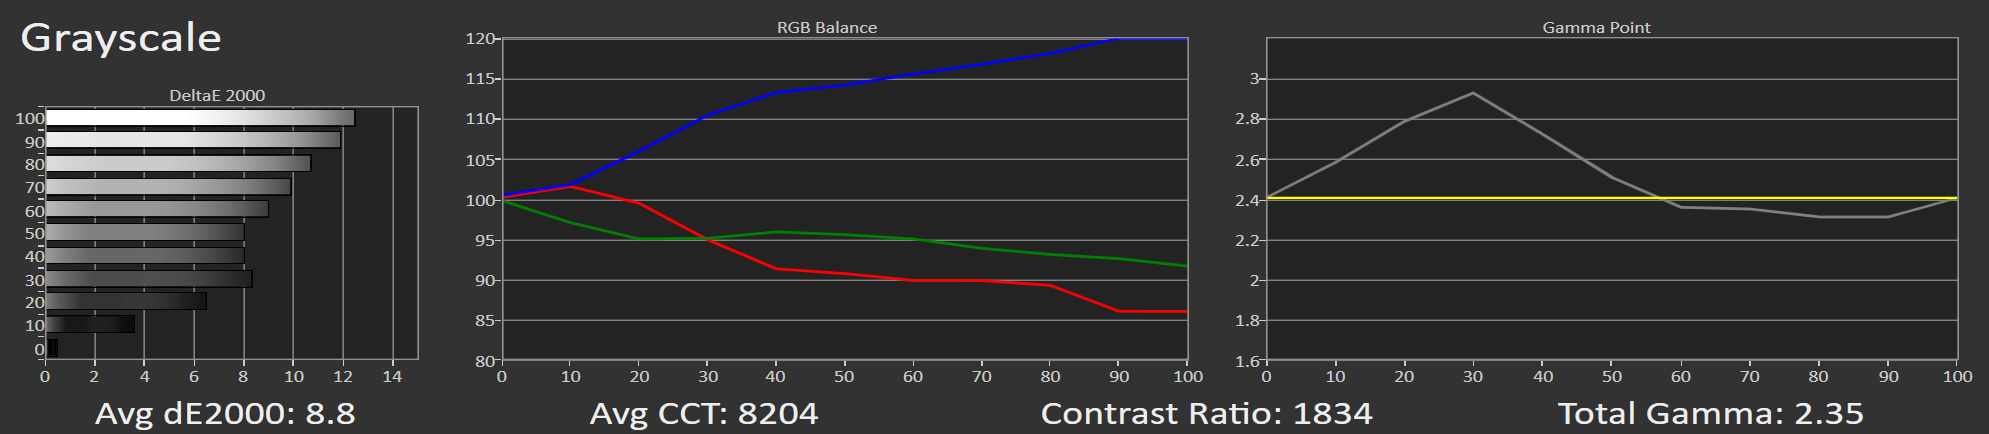
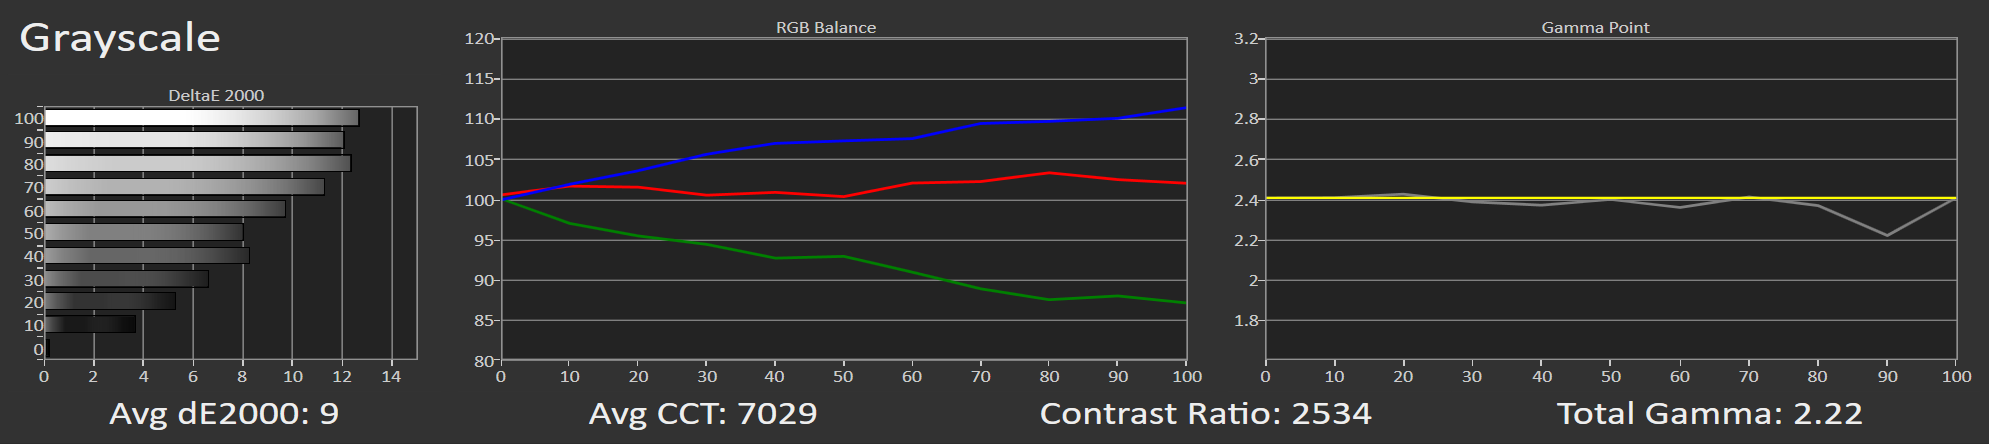
Grayscale & Gamma
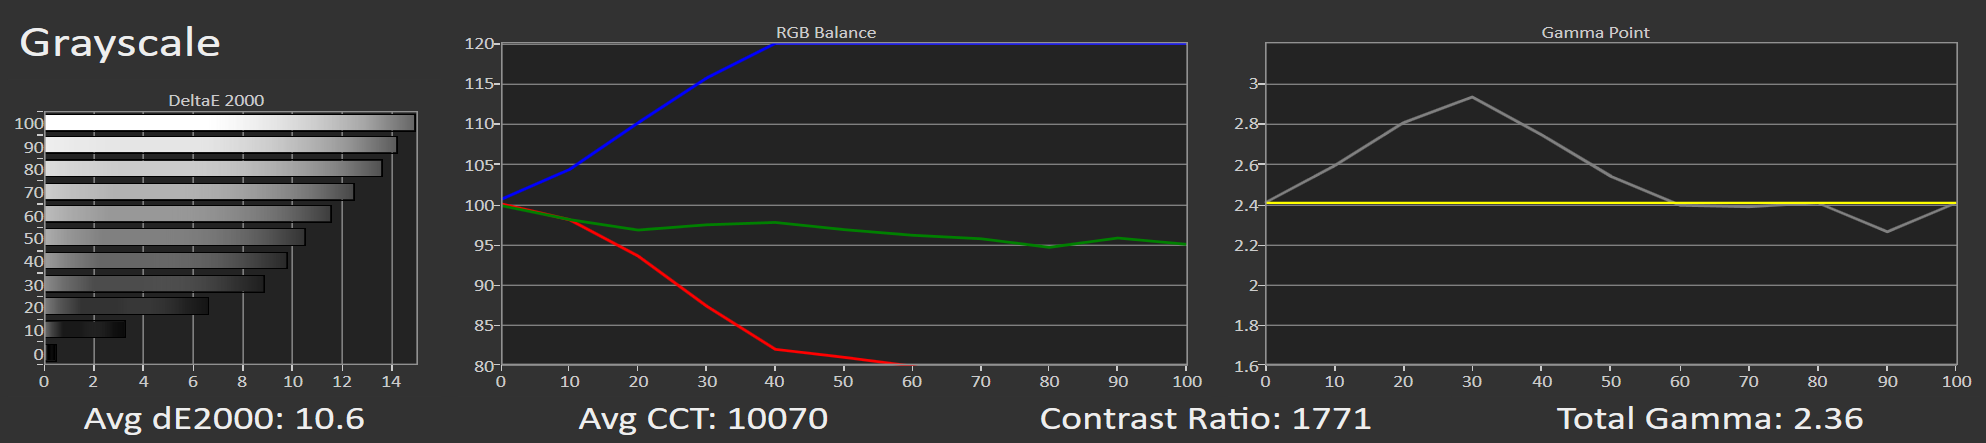
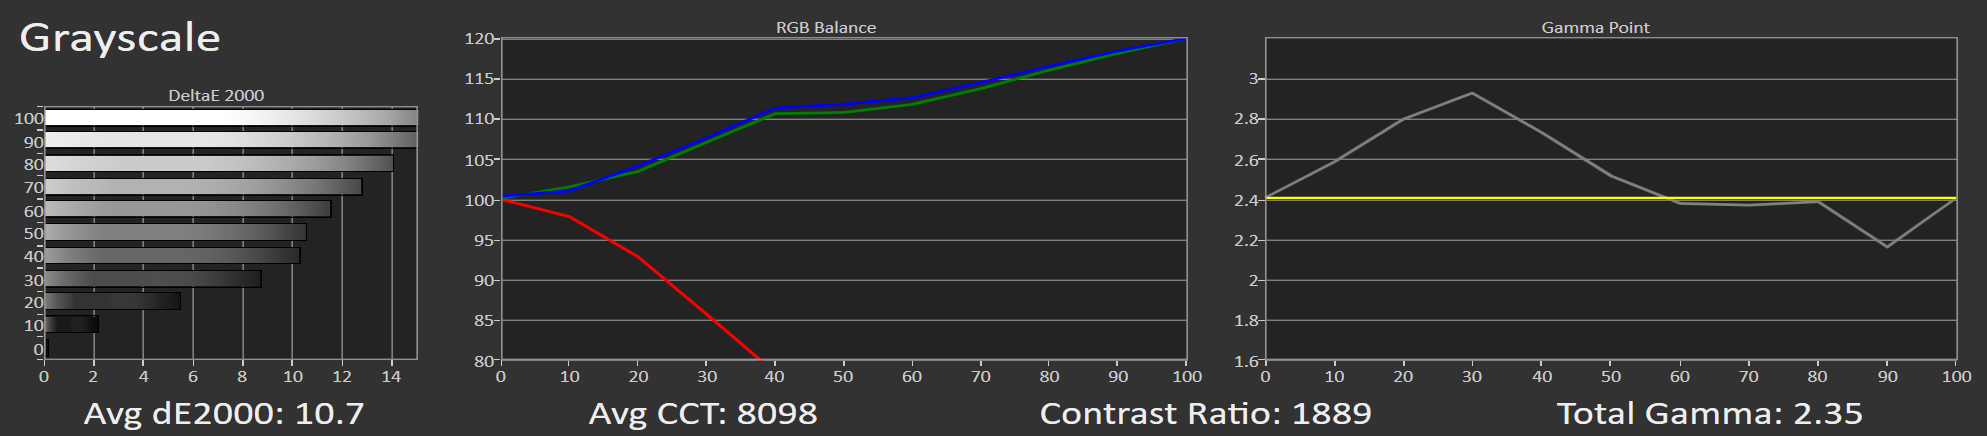
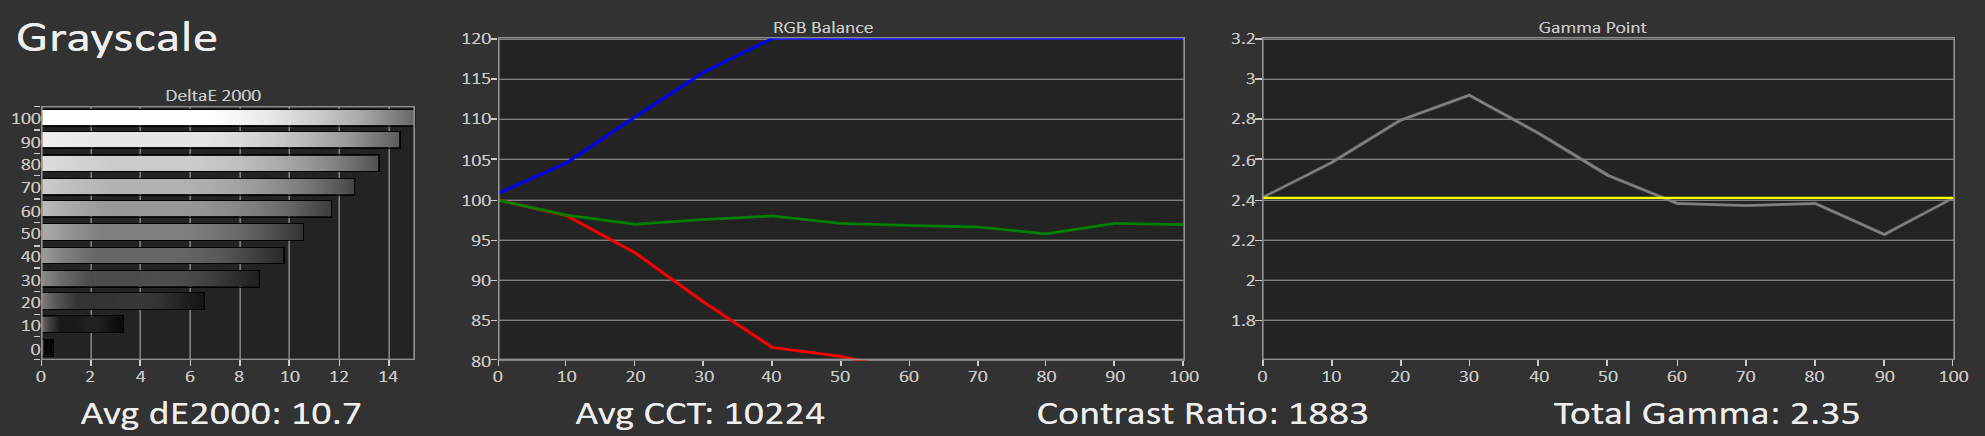
The Nebula X1 offers a wide range of picture modes. Personally, I find the sheer number of modes somewhat unnecessary, even confusing at times, and not particularly practical, but who am I to judge? Let’s take a look at the grayscale and gamma measurements for each mode and analyze the results.
Nebula Master
Standard Mode
Movie Mode

Sport Mode
Game Mode
Vivid Mode
ISF Night Mode
ISF Day Mode
Conference Mode
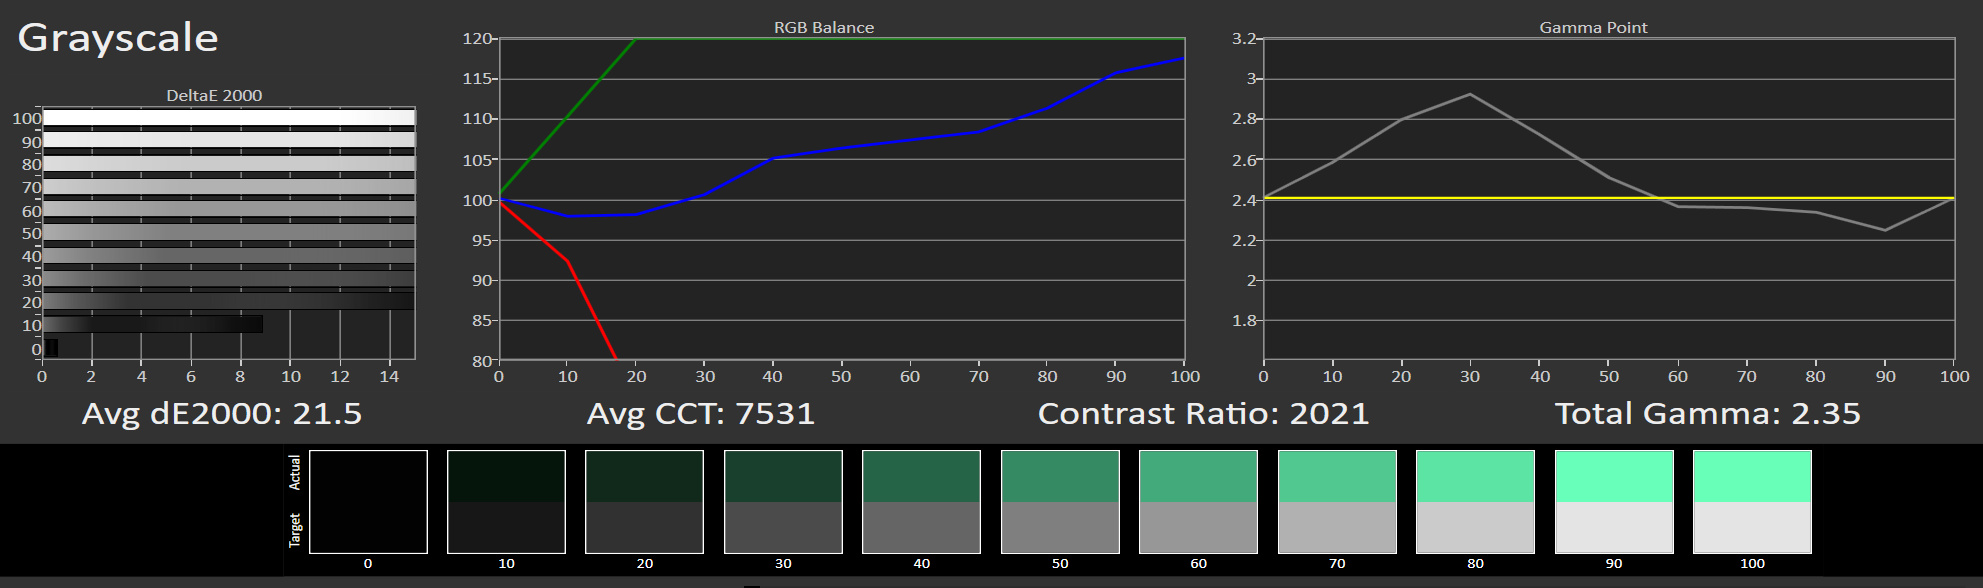
As a general conclusion from these measurements, it’s clear that the Nebula X1 is not well calibrated out of the box, despite what the company claims. In fact, I’d say quite the opposite. Almost all of the available modes exhibit a cold white balance, with color temperatures reaching up to 10,000 Kelvin in some cases.
There’s also one particular mode, the Conference Mode, whose existence I genuinely can’t justify. It gives the image such a strong green tint that it makes you wonder if the projector is broken or so.
Additionally, the gamma correction curve reveals a consistent pattern: a noticeable gamma spike in the low–mid range (20–30 IRE), as if some form of dynamic contrast is permanently enabled. That’s not actually the case, there’s no active dynamic contrast running in the background of course. This behavior appears to be part of the factory calibration, for reasons I can’t explain.
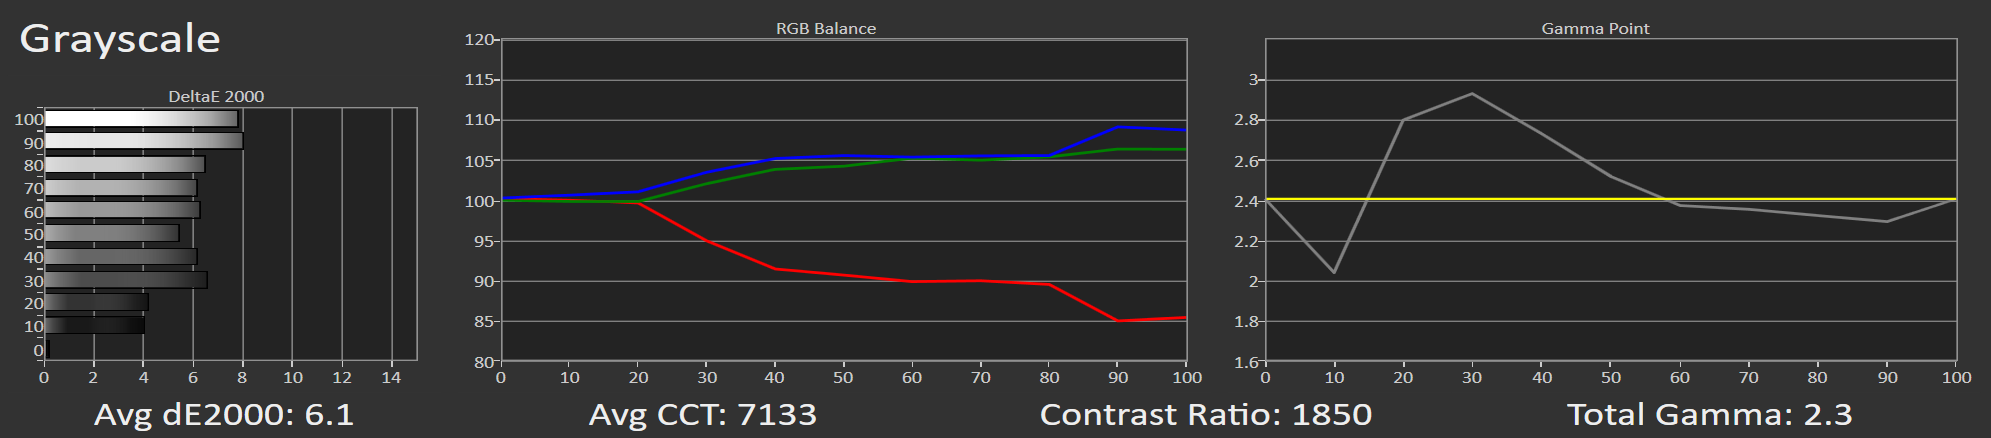
The most balanced mode, and the one I personally used for my testing, is Movie Mode. After quite a bit of tweaking and effort, I was finally able to achieve a very well-balanced result.
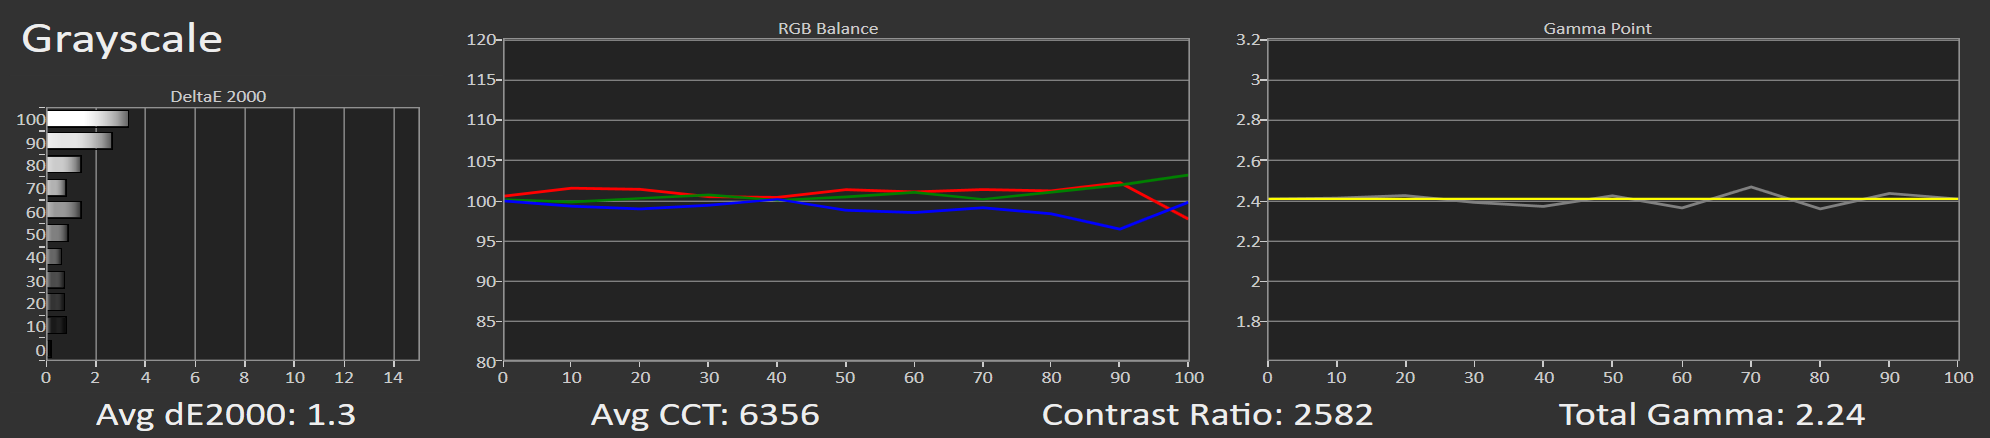
There is a trap here that every aspiring calibrator should be careful of when using the 11-point grayscale adjustment. If you overdo the corrections at specific IRE levels, your measurements might look good, but the actual image may show the opposite. You need to make small, careful changes and always check the final result using test patterns that help your eyes spot any problems. Consider this a friendly piece of advice.
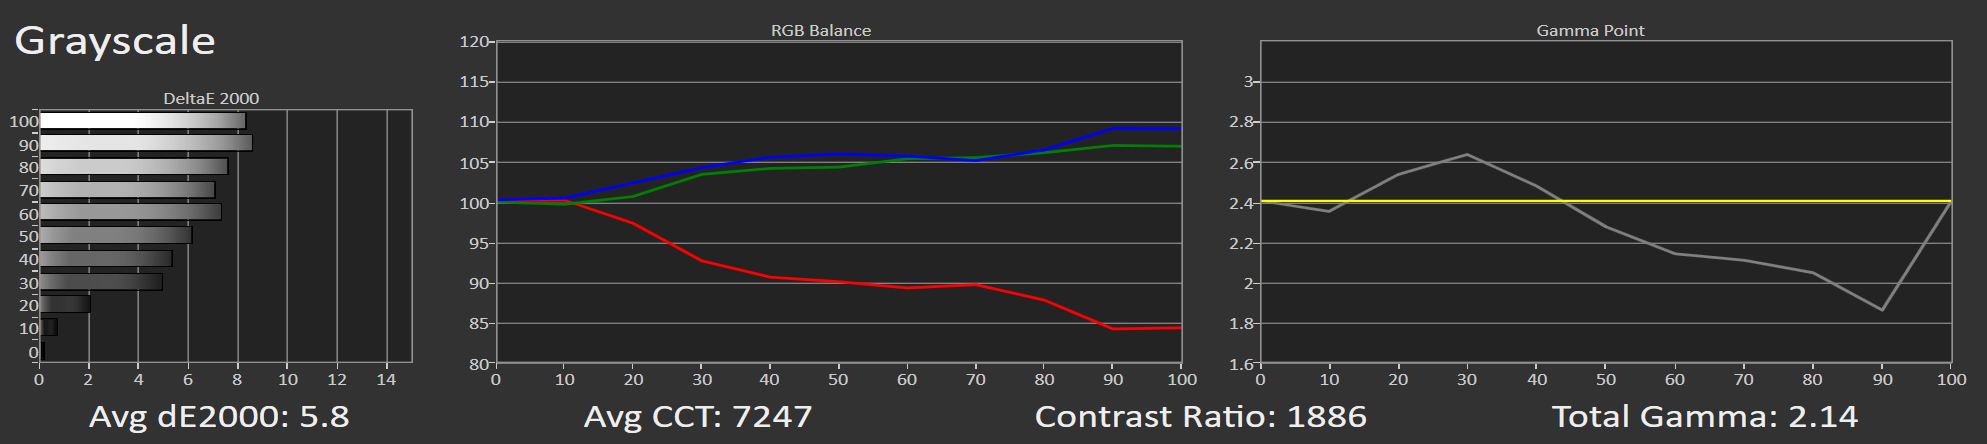
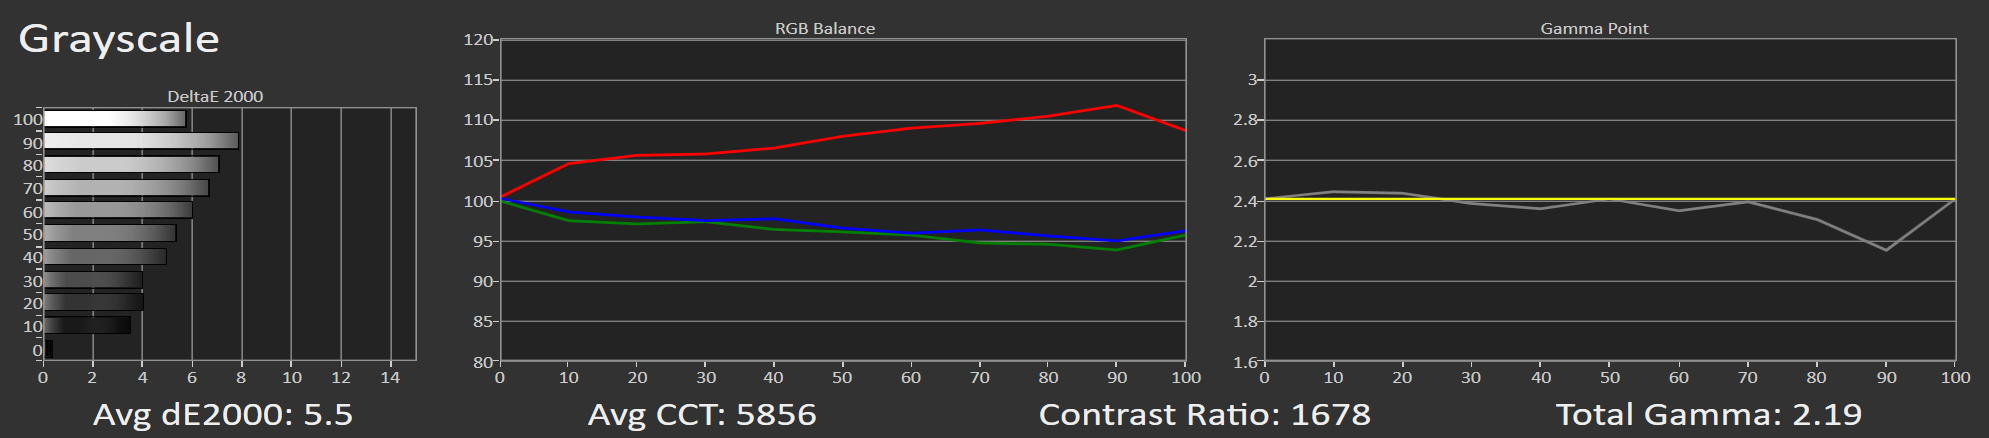
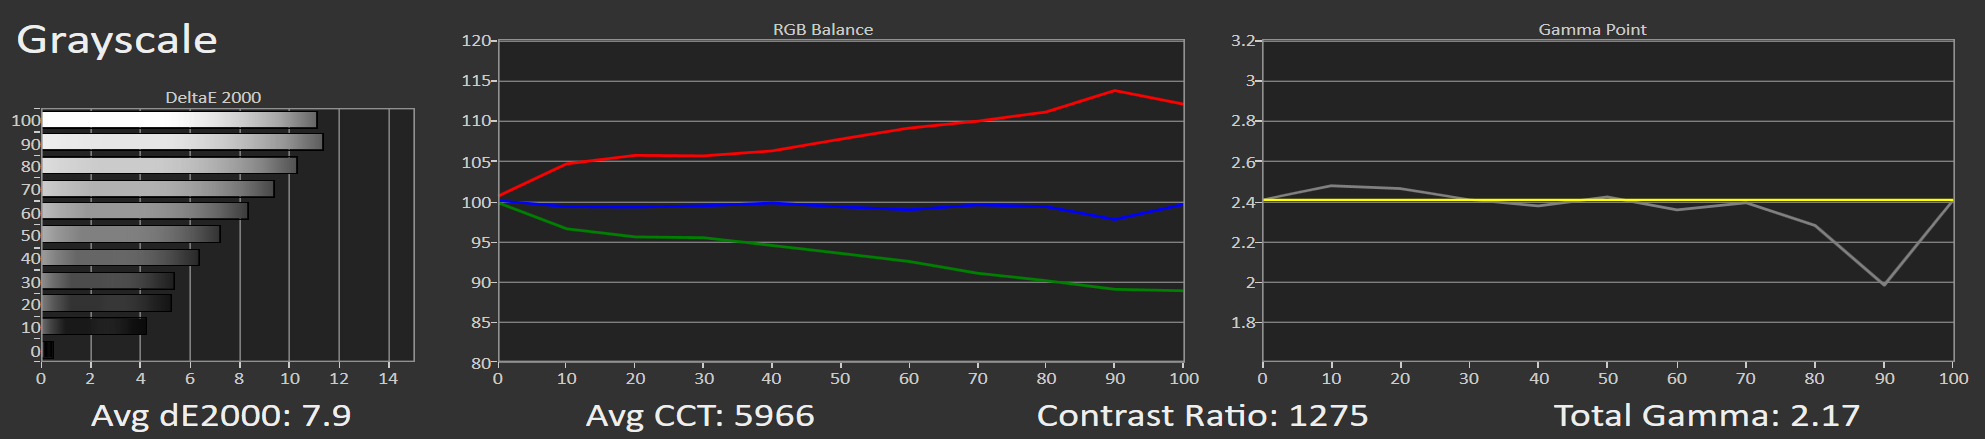
One thing I was curious about was how the laser power setting and the position of the manual iris affect grayscale accuracy and gamma performance. So, I used the calibrated Movie Mode measurements shown earlier as a reference and took new measurements while changing the laser and iris settings. Here are the results:
If we lower the laser power from 100 to 50, the image becomes warmer, but the gamma correction stays at a good level.
If we reduce the laser power even more down to its lowest setting (from 100 to 10), we see a similar behavior, but this time the blue returns to correct levels.
If we keep the laser power at 100, the same level used during calibration, and simply close the iris completely from the max to the min position, we see a change. Blue increases, green decreases slightly, and red remains stable. Gamma remains stable again.
In all cases, we can see that if we change the laser power or adjust the stepped iris position, the grayscale is affected, not by much, though. With just two or three clicks in the settings, we can bring it back to a good level. Gamma remains unaffected, which is very positive. In general, it’s best to decide from the beginning where you want the laser power and iris position to be and set the X1 accordingly.
I personally chose to stick with Movie Mode, with the laser power set at 40 and the iris fully closed at its minimum position. You will see later on why I made this choice.
Colors
The Nebula X1 allows the user to choose any color gamut, no matter what type of content is being played. Let’s start with the classic Rec.709, which is used in SDR 1080p content (HD).
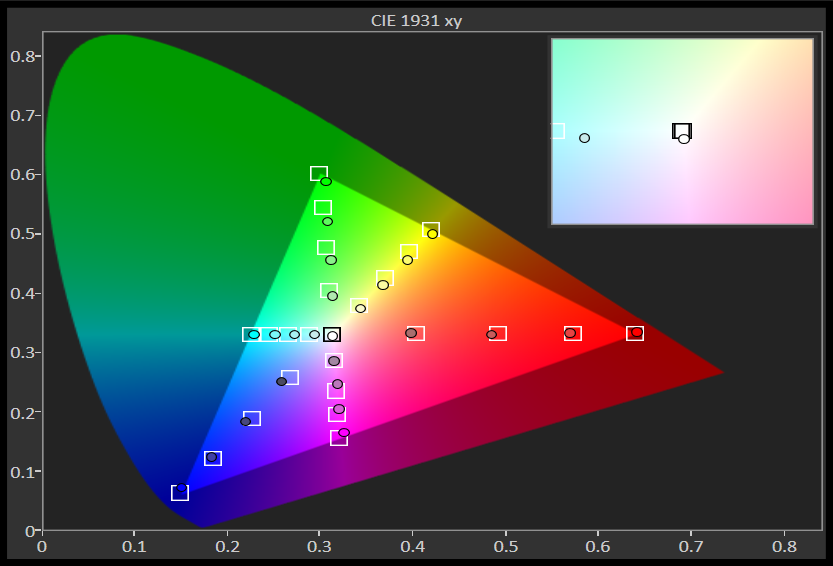
The Rec.709 color space is nearly perfect in terms of saturation and hue for both primary and secondary colors.
Next, we move to the DCI-P3 color space, which is supposed to be about 25% wider than Rec.709.
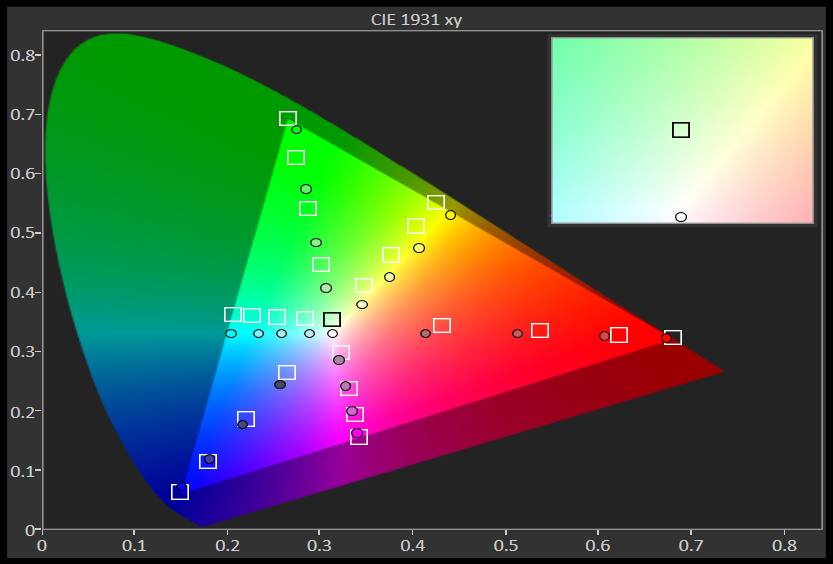
In this case too, the measurement is excellent, especially considering that we’re talking about factory calibration here.
Finally, we have the measurement of the color space that matters most to fans of 4K HDR and Dolby Vision content, the expanded BT.2020 color space.
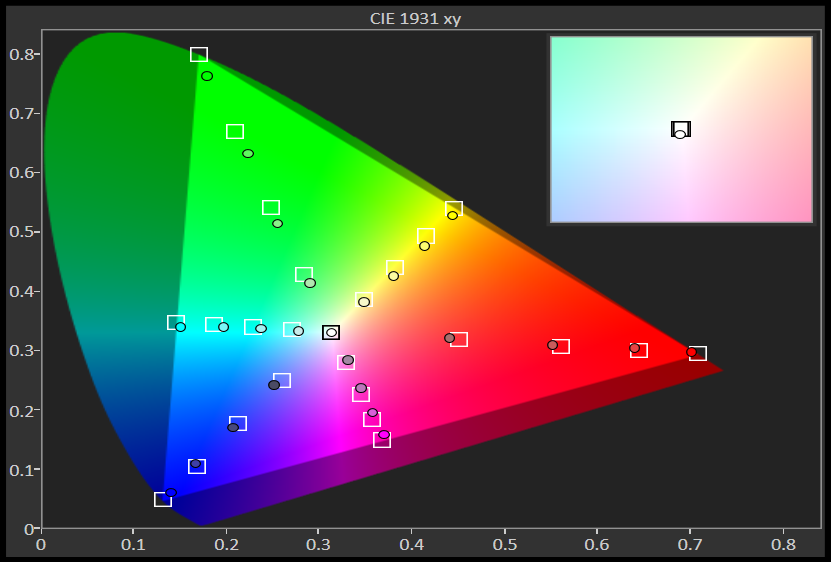
With BT.2020, the X1 also shows excellent performance, with very good saturation, hue, and brightness levels for both primary and secondary colors.
As for the BT.2020 coverage that Anker claims to be 110%, my measurements showed a coverage of 91.5%, which is more than satisfactory in my opinion.
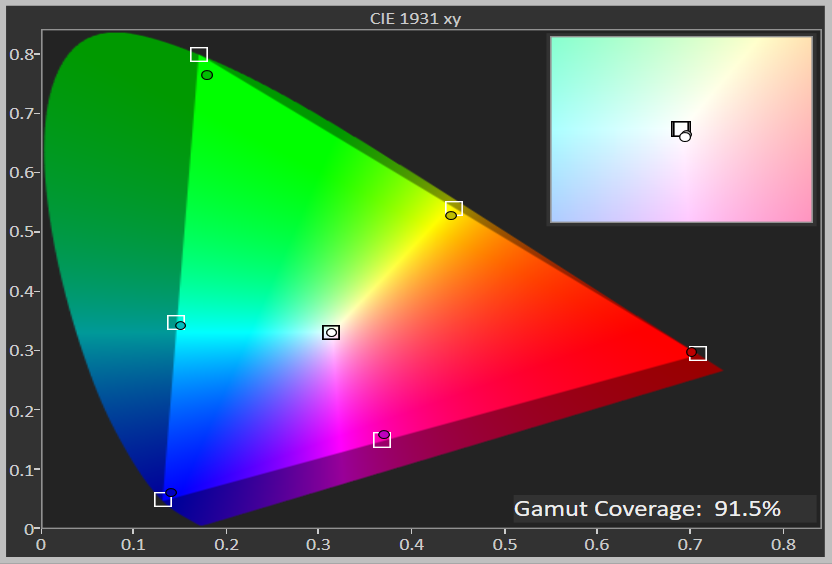
As a general conclusion, the Nebula X1 comes very well color-calibrated from the factory. However, when it comes to the white balance of its picture modes, some serious adjustment is needed in order for it to deliver its best performance.
Now let’s move on to what may be the most interesting measurements I took on the Nebula X1.
Brightness and Contrast
I conducted the most extensive brightness and contrast measurements I’ve ever done on a projector with the Nebula X1. To be honest, I did it more to satisfy my own curiosity about how this innovative stepped iris behaves, and less with the intention of informing you.
For all these measurements, I set up a true lab-like environment. In a dark room, everything that could affect the measurements was covered with black fabric. The projector was positioned facing black velvet instead of a traditional screen, and I created a precisely one-square-meter frame. This way, whatever my luxmeter recorded in lux when pointed at the projector lens could be instantly translated into lumens (Lumens = Lux × Surface Area) . For every brightness measurement shown, five different readings were taken, one at the center and one in each corner of the frame, so the values you’ll see are ANSI lumens, not just plain lumens.
The contrast measurements were performed in the same “lab” environment, with the luxmeters placed exactly 23 cm from the lens. Every measurement you’ll see was confirmed with a second reading using a different luxmeter.
Let’s take a look.
table.projector-table {
width: 100%;
border-collapse: collapse;
font-family: sans-serif;
font-size: 15px;
margin-bottom: 1.5em;
}
table.projector-table thead {
background-color: #f2f2f2;
}
table.projector-table th, table.projector-table td {
border: 1px solid #ddd;
padding: 8px 10px;
text-align: center;
}
table.projector-table th {
background-color: #e0e0e0;
font-weight: bold;
}
table.projector-table tr:nth-child(even) {
background-color: #fafafa;
}
Measurements with Lens in Tele Position (1.5 Throw Ratio)
Laser PowerIrisBrightness (ANSI lm)Contrast Ratio100Max28352.209:1100High26703.133:1100Medium24424.071:1100Low21205.140:1100Minimum15356.432:150Max19802.323:150High18603.149:150Medium17104.055:150Low14805.302:150Minimum11406.370:110Max8202.378:110High7603.074:110Medium7003.935:110Low6105.119:110Minimum4276.170:1
Measurements with Lens in Wide Position (0.9 Throw Ratio)
Laser PowerIrisBrightness (ANSI lm)Contrast Ratio100Max30741.612:1100High29202.232:1100Medium27702.844:1100Low25303.785:1100Minimum18734.764:150Max21151.611:150High20332.239:150Medium19302.840:150Low17563.781:150Minimum13734.656:110Max8812.378:110High8323.074:110Medium7943.935:110Low7295.119:110Minimum5216.170:1
As you may have already noticed, the lens’s zoom position (ranging from 0.9 to 1.5) affects both brightness and contrast.
The loss in brightness as we progressively close the stepped iris is completely disproportionate to the significant increase it brings to contrast. Take a look at the two charts I’ve prepared to see exactly how and by how much contrast increases relative to the brightness loss caused by closing the iris. We’ll also examine this behavior with the lens set to both the wide position (0.9 throw ratio) and the tele position (1.5 throw ratio).
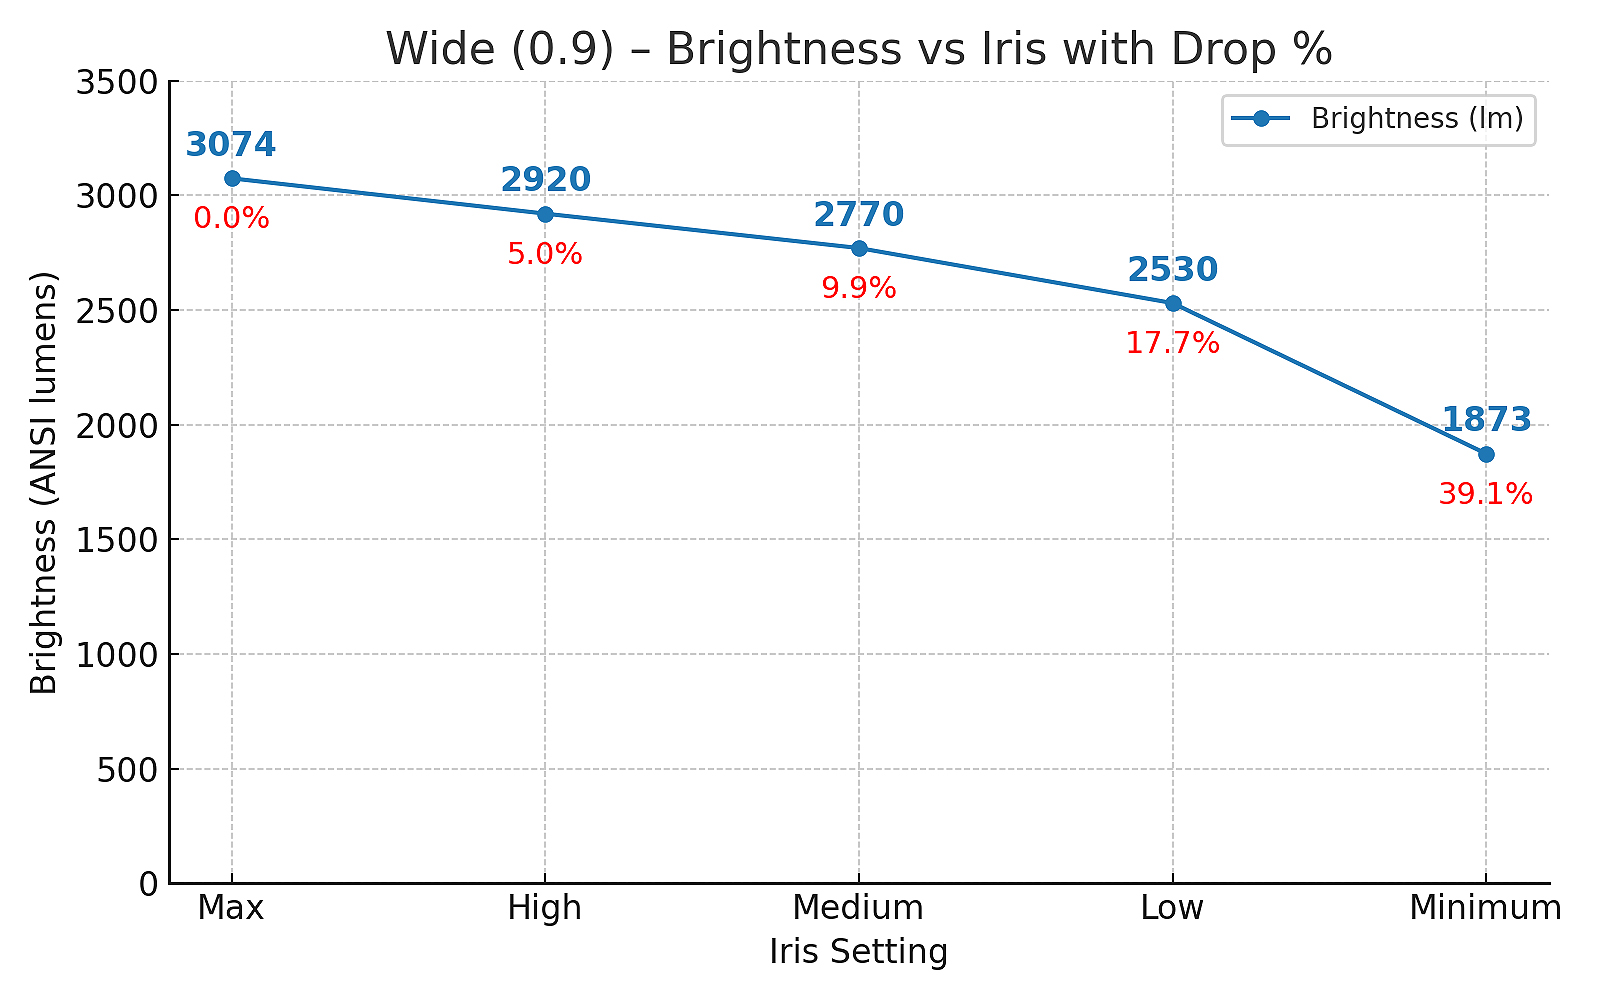
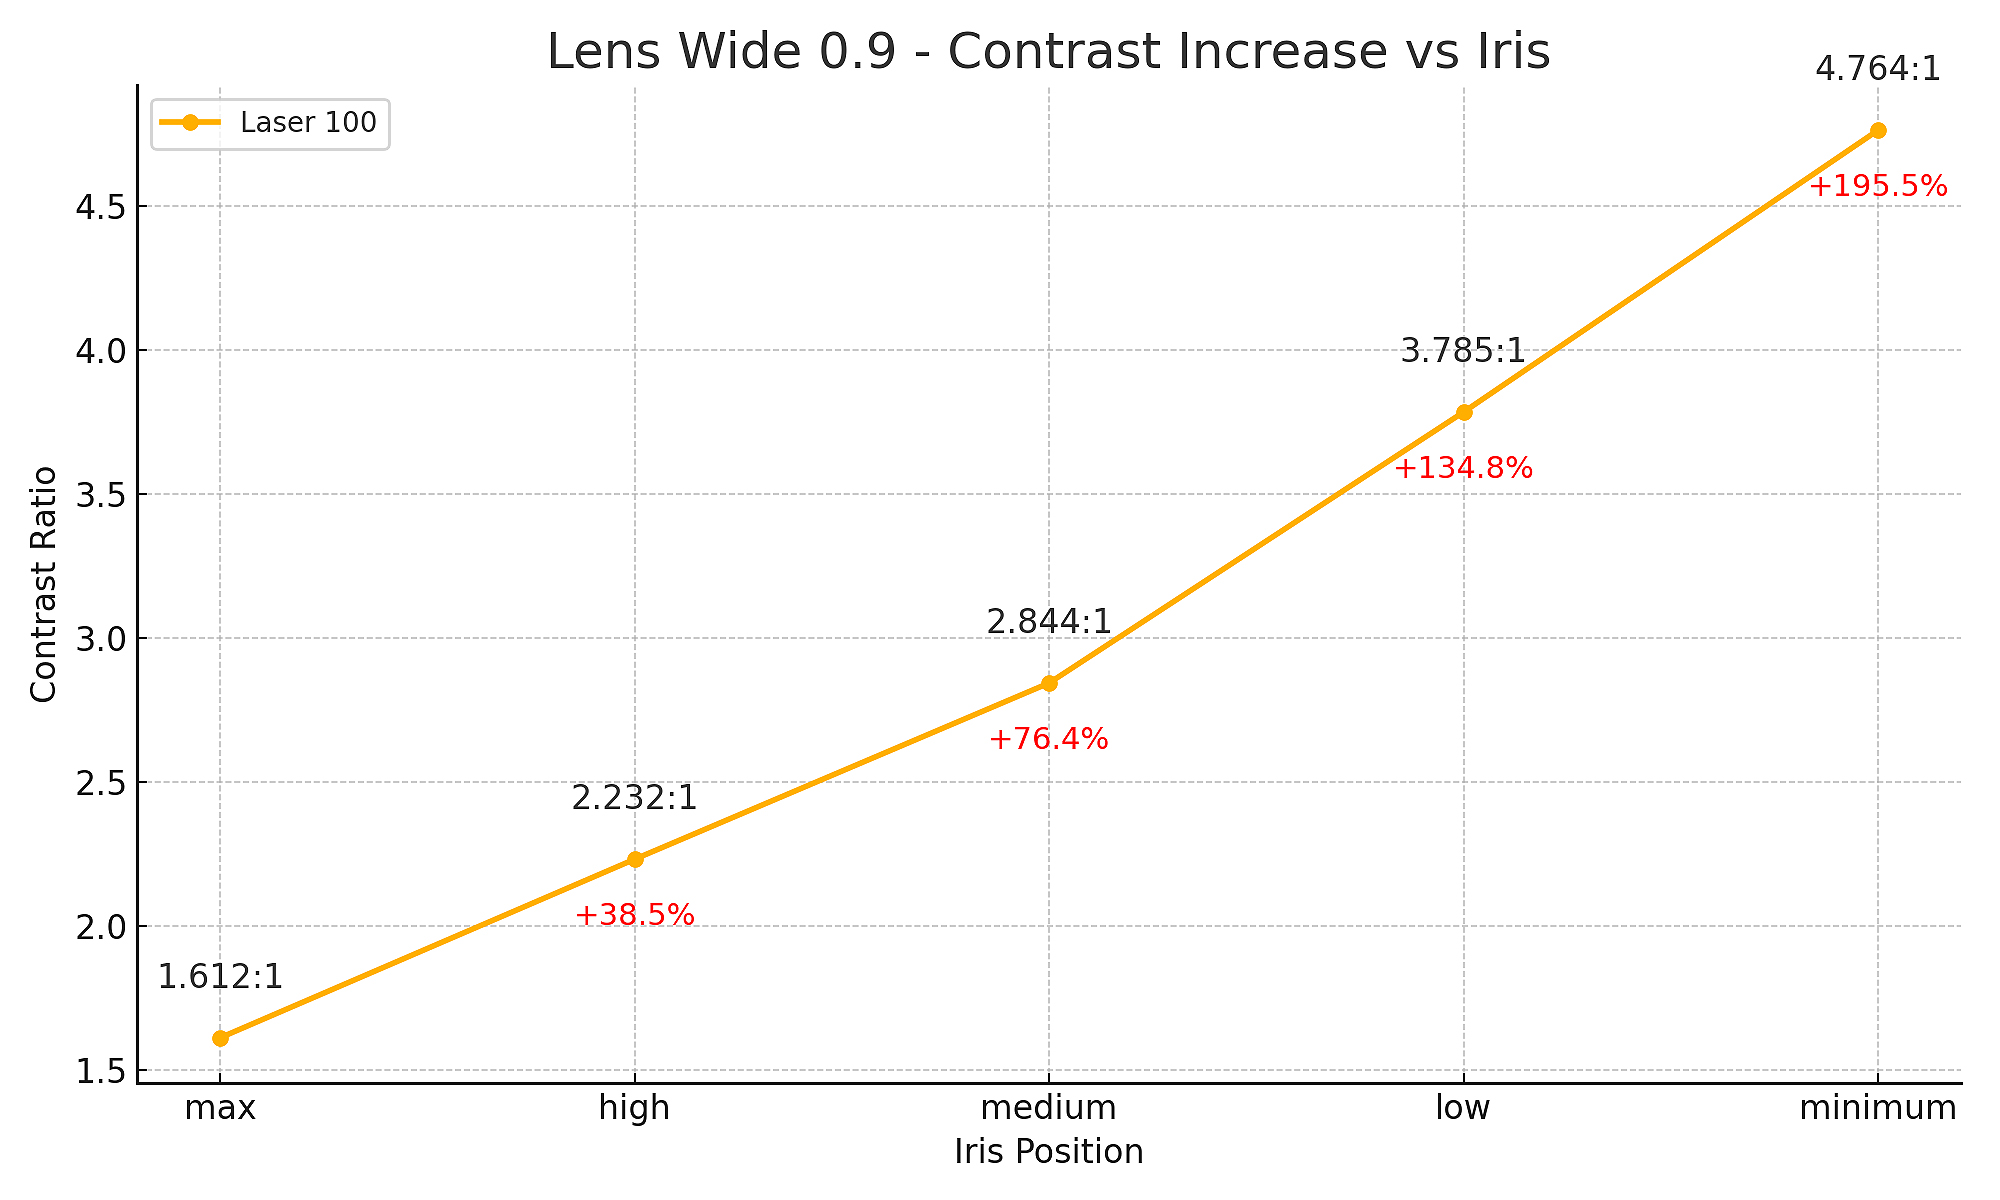
What we observe when analyzing these charts is almost unbelievable. Starting from the medium iris position, we already see a remarkable ratio between light loss and contrast gain. For example, at the medium iris setting, we lose just 9.9% in brightness, yet we gain a 76.4% increase in native on/off contrast, jumping from 1,612:1 to an impressive 2,844:1.
At the low iris setting, we may be looking at the most “efficient” position overall: with just a 17.7% brightness drop (from 3,074 to 2,530 ANSI lumens), we get a stunning 134.8% boost in native on/off contrast, skyrocketing from 1,612:1 to 3,785:1. For those who value deep black levels and high contrast, the minimum iris setting trades 39.1% of brightness for an almost 200% increase in native contrast!
Even more impressive results occur when using the long throw position of the lens. In that configuration, we achieve not only the highest native contrast I’ve ever measured on a DLP projector, but quite possibly the highest ever achieved on any DLP projector, in any category.
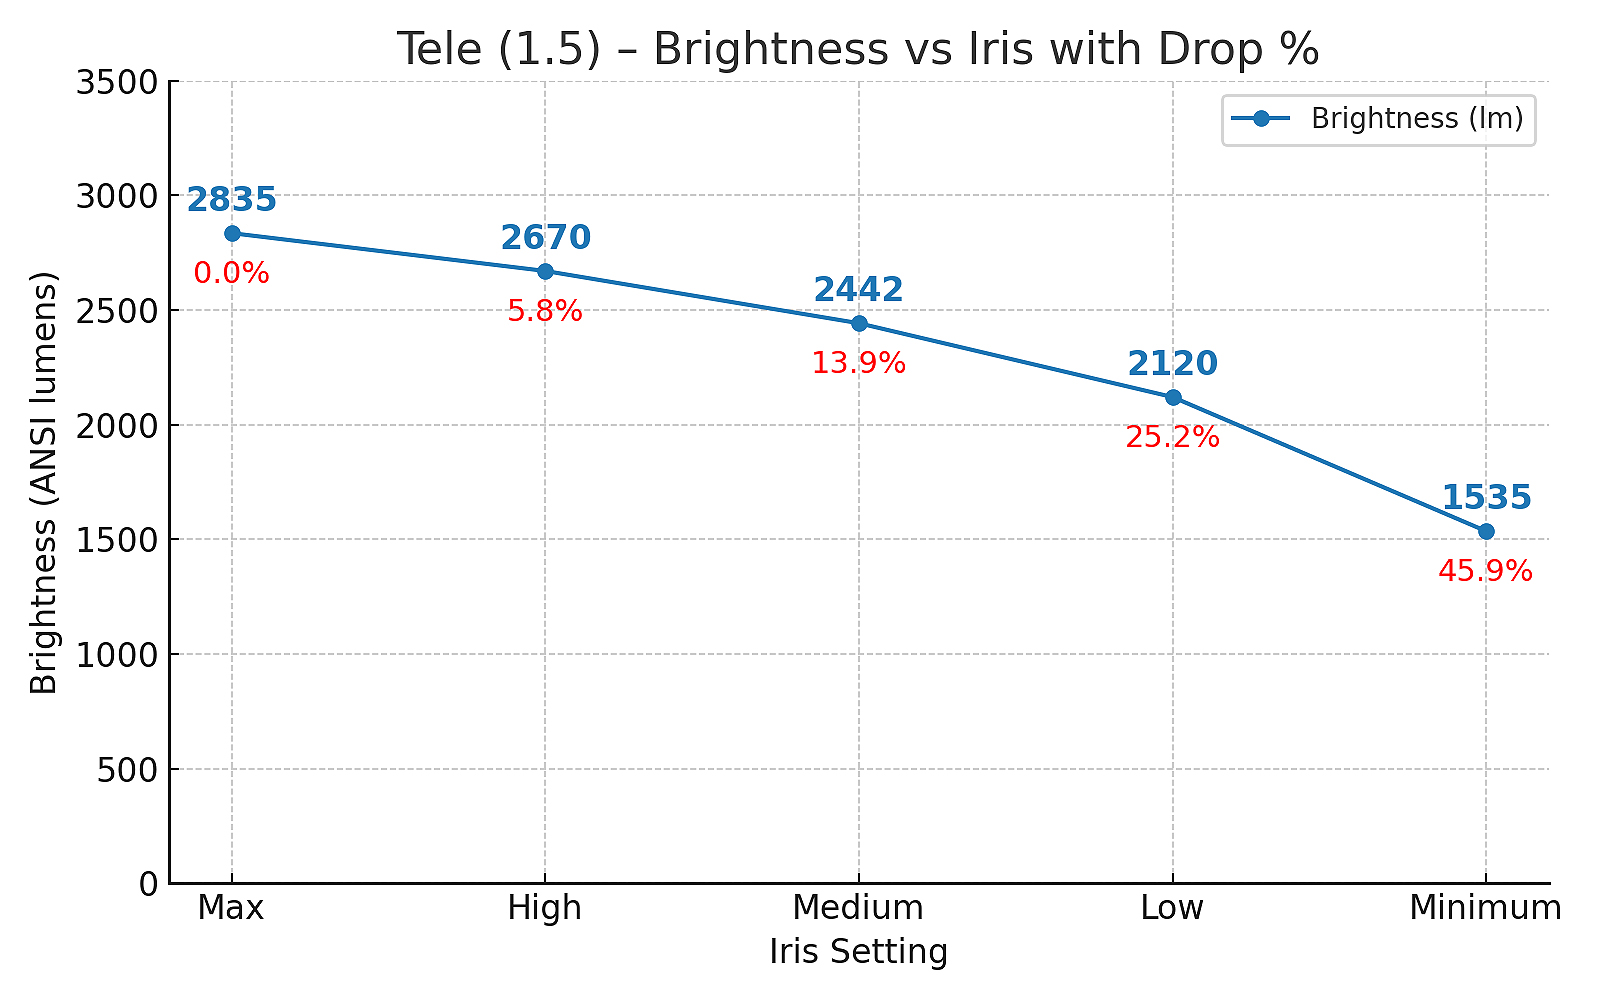

Ok, DLP fans, can you believe there’s now a DLP laser projector on the market that delivers 1,535 calibrated ANSI lumens with a native on/off contrast of 6,432:1? Believe it. It’s real.
Equally impressive is the projector’s capability of achieving 3074 ( 2835 ANSI lumens in tele lens position) clean and true ANSI lumens with the iris fully open, in Movie mode (fully calibrated) and not merely in an overly bright factory preset mode with compromised color accuracy. For those of us deeply passionate about video projection and long-time fans of DLP technology, I can confidently say: we are experiencing extraordinary times my friends.
A native on/off contrast of 6,432:1 on a DLP projector is not just an all-time record, it’s something none of us who have followed this technology over the years could have even dreamed of. Honestly, I have no idea how Anker’s engineers pulled this off but from me, a huge congratulations and an even bigger thank you!
Performance
Let me start by saying that when it comes to installation, setting up the Nebula X1 in front of your projection surface is incredibly simple and easy.
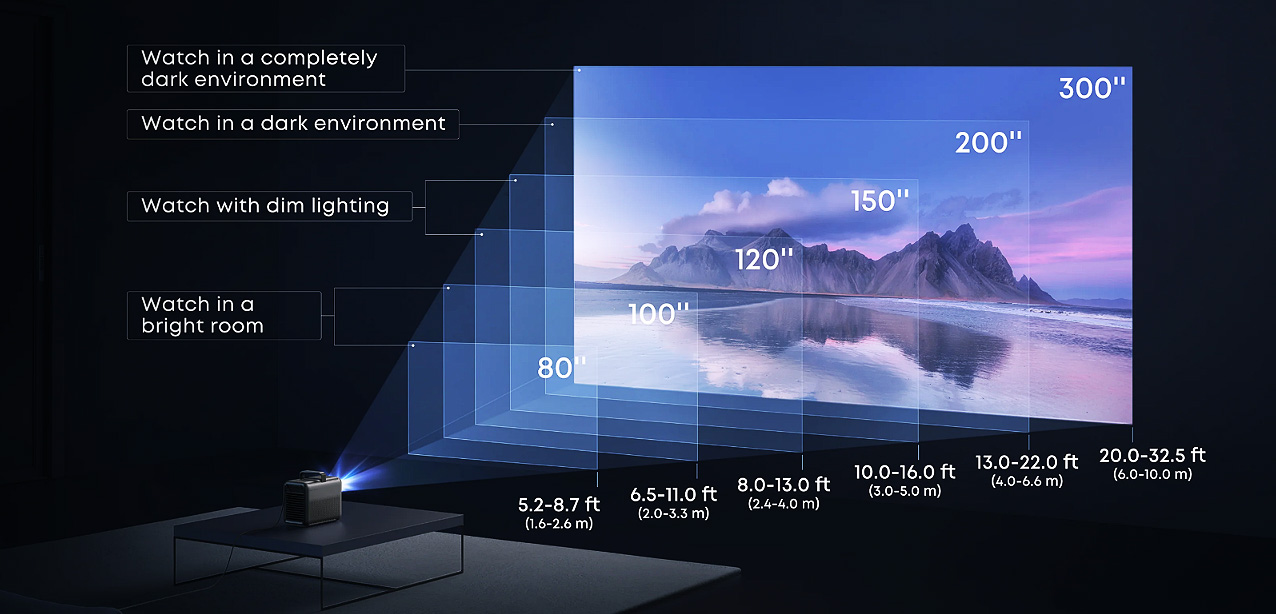
It features a zoom lens with a throw ratio from 0.9 to 1.5, which means you can create a 100 inch image with the projector placed anywhere between 2.0 and 3.3 meters from the screen. Of course, you can also use the digital zoom if you want to move the X1 even closer or further back.
In the photo below, you can get a rough idea of the required distances for screen sizes up to 300 inches.
I will focus on the points I consider most important, so you can draw a clear conclusion about the overall performance of the Nebula X1.
So, let’s begin..
Laser Speckle
Laser speckle is a kind of visual noise or pattern you often see on laser projectors. It looks like small moving dots or grainy sparkles across the image. This happens because laser light is very narrow and focused. When it hits a surface (like a screen), the light waves bounce around and mix, creating tiny bright and dark spots.
Laser speckle is usually more visible on bright or white areas of the image, especially during slow-moving or still scenes. It’s not always easy to see, but some people notice it more than others.
Anker claims that the new RGB 4K LaserForge 2.0 laser engine, featuring a groundbreaking dual-pass speckle diffuser wheel, dramatically reduces the laser speckle effect.
However, in practice, this is not the case. Like all pure RGB laser projectors, the Nebula X1 still suffers from laser speckle. Pay close attention to the right side of the image, where there is a solid blue area, you will clearly notice the laser speckle effect.

It is even more noticeable in red, as shown in the photo below. This particular image was taken with a one-second exposure in order to capture all the visible speckle dots that appear throughout that entire time frame.

If I had to rate the laser speckle effect of the Nebula X1 on a scale from 0 to 10 (with 0 being no speckle at all and 10 being the most intense), compared to other projectors I have come across in recent months, I would rate it as follows:
.speckle-table {
width: 100%;
border-collapse: collapse;
font-family: sans-serif;
margin: 1em 0;
}
.speckle-table th, .speckle-table td {
border: 1px solid #ccc;
padding: 0.6em;
text-align: left;
}
.speckle-table th {
background-color: #f2f2f2;
}
.speckle-low {
background-color: #d4edda; /* light green */
color: #155724;
font-weight: bold;
}
.speckle-medium {
background-color: #fff3cd; /* light orange */
color: #856404;
font-weight: bold;
}
.speckle-high {
background-color: #f8d7da; /* light red */
color: #721c24;
font-weight: bold;
}
ProjectorLaser Speckle (0–10)Nexigo Aurora Pro MKII2XGIMI Horizon S MAX3JVC DLA-NZ5003Formovie Edge4Valerion VisionMaster Pro 25Nebula X16JMGO N1S Ultimate7
Laser speckle can be dramatically reduced by using the right type of screen. Also, the effect is distracting for some people, while for others it is barely noticeable. For example, in my case, not only does it not bother me, I do not even notice it at all while watching a movie. Keep that in mind.
Color Fringing
What is color fringing on RGB laser projectors?
Color fringing is a kind of visual issue you sometimes see on RGB laser projectors. It looks like a thin red, green, or blue outline (or shadow) around bright objects — especially on white areas or text.
This happens because RGB laser projectors use three separate laser beams (red, green, and blue) to create the image. If these colors are not perfectly lined up (aligned), you may see a second, faint image in one color next to the real one.
That’s what we call color fringing.
This problem does not exist on most single-laser projectors, because they use one light source (usually a blue laser) with a color wheel or phosphor to create all the colors. So there’s no misalignment between red, green, and blue.
The amount of color fringing present in an RGB laser projector clearly depends on the following factors:
- The precision and build quality of the laser optical engine
- The quality of the lens, especially in terms of color aberration and light redirection control
- And finally, the technology used in the laser light engine itself
The Nebula X1 seems to perform exceptionally well in all three areas, as color fringing is nearly imperceptible.
In the photo below, I have artificially removed sharpness in Photoshop to make the effect as visible as possible. What you see here is extremely minor for an RGB laser projector, and most importantly, completely invisible during actual viewing.

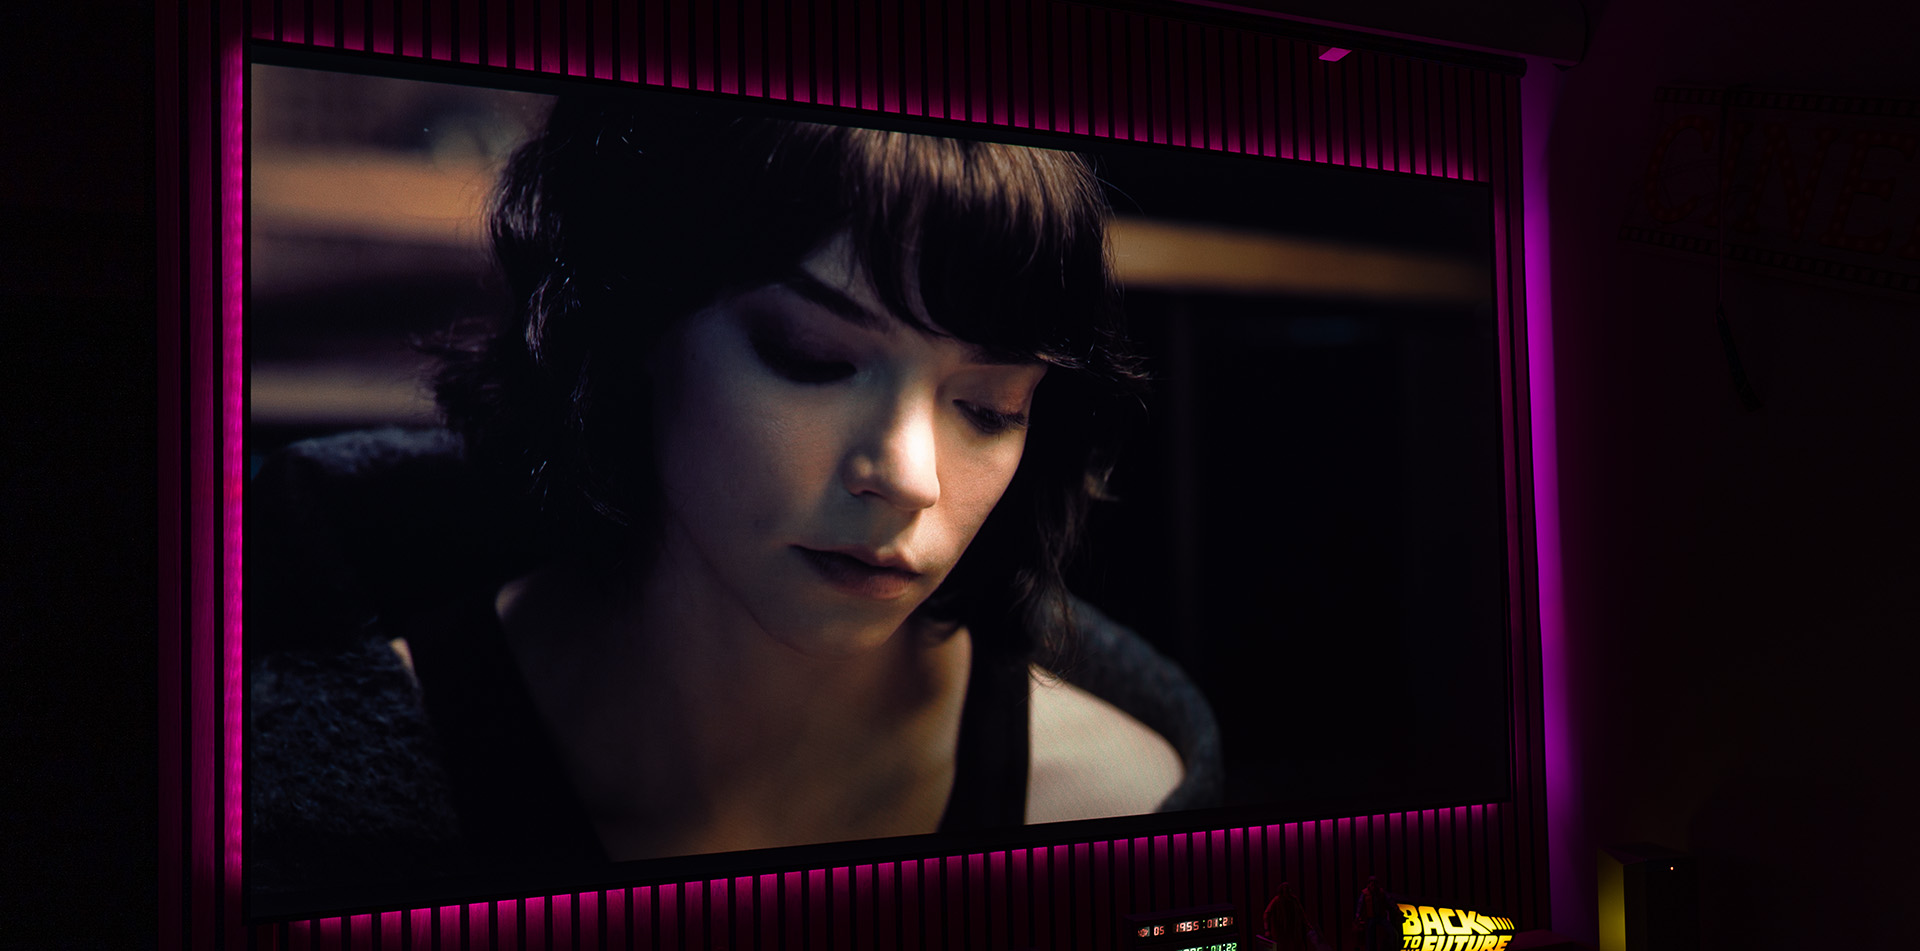
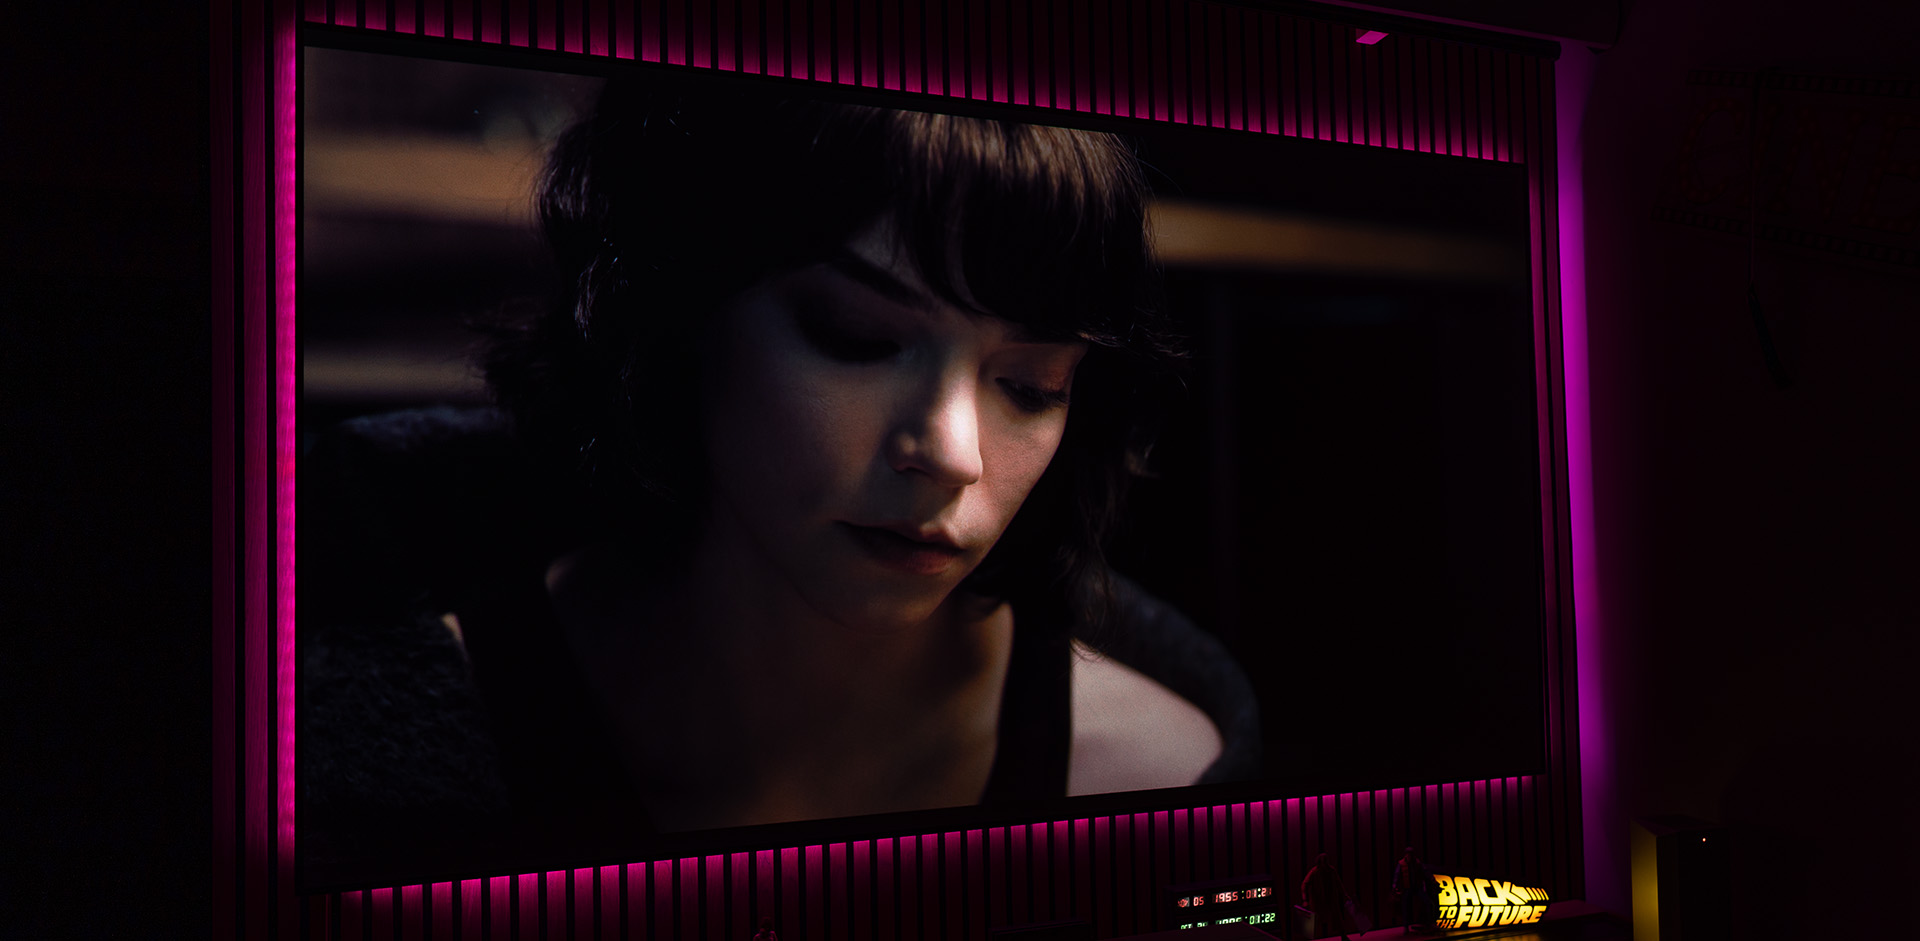
Contrast
Based on the measurements I took, which you also saw above, I could not skip dedicating a specific paragraph to explain how the Nebula X1 performs in dark scenes, and to share the impressions it left me in this area.
Photographing the Nebula X1 with the iris fully open, and then again with the iris fully closed, and managing to capture the contrast increase through the lens of my camera, was one of the most difficult photography challenges I have faced in recent years. Still, I gave it a try, and now I will show you the results.
Here is the Nebula X1 with the iris fully open.
And here is the exact same scene, this time with the iris set to minimum (fully closed).
And here is another attempt with a different scene. This is the shot with the iris set to max (fully open).
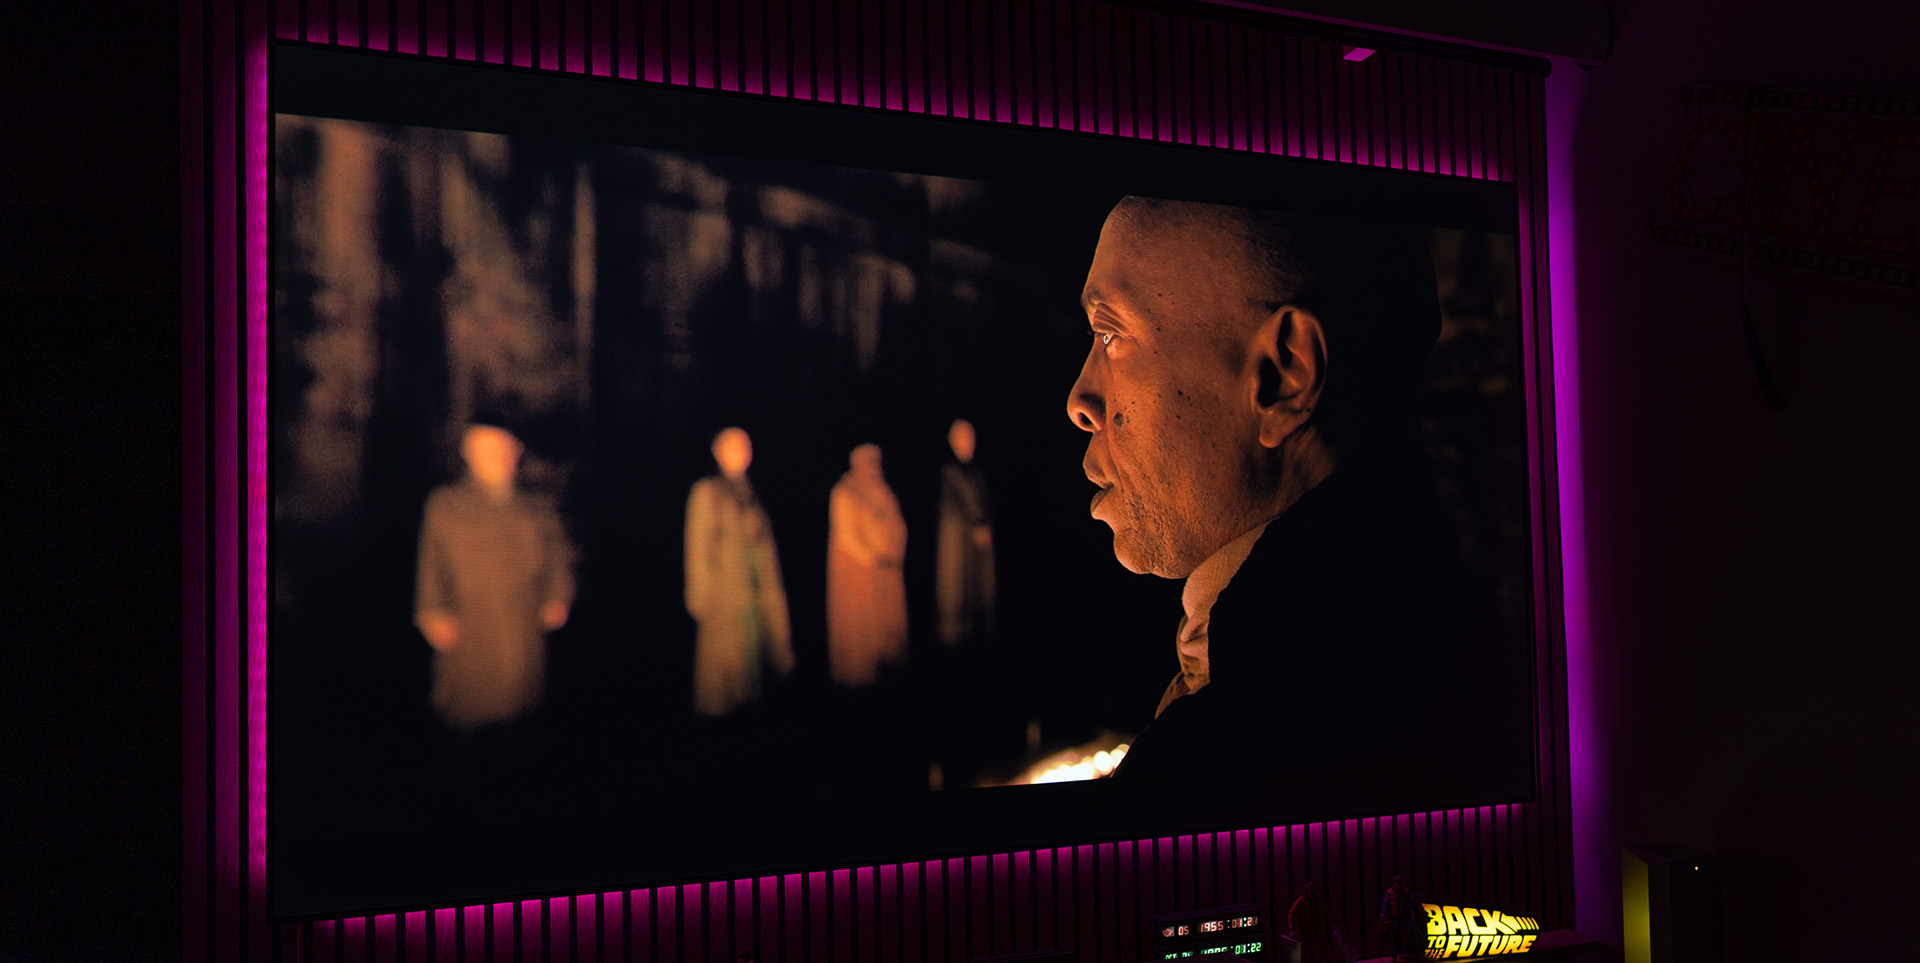
And here is the same frame, this time with the X1’s iris set to minimum (fully closed).
The difference that this stepped iris makes in improving contrast is something my camera can barely capture. The increase in contrast and the improvement in black level is extreme. You are impressed from the very first second, because what the iris of the Nebula X1 achieves is truly unique.
With minimal (comparatively) loss of brightness, the contrast boost is dramatic, and the image instantly gains a 3D texture that strongly resembles the look of an OLED TV.
If you combine this contrast improvement with all the other strengths of a DLP projector, such as excellent ANSI contrast, you can already understand that we are dealing with something very special here. And if we add to the equation the fact that this improved black level and contrast is stable, it does not come from some dynamic algorithm that adjusts laser power or gamma in real time, then the end result is truly exceptional.
Subtitles maintain a consistent brightness. There are no scenes that confuse the projector. Overall, it is a stable, native performance. You are essentially watching an image with over 5,000 to 1 real native contrast.
– There is a dynamic contrast feature that Anker claims pushes the contrast ratio up to 56,000:1. Even though I enabled it in the menu, I never actually saw it working, not once. I don’t know if it’s something that will be activated with a future firmware update, but for now, I’ll just pretend I never read that spec –
And I can already hear your question: “How does it compare to the Valerion Nikos?”
Valerion is by far my favorite projector, and maybe I am not being completely objective here. No, I will be. The Nebula X1 is simply outstanding…but that “damned” EBL algorithm on the Valerion… what can I say, it delivers astonishing results.
In completely dark scenes, the Valerion appears to deliver even deeper black levels, along with brighter highlights within the scene. As I said in the Valerion review, the projector’s ability to adjust laser power on the fly, while simultaneously increasing highlight intensity through gamma manipulation, gives the Valerion incredible contrast depth.
On the other hand, the superior native contrast of the Nebula X1 is always there. It holds up in every frame, even when subtitles are present, even when there are bright elements on screen, even when the frame is not entirely dark but contains both shadow and bright spots.
The two projectors are close, very close, in terms of contrast and black levels, with each one having the upper hand in certain specific areas.
I do not know if I am managing to express exactly what I mean, but I will not leave you guessing. I put a lot of effort into creating a comparison video between the Nebula X1, the XGIMI Horizon S Max, and of course the Valerion VisionMaster Pro2. The video is completely RAW, with no post processing, shot in S-Log3, using the full 14 stops of dynamic range my camera can capture.
Whatever differences you may see in this video are exactly what I saw with my own eyes, watching the projectors side by side here in my space.

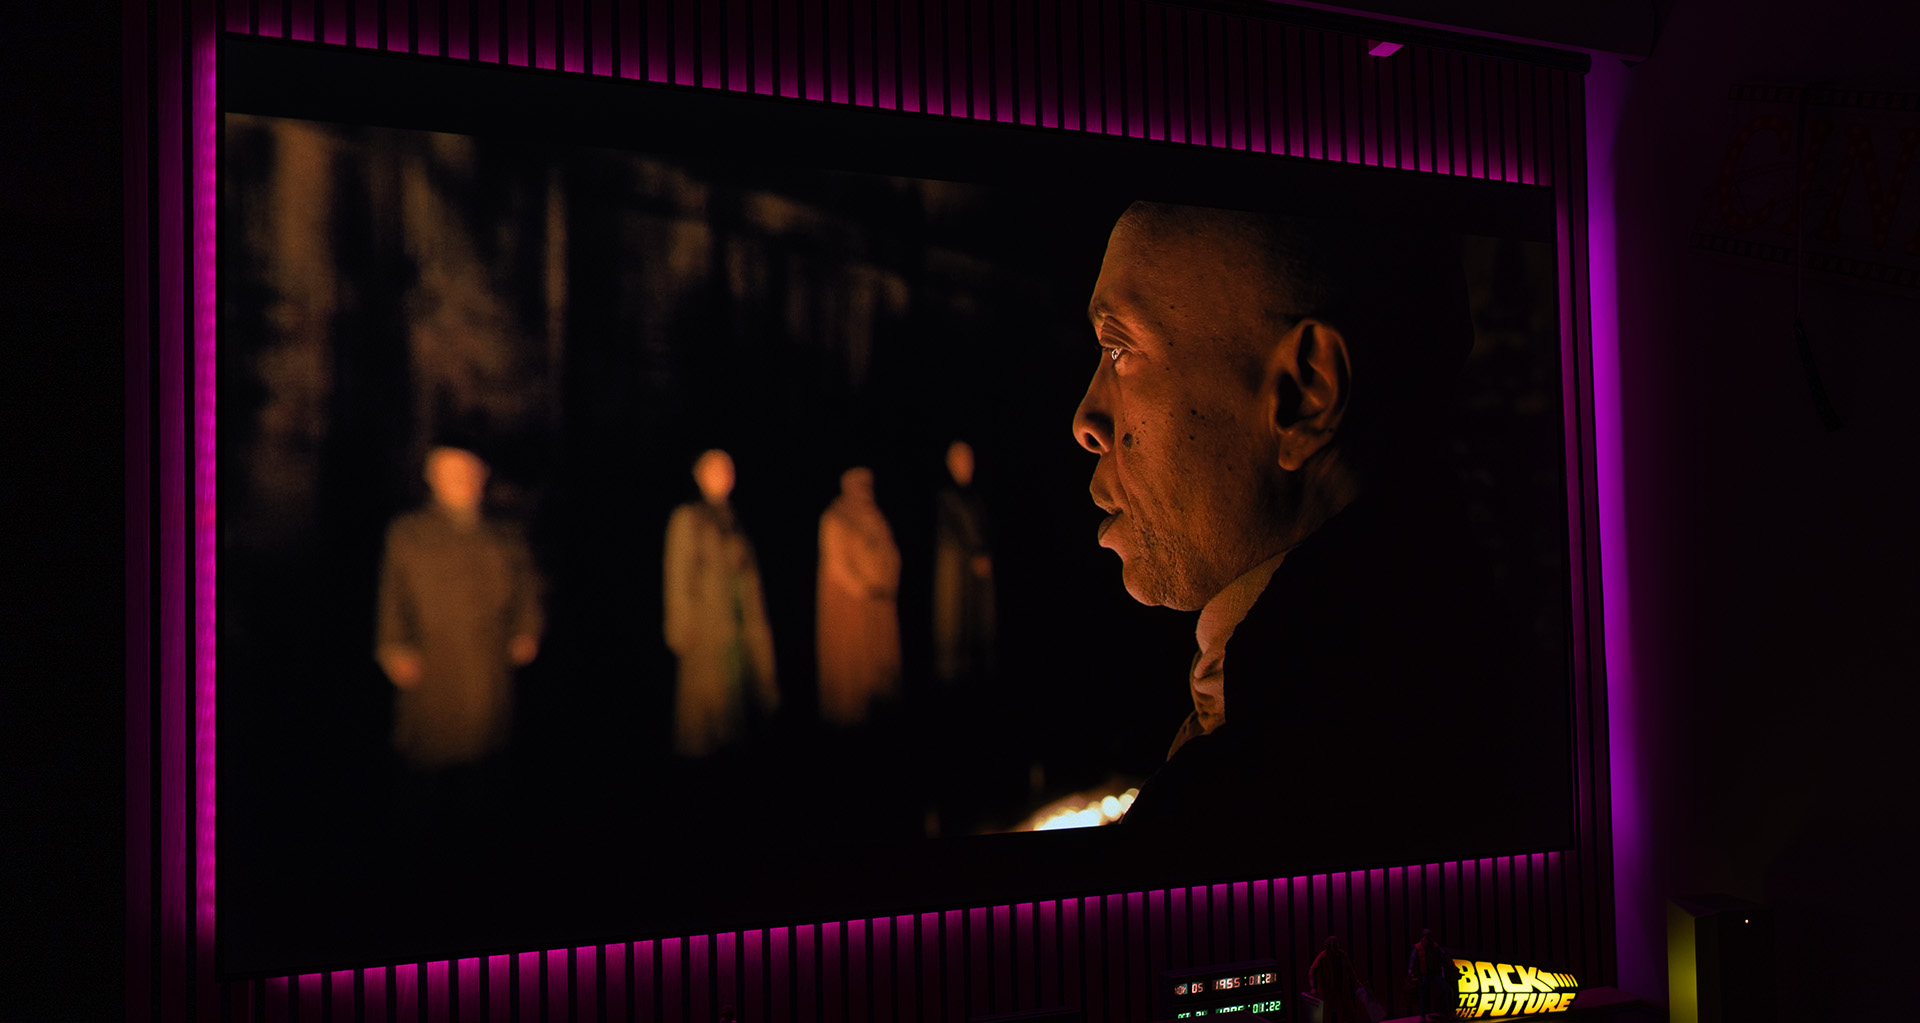
Dolby Vision
When the Nebula X1 detects Dolby Vision content, it changes, it becomes a completely different projector. A new menu appears, offering a range of additional options. Among them are screen size and screen gain. It is a good idea to enter the specifications of your own screen here. If you are projecting onto a plain white wall, set the screen gain to 100 (gain 1).
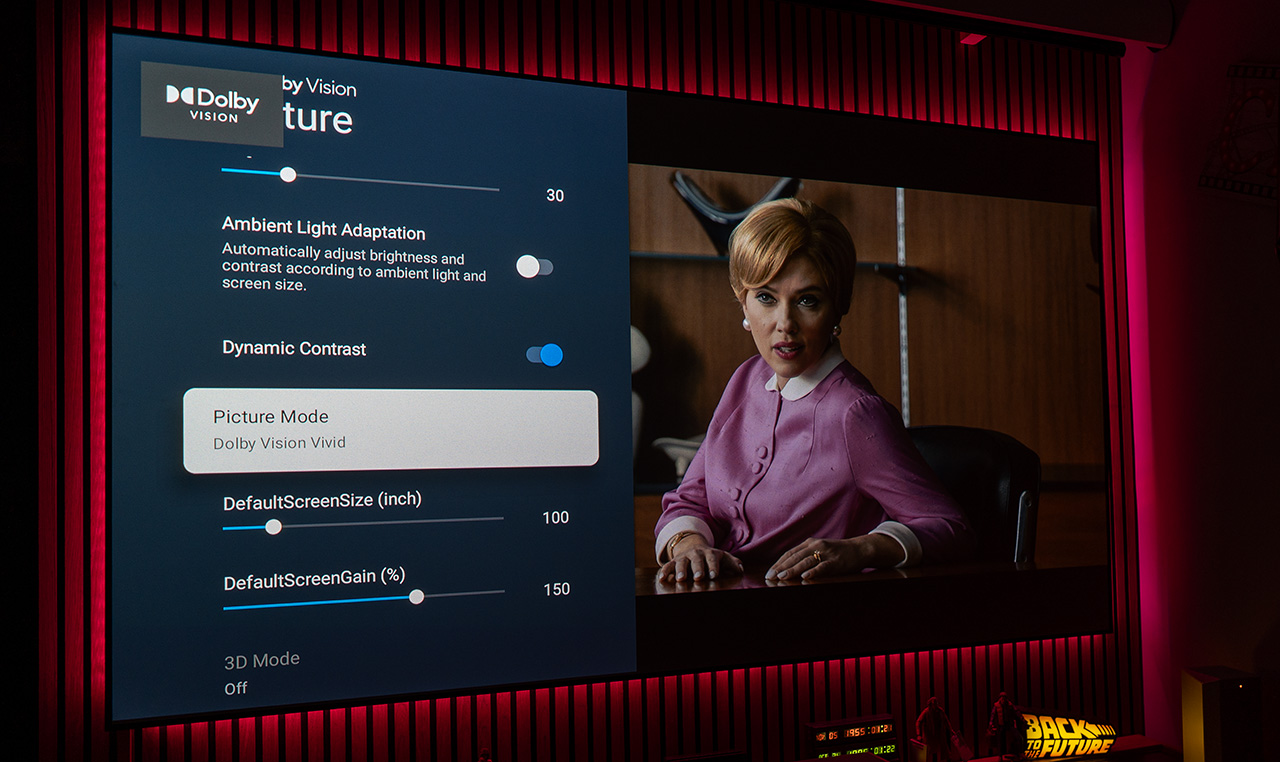
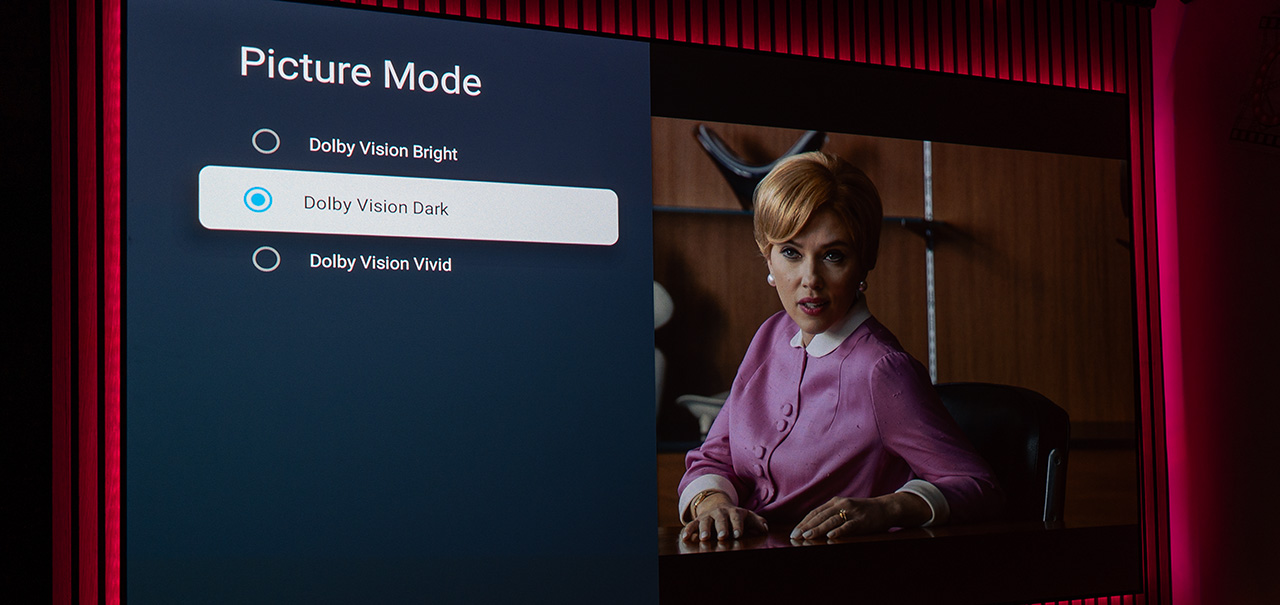
When playing Dolby Vision content, the available picture modes are reduced from nine to just three. My personal favorite is Dolby Vision Dark. All the other settings we looked at earlier are still fully functional and available, so you can tweak and fine-tune everything to your liking. It is rare to find a projector that gives you this level of control when playing Dolby Vision content!
Oh boy, the X1 is good. One of the great things about high native contrast is that it’s visible everywhere across the image. You know, when you have a picture with truly high native contrast, it can look impressive, even if all the other parameters are below average.
Of course, that’s not the case with the Nebula X1, it combines high native contrast with excellent Dolby Vision metadata decoding, great image sharpness and high in-scene contrast (ANSI contrast). This NebulaMaster 2.0 Image Engine is the real deal and it’s doing its job perfectly.

Ok, the lens that Anker proudly advertises as being made entirely of glass is clearly a major strength. After all these years of being involved in this field, it has become very easy for me to tell the difference between artificial, software-enhanced sharpness and pure optical clarity that comes directly from a projector’s lens.
And the lens on the Nebula X1 is one of the best you will find on any DLP lifestyle projector out there. The sharpness and neutrality it brings to the image projected by the X1 is truly remarkable.

My overall impression after watching many hours of Dolby Vision content on the Nebula X1 is that Anker clearly paid special attention to this format.
It is the first time I have seen a projector handle a high dynamic range format with dynamic metadata so accurately on screen, especially when it comes to EOTF gamma mapping, while also having the brightness to support it properly. Once again, bravo Anker, truly well done.
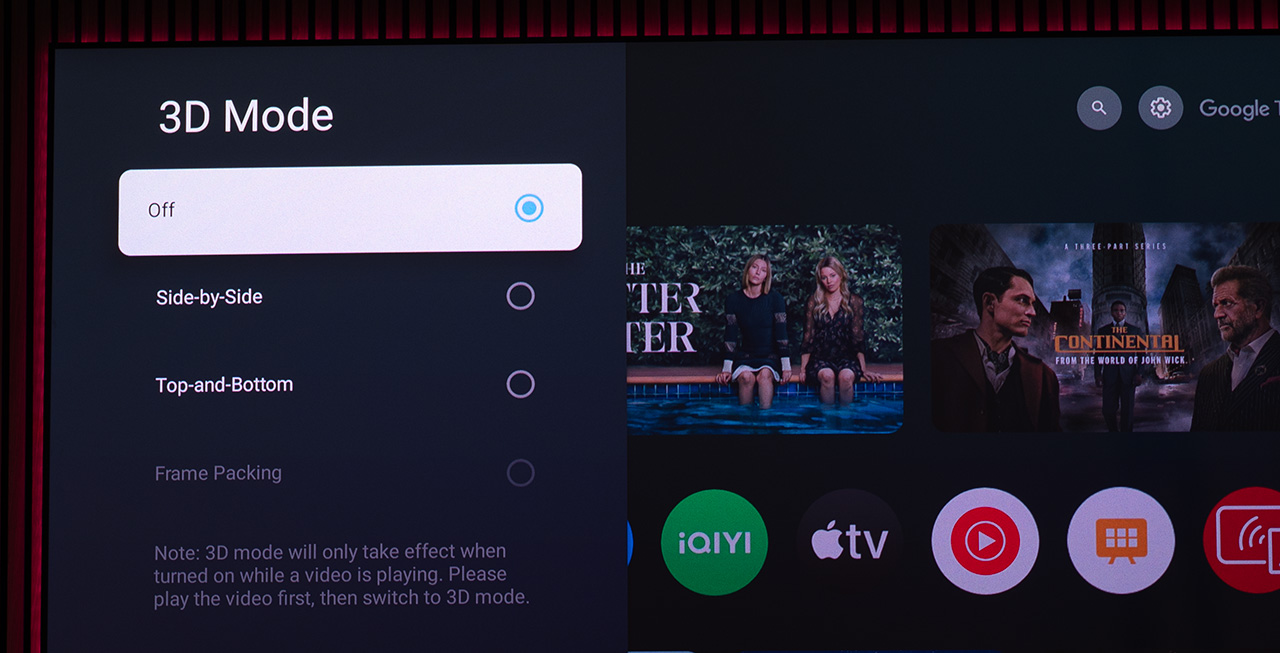
Gaming & 3D on Nebula X1
3D on the Nebula X1 is easily one of its best features. Over the past three months, I have watched more than five or six full movies, along with countless clips, in every possible format. Blu-ray discs with frame packing, as well as content in side by side and top and bottom formats.
All I can say is that the Nebula X1 ranks confidently in the top three, if not the very best, in terms of 3D performance among all the projectors I have tested. Its 3,000 lumens of pure raw brightness, combined with the excellent color reproduction of the LaserForge 2.0 laser engine, transforms every 3D viewing session into a truly magical experience.
To activate 3D, you simply need to provide the X1 with compatible 3D content, and then manually select the correct 3D mode from the menu.
If you are planning to buy the Nebula X1, or if you already own one, do yourself a favor and watch Dune in 3D. Give yourself that gift, please.
Some of you already know that I am a passionate gamer. I always try to carve out some time during a busy week to play a game that helps me relax and escape for a while.
Having experienced gaming on a big screen, with the natural depth and realism that projection offers, I now play exclusively on my projector. When I try to switch back to my gaming monitor, it honestly feels like going back to the days of the Game Boy. The screen looks tiny, and the overall experience feels heavily downgraded.
The only exception is my beloved Nintendo Switch, which still follows me everywhere whether I am traveling, in bed, or even, I admit it, in the bathroom sometimes.
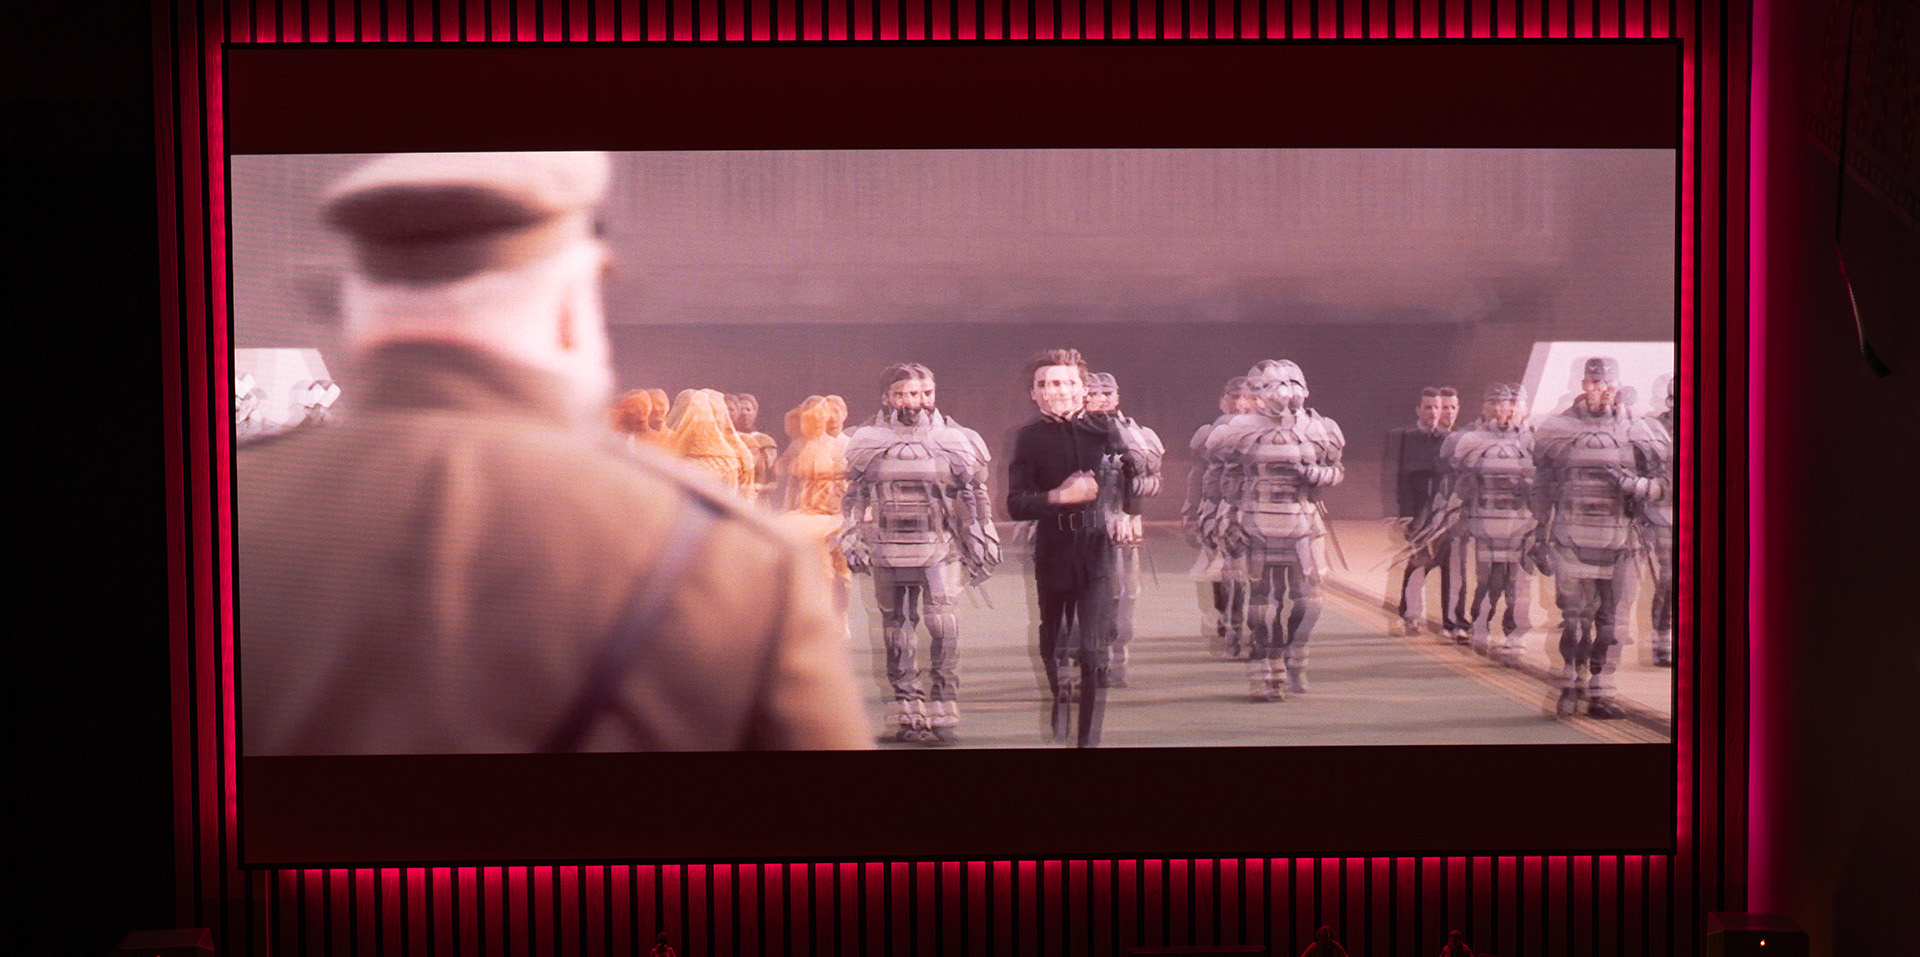
With the Nebula X1, I had the chance to enjoy the incredible new Expedition 33. The game was released right when I started testing the X1, and all I can say is, what an experience it was.
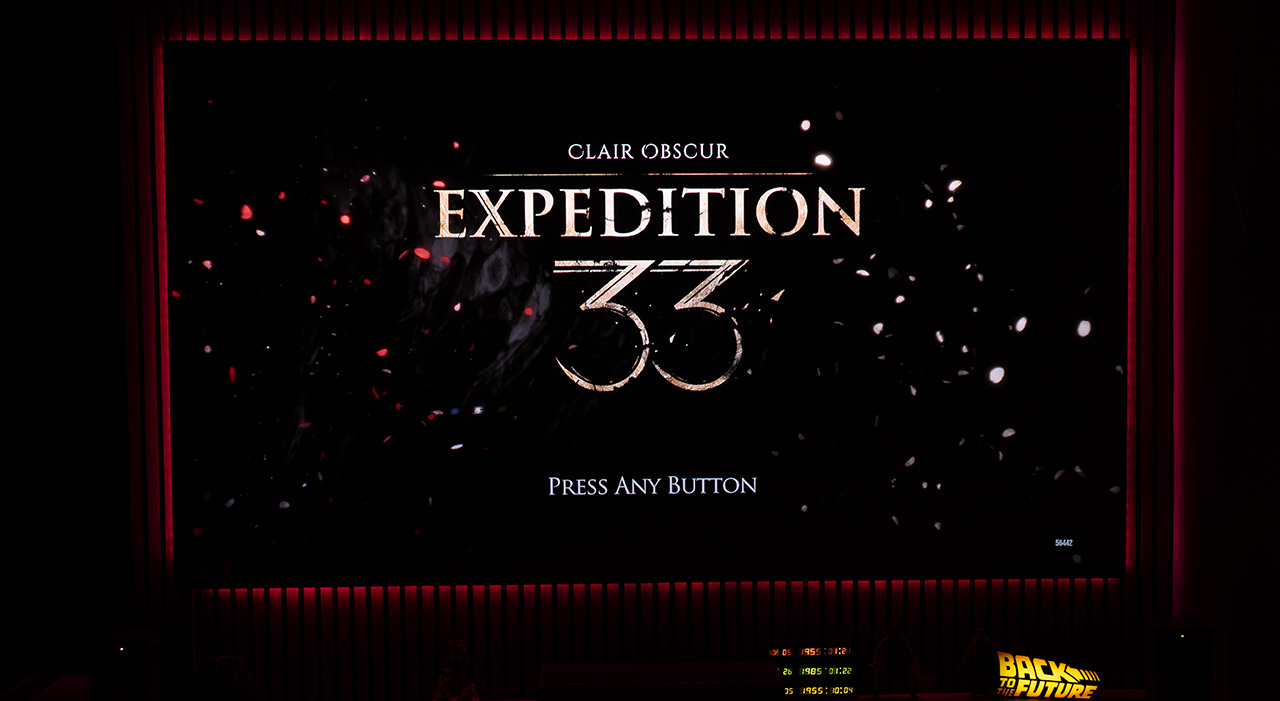
If you have not played Expedition 33 yet, here is my advice. Take your summer vacation from work, turn off your phone, send your wife and kids to grandma’s for the week, stock up on supplies — mainly junk food and soft drinks loaded with this unhealthy aspartame (sugar makes you fat) and dive into this magical journey.
Once a year, the Paintress awakens and lifts her brush to the monolith.
She paints her cursed number and everyone of that age turns to smoke,
fading from the world as if they were never here.
Year by year, the number falls.
And with it, more of us vanish – lives erased like strokes wiped from a canvas.
Tomorrow, she will wake again. Tomorrow, she will paint “33.”
Tomorrow we depart on our final mission – Destroy the Paintress – so she can never paint death again.
– We are Expedition 33 –
The music, the level design, the visual storytelling, the atmosphere, the entire game is a masterpiece. Just live it. I truly believe the Nebula X1 arrived in my gaming room at exactly the right moment. It brought this masterpiece to life at 100 inch and transported me into its magical universe, a dreamlike world inspired by Belle Époque France.

This has nothing to do with the review I am trying to write here, but I have to say it. Playing Expedition 33 on the Nebula X1 with Dolby Vision, on a 100 inch Fresnel screen with its 4.1.2 surround speaker system connected, gave me one of the best gaming experiences of my life.
I did not just played the game, I lived a part of my life inside it. If you are a gamer, I am sure you know exactly what I am taking about here.
As for the compatibility of the Nebula X1, I can say that it locked perfectly with my Xbox Series X at 4K 60Hz, and I tried several games in Dolby Vision without any issues at all.
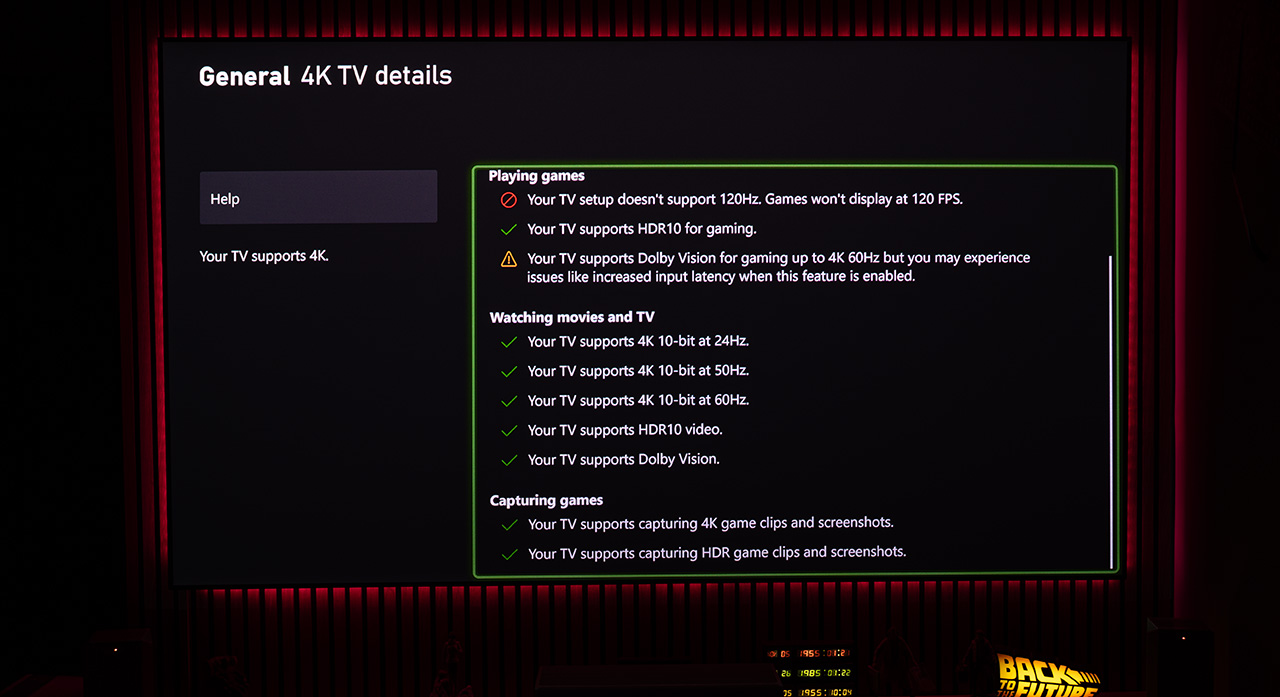
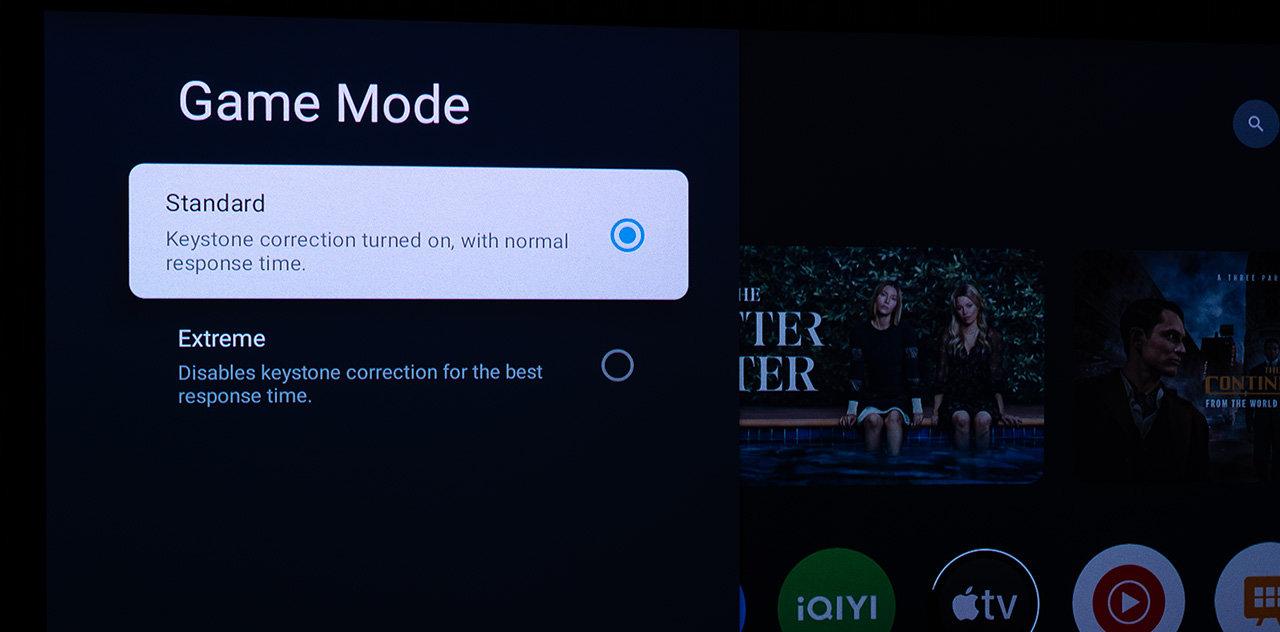
As far as input lag is concerned, you need to select Gaming Mode to achieve the best possible performance. In Gaming Mode, you have two options. The first is Standard, where the X1 allows you to apply image adjustments such as keystone correction or digital zoom, and while the input lag is significantly reduced, it is not at its minimum.
The second option is Extreme, where the input lag drops below 20 milliseconds at 4K 60Hz, but any digital image adjustments, such as keystone corrections, are disabled.
Personally, I used Standard mode for all the gaming I did, and I never felt the need to switch to Extreme. Of course, this depends entirely on the type of game you plan to play on the X1.
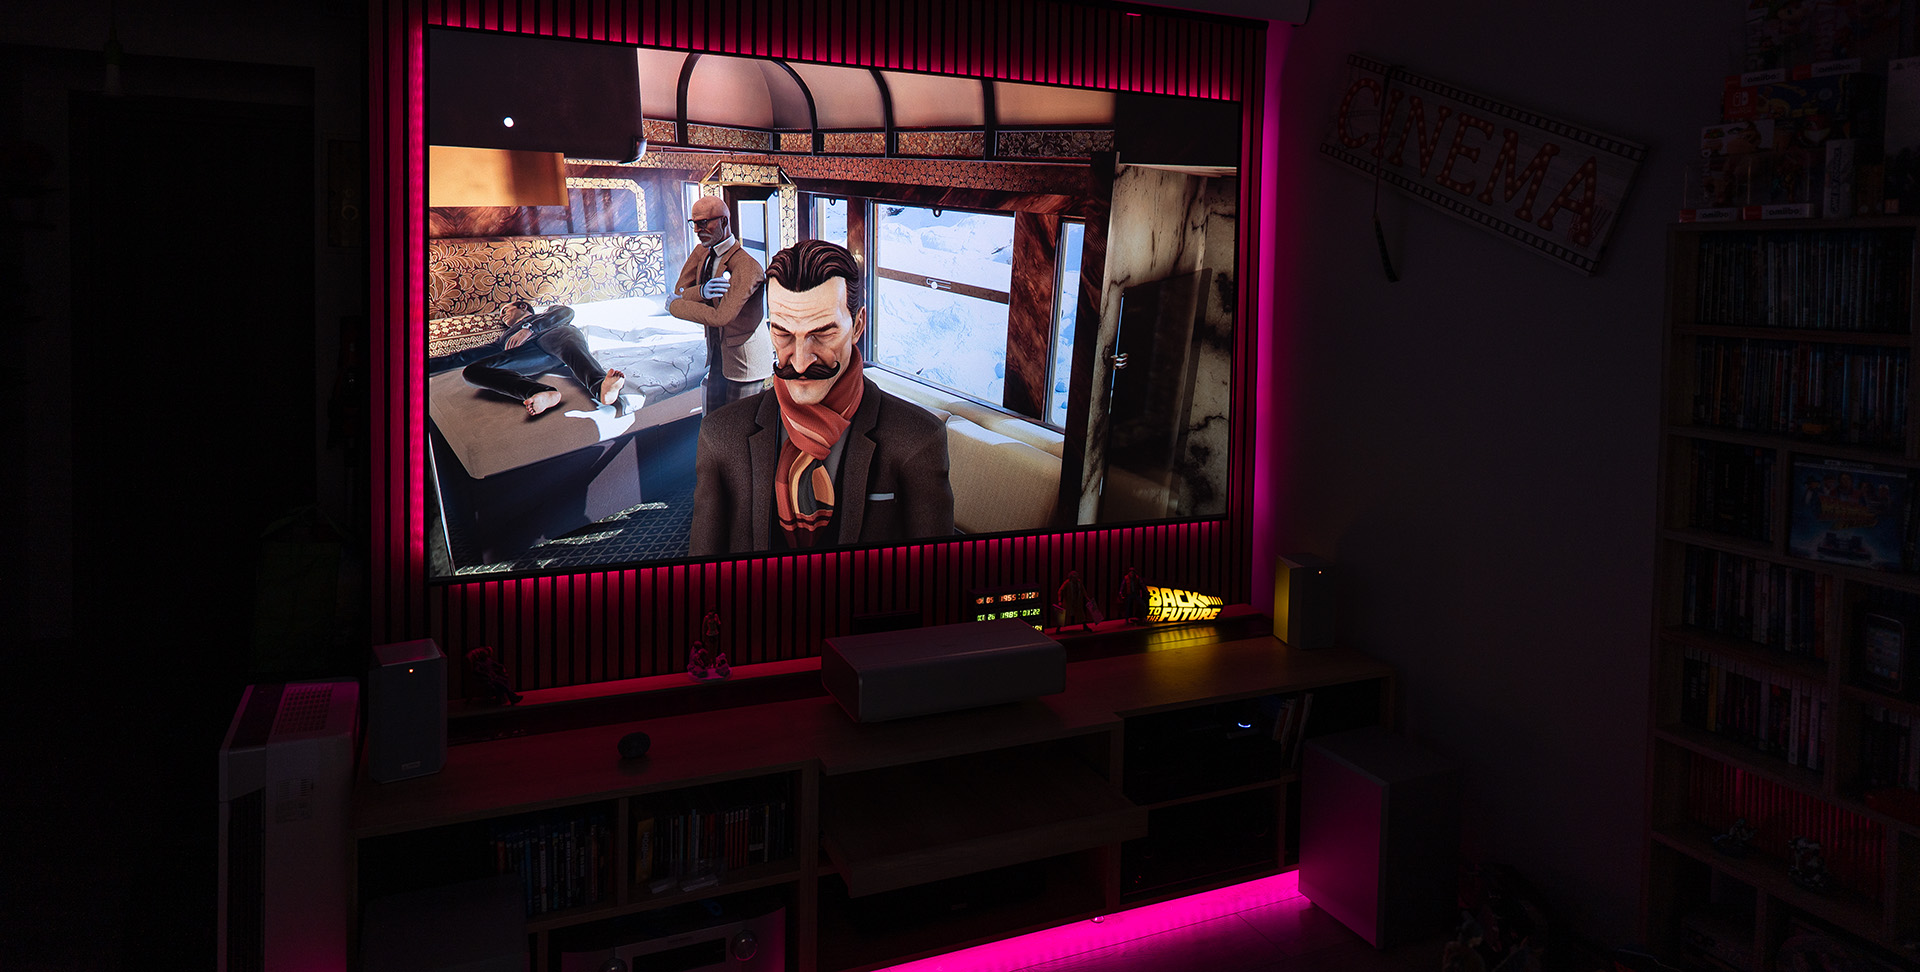
I could not possibly close the chapter on gaming with the Nebula X1 without also trying out the PS5 and a brand new game I recently purchased, one I just had to show you.
So, I had the pleasure of enjoying on the PS5 and the Nebula X1 the magical Murder on the Orient Express, by none other than Microids, my favorite game studio. A game, of course, based on the classic novel by Agatha Christie.
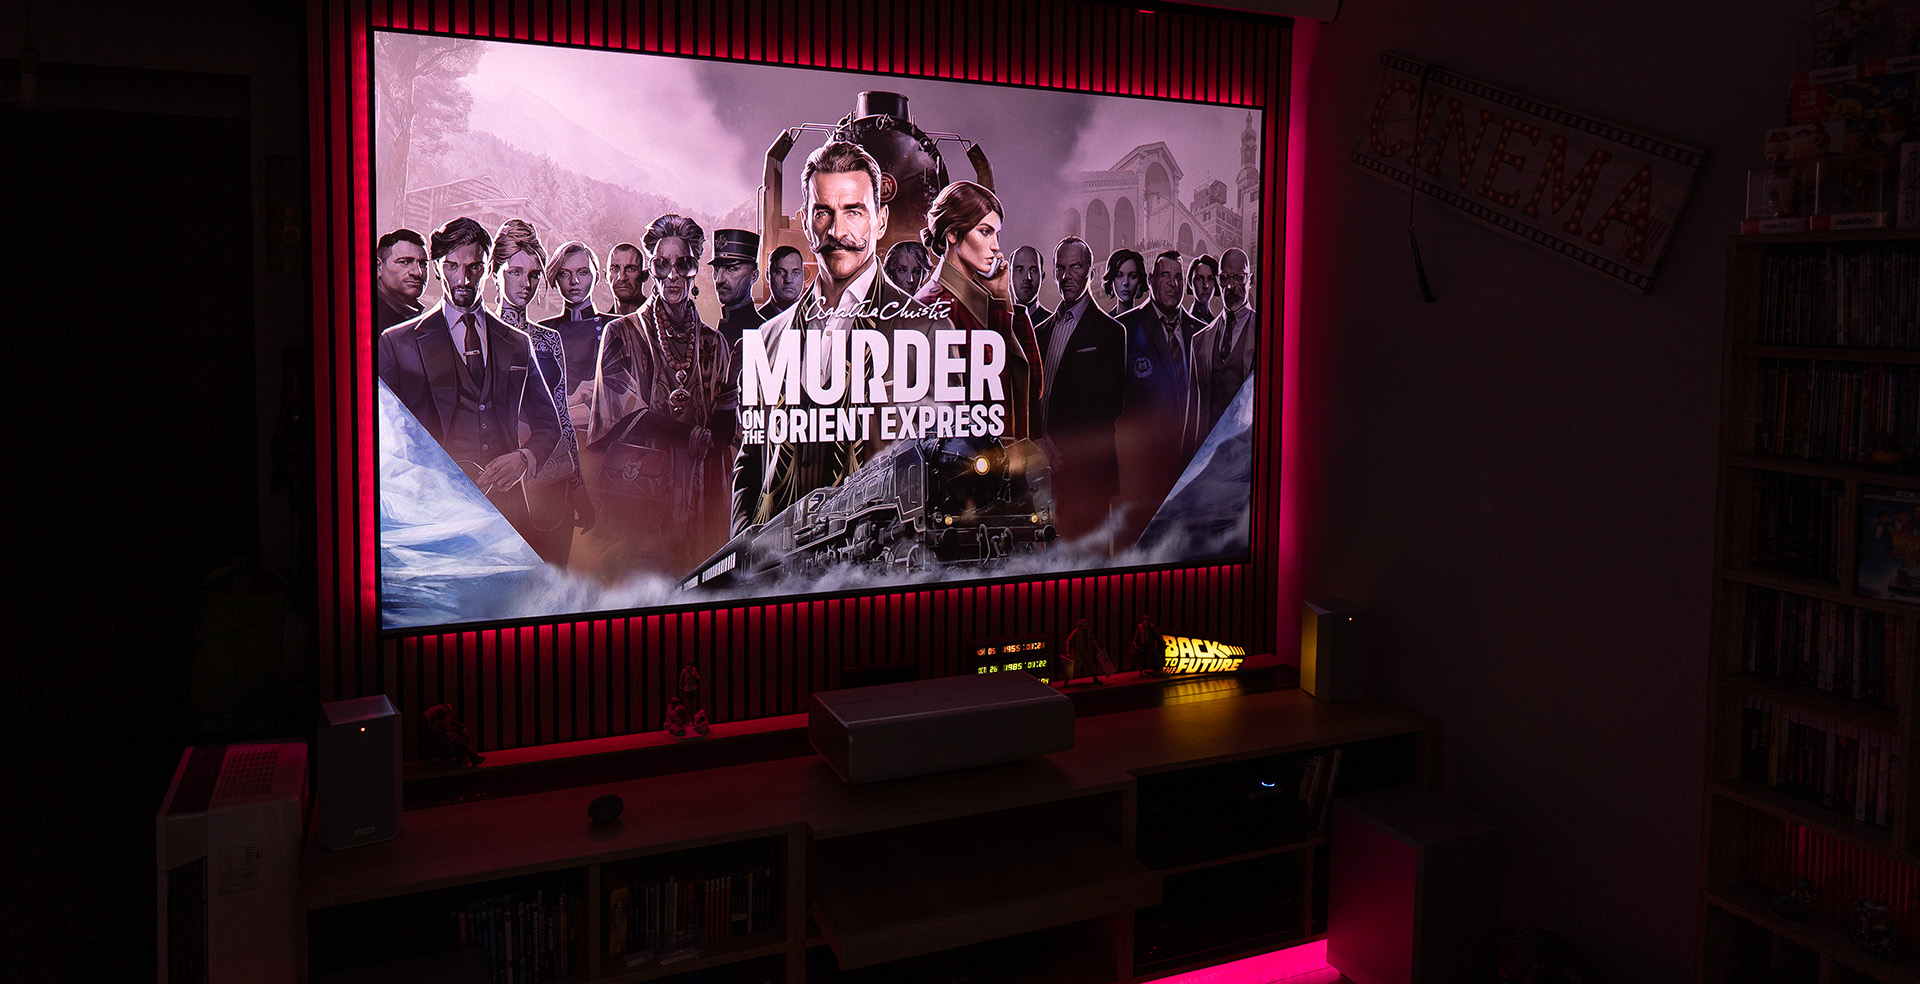
Imagine this. Investigating a murder, trying to solve the mystery as Hercule Poirot aboard the Orient Express. The train is en route from Constantinople to Paris, stuck in a snowstorm somewhere in the Dinaric Alps.
All of this unfolding in front of you across a 100 inch screen, with the Nebula X1 painting the image in colors so vivid that only an RGB projector can deliver.
This is something I simply cannot put into words. You have to experience it for yourself.
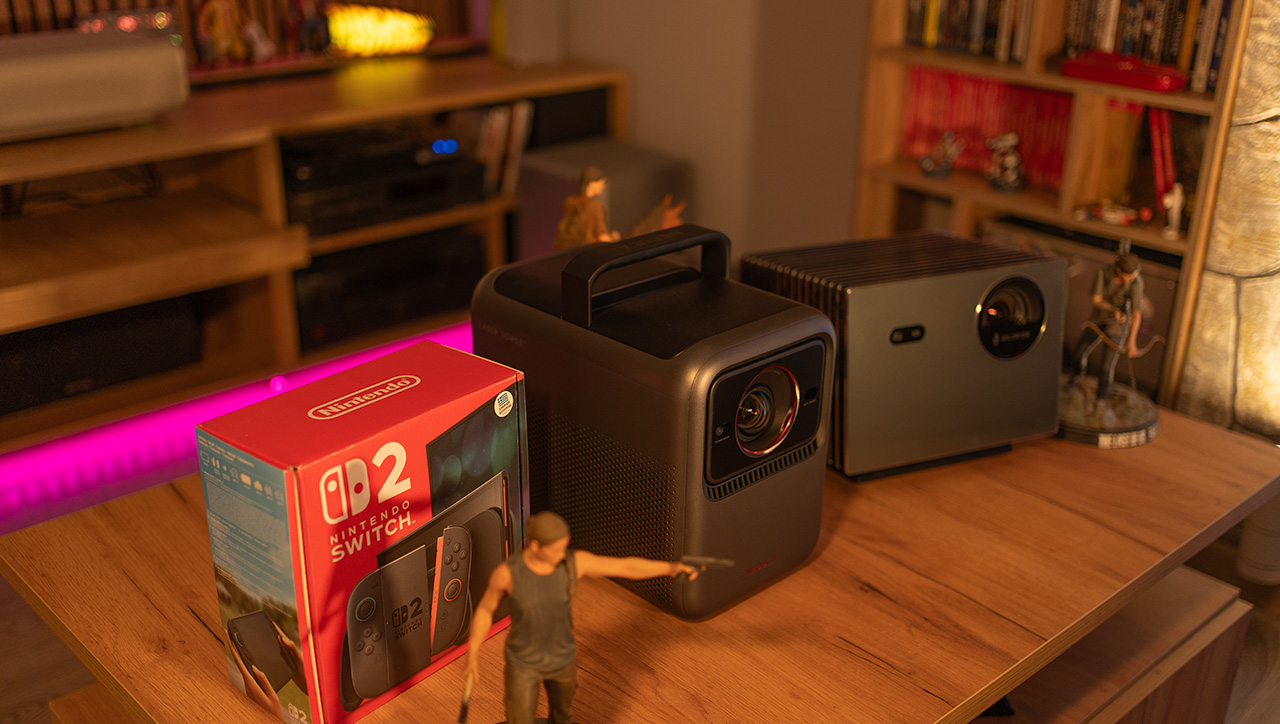
I also wanted to share my impressions of the Nebula X1 paired with the new Nintendo Switch 2, but unfortunately, the unit I had pre-ordered arrived DOA, with a hardware fault, and I was not able to test it or give you any feedback.
So, you will have to settle for a single photo, and my promise that I will include it in my next review.
Sound Performance
When it comes to the Nebula X1 and sound, things get a bit more complex. The X1 does feature a built-in audio system with 4 drivers (2 mid-range and 2 tweeters) and 2 passive subwoofers, making it fully capable of standing on its own.
However, Anker also offers two optional wireless speakers that can work in sync with the X1 to create a 4.1.2 multichannel sound system (that’s 2 front speakers + 2 side surround drivers = 4, the X1 acting as the subwoofer = 1, and 2 upward-firing Atmos drivers = 2).
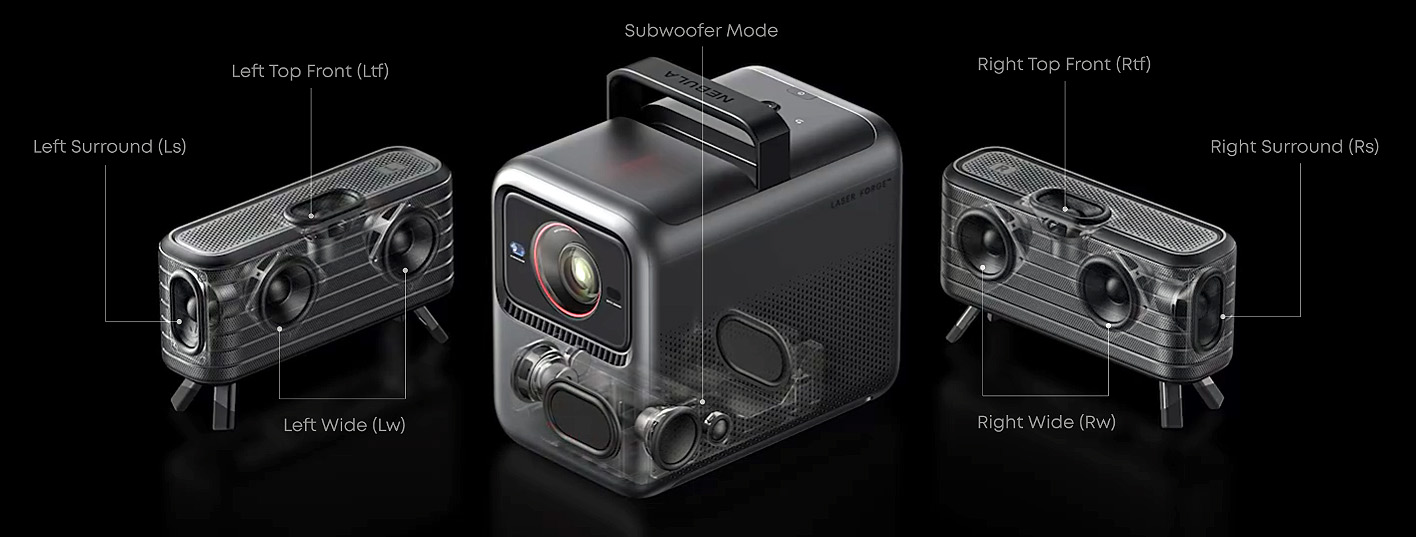
In the image below, you can get a clearer understanding of how Anker’s wireless multichannel audio system works—using just two wireless speakers, with the projector itself acting as the subwoofer.
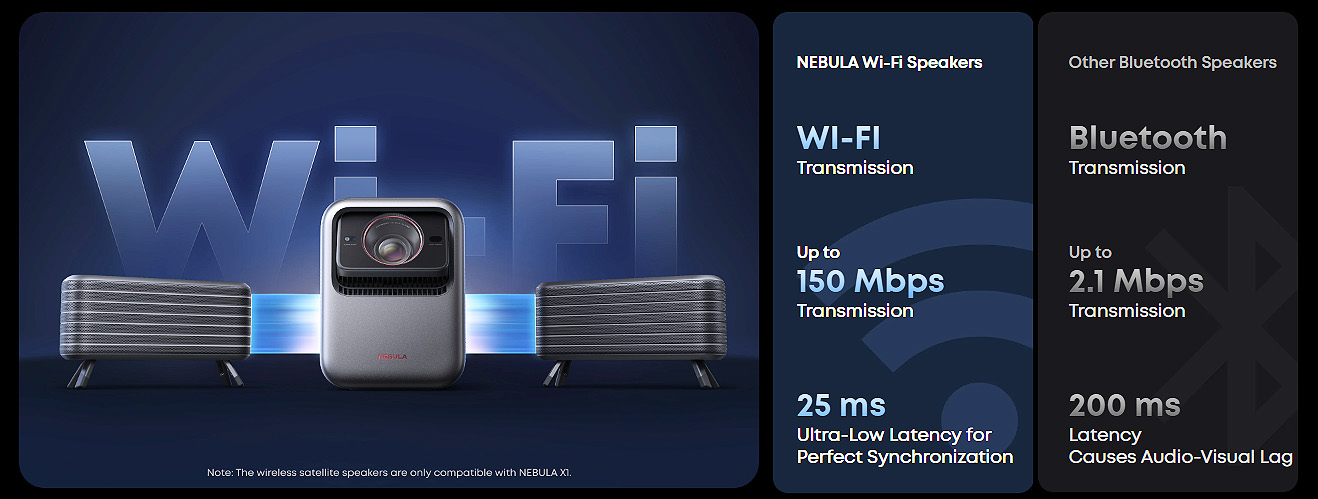
These two optional wireless speakers, available as add-ons for the X1, are wireless but not Bluetooth, they use Wi-Fi instead. That means the wireless connection bandwidth jumps to 150 Mbps, allowing uncompressed high-quality audio to pass through, while also minimizing synchronization latency to just 25ms, compared to the typical 200ms delay seen in Bluetooth connections.
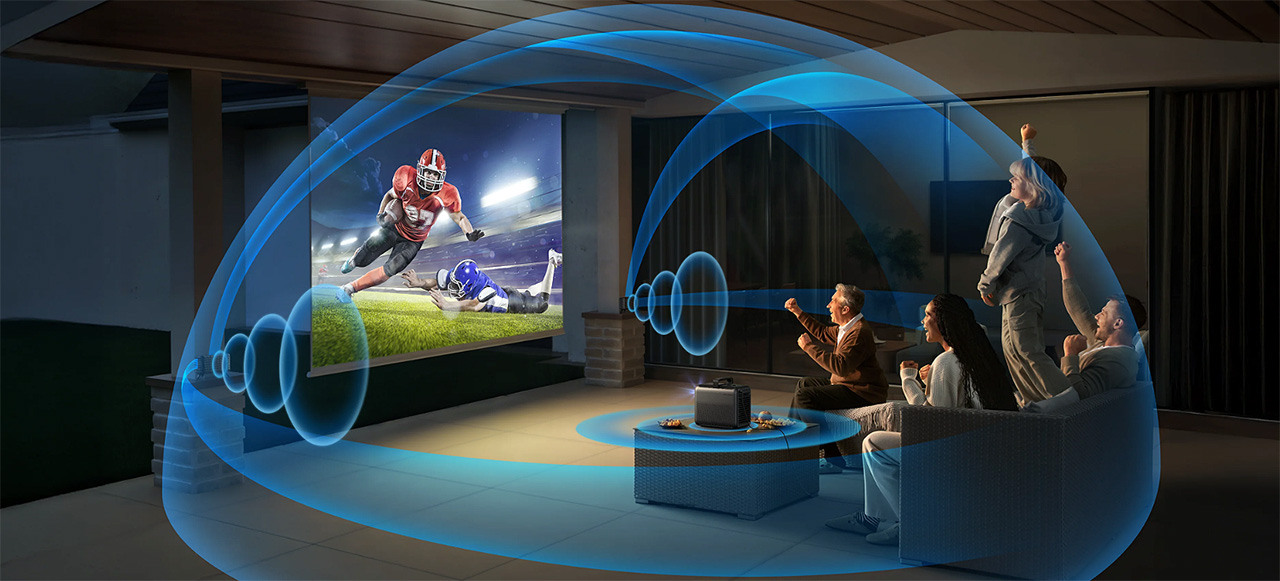
I tested this 4.1.2 setup not only indoors, but also in a large outdoor space, as you’ll see in the video later in the article. The speakers have a combined output of 160 watts (80W + 80W), and I want to focus on two key aspects.
First, the Dolby effect created by the directional side and upward-firing drivers actually works, and it works remarkably well. It delivers a strong sense of space that truly immerses the viewer in the film. I was genuinely surprised by how convincing it felt. Anker’s engineers have done an outstanding job with the design and implementation of these two speakers, and they’ve also handled DTS channels processing very well.
The second highlight is volume. These two compact wireless speakers can easily fill very large spaces, and I mean very large. The volume level they can reach is comparable to that of professional powered PA speakers. They’re more than capable of handling something like a children’s party in a large garden, for example. The loudness they deliver is simply outrageous.
What’s even more impressive is that the sound quality doesn’t degrade at high volume, as you might expect from speakers with such small drivers. Even near their maximum output, they remain clean and distortion-free, which is genuinely impressive. In terms of sound quality, I’d rate them a 7 out of 10, solid, though not exceptional. But for their raw power, they absolutely deserve a 10 out of 10.
However, in terms of reliability and seamless operation, I’d unfortunately give them only a 3 out of 10, and here’s why.
Despite receiving a firmware update over the span of three months (updates applied not just to the projector, but to the speakers themselves), their operational stability remains a serious issue. Whenever I hadn’t used them for a few days and left them powered off, I’d find them with 0% battery, as if something inside was draining power even while the speakers were shut down.
In addition, there were frequent connection issues. The left speaker, for example, often failed to reconnect automatically, likely due to frequent disconnections that caused it to shut down. I had to manually power it on every time to re-establish the connection. On several occasions, one of the two speakers wouldn’t turn on at all on the first try, requiring multiple attempts.
Another major issue is that if the projector is shut down, the speakers will stay on indefinitely. They do not power off automatically, which, in my opinion, is unacceptable and highly impractical. At the very least, they should follow the projector’s power state or offer an auto-shutdown option after a period of inactivity.
One last thing, and I promise this is the final time I “pick on” the X1’s speakers, is the rubber cover over the USB C port on the back. I get it, it needs to fit tightly to ensure proper water resistance, but come on Anker, seriously now, do we really need fingernails like a concert guitarist just to open it every time we want to charge the speakers? That’s definitely not what I’d call practical.
– Update –
Another update has been released, which is supposed to improve the stability of the speakers.
Unfortunately, although the firmware update completed successfully on the projector, it failed completely when it came to the speakers.

Every time I connect the speakers, a message appears saying that new firmware is available. I go through the update process, but at some point during the procedure, the speakers power off on their own, and the update fails repeatedly. Eventually, I gave up, so I cannot say whether this update actually solves the stability issues the speakers have or not.
I said I would stop picking on these poor speakers, but I lied.
Another thing I really did not like is the material used for the speaker housing. It has a strange texture, with a rough surface and large pores, and it gets dirty very easily and is very difficult to clean it. It actually acts like a dust magnet. I do not know if the dust is also being drawn in by the internal magnets of the drivers, to be honest, but the result is clear.
Just take a look for yourself.
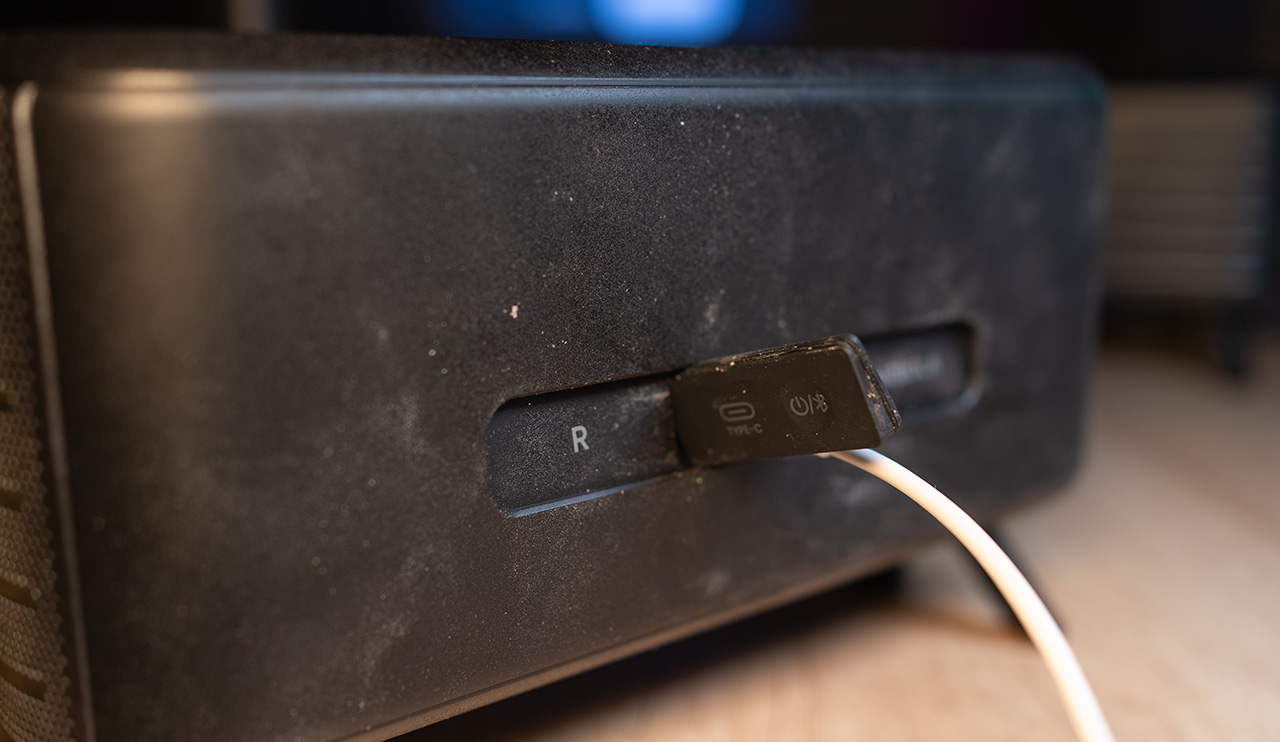
Now let’s talk about a feature I truly loved on the Nebula X1, and that is its excellent Bluetooth speaker mode. When you press and hold the power button on the remote control, the following menu appears.
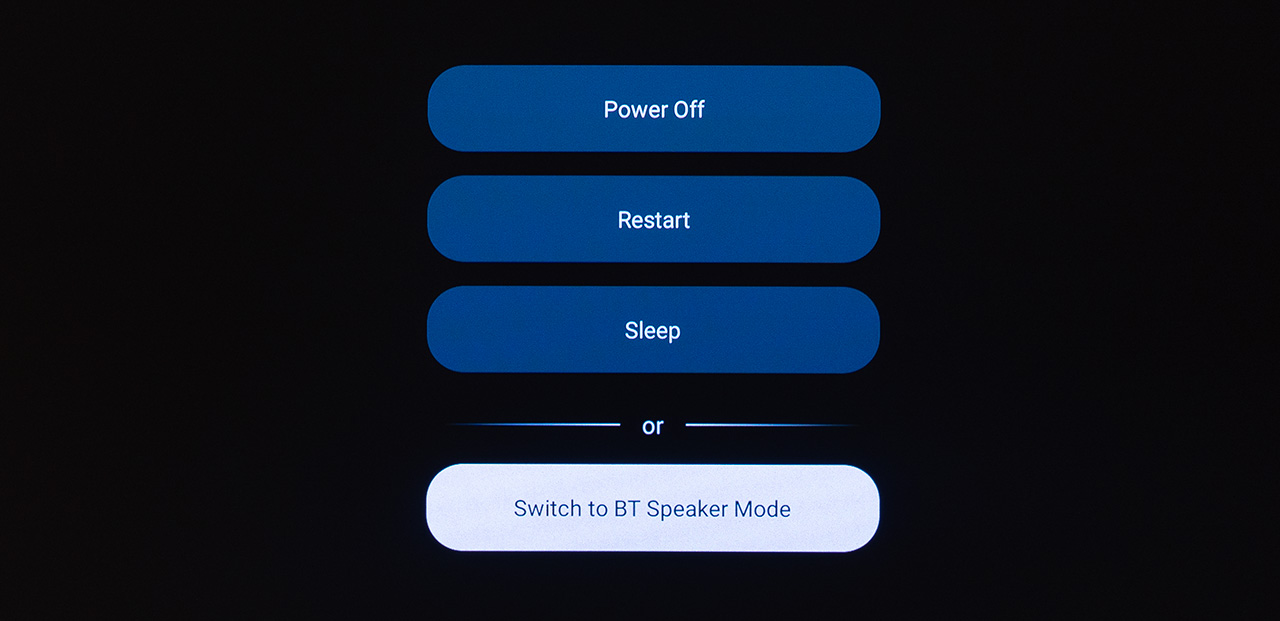
If you select BT Speaker Mode, you are taken to a screen with instructions on how to connect your phone to the X1 via Bluetooth. It is a simple and standard process, just like with any other device , you find the X1 on your phone’s Bluetooth list and pair it.
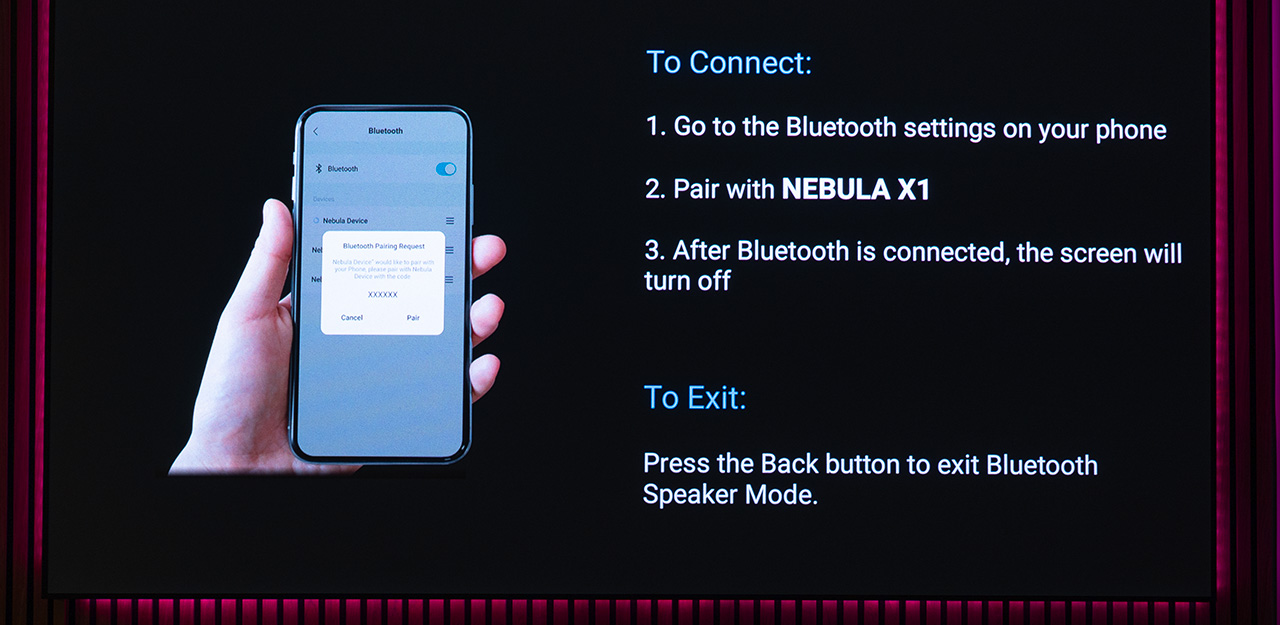
Almost immediately, the X1 turns off its laser optical engine and enters a sort of standby mode, while still maintaining the connection between your phone and the speakers. This allows you to use the X1 as a Bluetooth speaker system, with volume control directly from your phone.
Once paired, the speakers form a Bluetooth system that easily outperforms many far more expensive setups of this kind, both in volume and sound quality. I would rate it a solid 9 out of 10.
Finally, let me share a few thoughts on the built-in sound system of the Nebula X1, when used without the two optional external speakers. X1 features a full internal sound system with two tweeters, two mid-range drivers, and two passive woofers, with a total power output of 40 watts.
Its performance in both movies and music is quite decent, although it is clear that Anker focused more on raw power and volume rather than sound detail and refinement. The bass is slightly overemphasized, but the overall experience while watching a movie is very enjoyable.
In general, it is a well-designed and high-quality system, but it does not quite reach the level of precision and tuning found in the Harman Kardon audio system of the XGIMI Horizon S Max, for example, and it ranks just a step below the very capable audio system found in the Valerion projectors.
I would give it a 7 out of 10.
– Update 13/6/2025: A new firmware was released by Anker (11.0.42). I have installed it, and the stability issues I mentioned above concerning the two wireless satellite speakers seem to be gone for good, which is great news –
Operation Noise & Temperature
Let’s start with power consumption, which is genuinely surprising and clearly shows how increasingly efficient the new generation of RGB laser projectors has become.
The Nebula X1 likely sets a new benchmark in power-to-lumen efficiency, drawing just 127 watts with laser power at 100%.
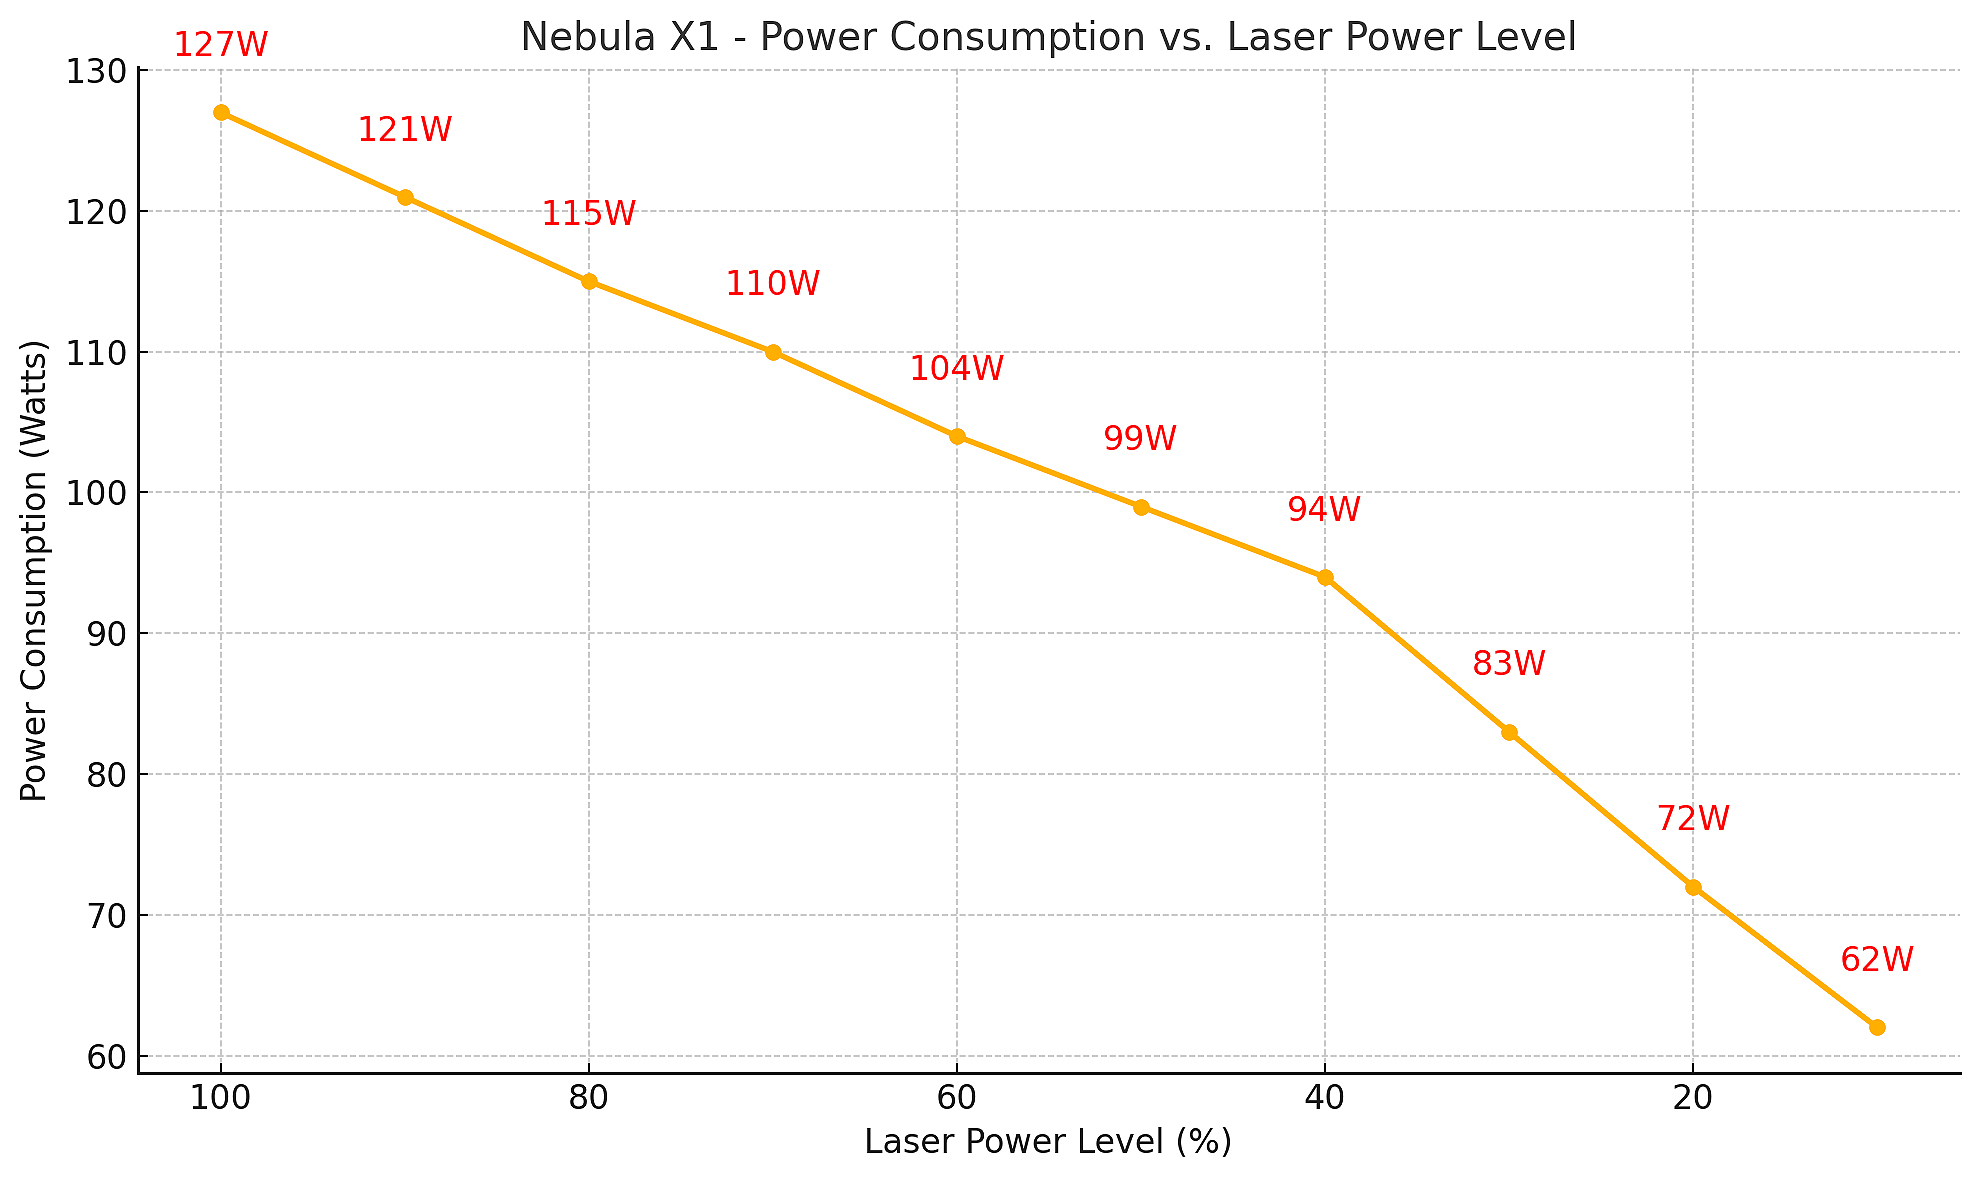
The power supply offers double the power in watts (240W) compared to what the Nebula X1 requires, and it operates without struggling or overheating while powering the projector.
As for operating noise, I honestly feel like it’s no longer something that needs much discussion in modern projector reviews, at least not when it comes to today’s RGB laser models. All the latest models are impressively quiet during operation, so quiet in fact, that you can sit right next to them and watch a movie without any distraction. The days when projectors sounded like old desk fans trying to cool down a room in the middle of a heatwave are long gone (ok, there are still some noisy new laser models on the market, like the new JVC NZXXX series).
I don’t have an acoustically treated room to take precise dB measurements, but I can offer a useful comparison with two other very quiet laser models. The Nebula X1 is quieter than the Valerion Pro 2 and only slightly louder than the XGIMI Horizon S MAX I tested recently. Keep in mind that the Horizon S MAX is one of those rare projectors that feels almost dead silent, as if it doesn’t have a fan inside at all.
What’s even more important than overall noise level is how stable that noise is. This small amount of noise the Nebula X1 does produce is constant, you don’t hear the fan ramping up and down during playback, something that is really annoying, at least for me. On top of that, the heat it expels from the rear is impressively low.
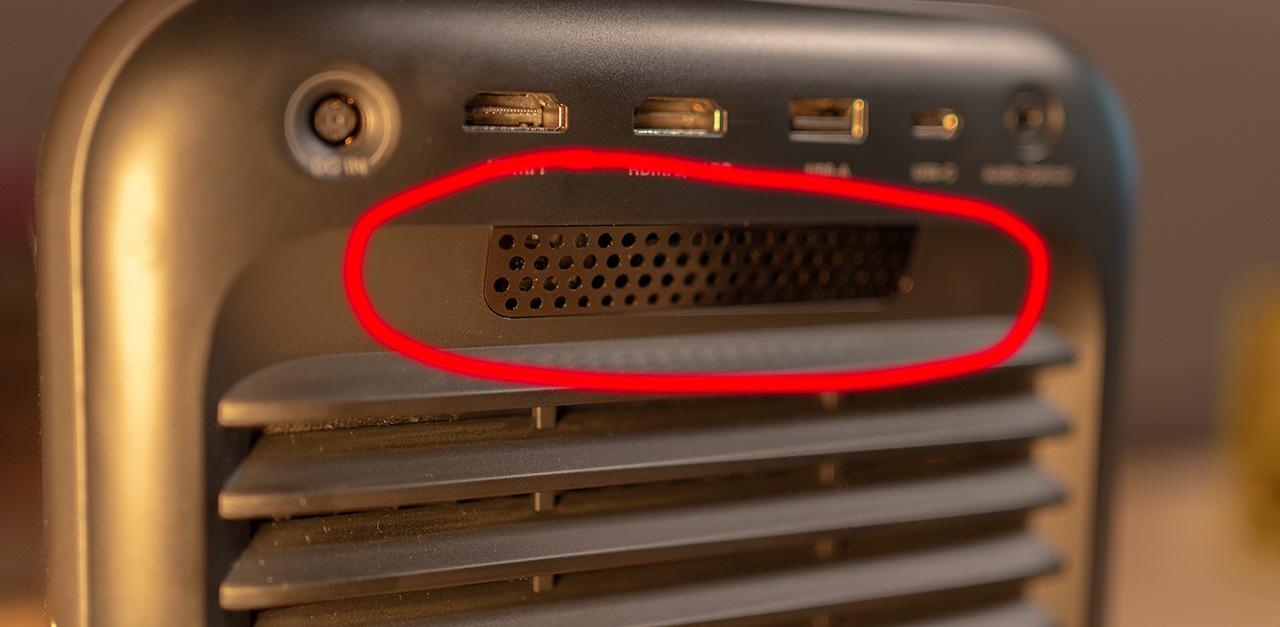
One interesting detail, all the heat seems to be directed through a small metal grille, rather than across the entire rear panel as I initially expected.
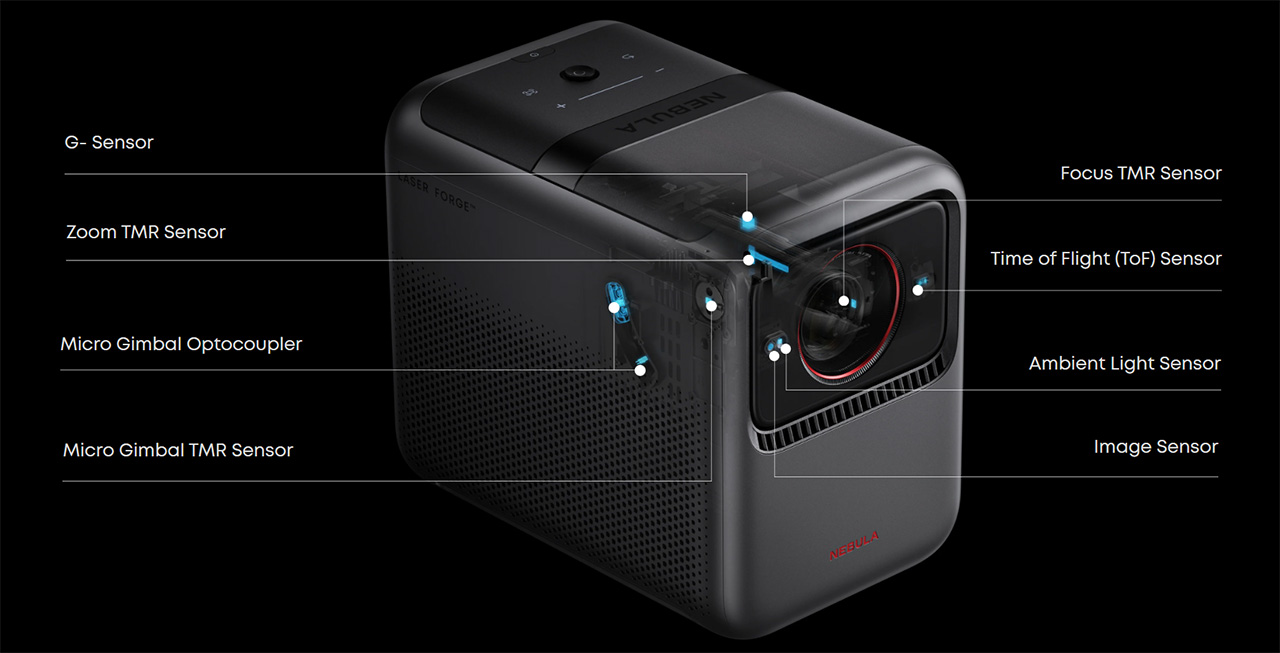
Useless Fact of the Day
The Nebula X1 has the same number of sensors as the iPhone 16 Pro Max, eight in total!
Nebula X1 Goes to the Movies!
Come on, guys! Did you really think I would leave you with just a plain review? Of course not!
I live in Greece, specifically in Athens, one of the most beautiful and historical cities in the world, where it’s basically summer all year round (damn you global warming, we used to have winter too, you know). And that means one thing, open-air summer cinemas are everywhere.
So of course, I couldn’t resist. I had to take the Nebula X1 out to one of these iconic outdoor theaters and see how it performs under the stars on a 10-meter-wide cinema screen.
I did it, and we had an unbelievable time with the Projectorjunkies team.
Enjoy it!

Conclusion
Anker has not only surprised the DLP projector market but also experienced, hardcore users like myself with the Nebula X1.
Although it’s marketed as an outdoor projector, the X1 is far more than that. You can easily mount it on your living room ceiling or set it up in your dedicated indoor cinema room and enjoy it as a true home cinema projector.
Its build quality ranks among the highest I’ve ever encountered in any projector (regardless of category) and the list of technologies packed inside its chassis is nothing short of impressive.
Water cooling, an industry-first U-shaped 2nd-generation pure RGB laser light engine, a built-in 25-degree gimbal lens mechanism, a cinema-grade 14-element all-glass lens, and a 6-blade dynamic iris are just a few of the standout hardware innovations the Nebula X1 brings to the table.
With over 3,000 real ANSI lumens of brightness, the highest native contrast ever measured on a DLP projector, vivid colors covering approximately 92% of the BT.2020 gamut, a zoom lens that makes placement effortless, certified Google TV with all major streaming apps, low input lag, quiet operation, and optional wireless 160W surround speakers that create a full 4.1.2 Dolby Atmos setup in minutes, this projector I think checks nearly every box.
In my opinion, the Nebula X1 has shaken up the lifestyle 4K DLP category with noise, setting new standards that competitors will have a hard time reaching.
Basically, forget everything you have read in this review. If what you are looking for, is an RGB laser DLP projector with the absolute best native contrast on the market, then the Nebula X1 is the one. I think that alone is enough for many of you.
Well done Anker, well done.
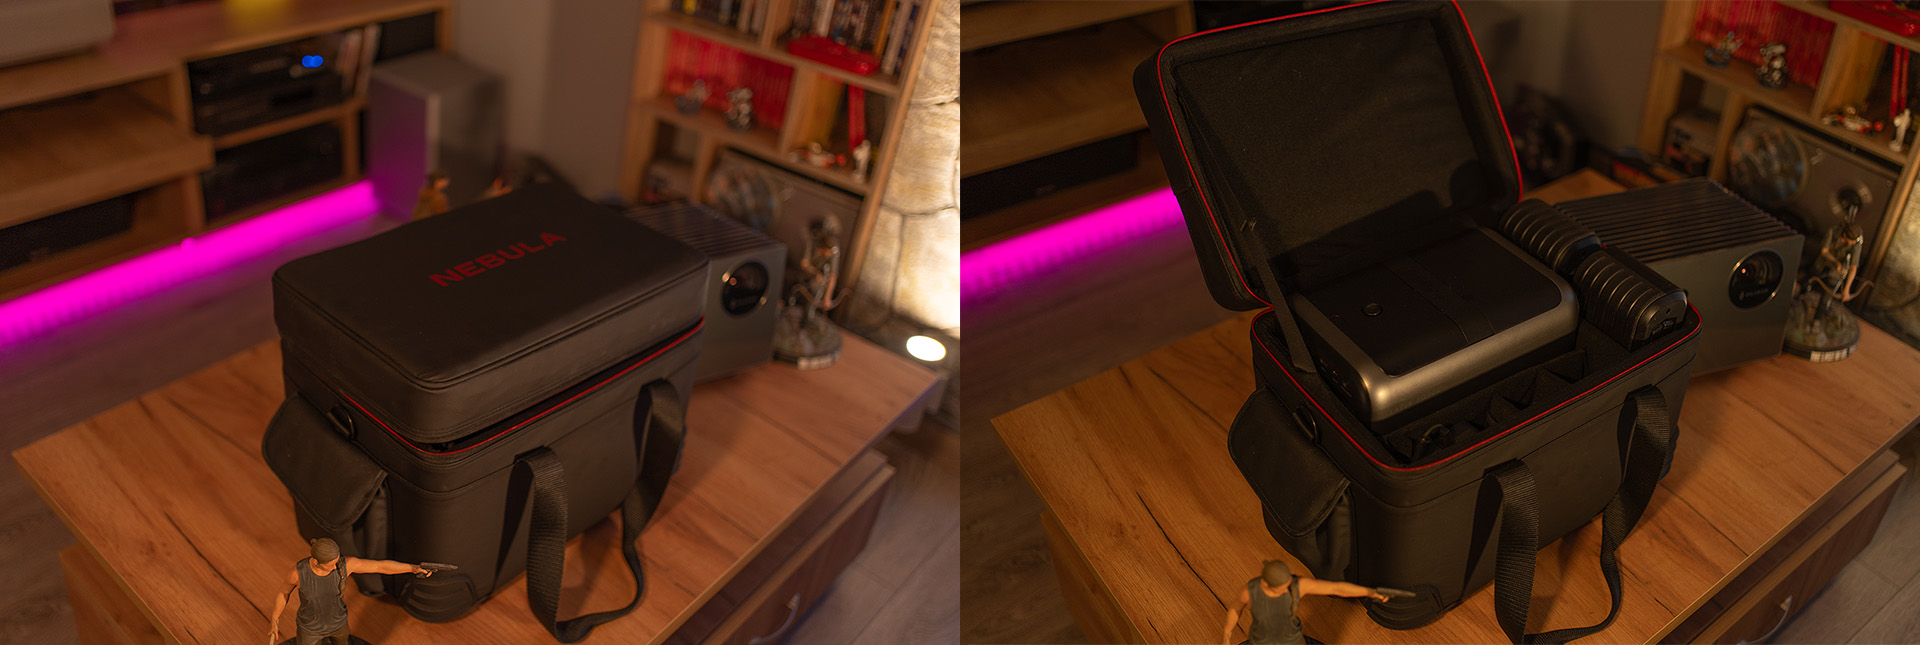
I almost forgot! The Nebula carrying case, which you can get as an optional accessory, is absolutely awesome!
Pros ✅
- Exceptional build quality, among the best in any category
- Industry-first U-shaped 2nd-gen pure RGB laser light engine
- Remarkably high native contrast for a DLP projector
- Bright output with over 3,000 real ANSI lumens
- Vibrant, wide color gamut (≈92% BT.2020 coverage)
- High-quality 14-element all-glass lens with zoom for easy placement
- Built-in lens gimbal with 25° adjustment range
- Quiet operation even under heavy use
- Certified Google TV with access to all major streaming platforms
- Low input lag, suitable for casual gaming
- Optional wireless 160W speakers create a true 4.1.2 Dolby Atmos setup in minutes
- Very competitive price for the features offered
Cons ❌
- Slow user interface
- Poor factory calibration in grayscale and gamma
- Unable to smoothly play high-bitrate 4K video files from local storage or USB
- Noticeable laser speckle in some viewing conditions
Until out next article, keep dreaming and enjoy your personal home theater to the fullest.
Nikos Tsolas
If you had to rate the 3D performance between the Nebula X1 and the VisionMaster pro2, which , in your opinion, would come first?
Oh, thanks for the fantastic, in depth review, BTW!
Hi Nikos. If you had to choose between Valerion Pro 2 or Nebula X1 which one would it be? Also what type of screen ( up to 120
inch) is the best to be used with both of them? I dont own another projector but i am looking too and because i am currently using a Sony 83 A90J Oled i want to come as close as possible in terms of picture quality and contrast. It will be used mostly for movies and for single player gaming on all generations of consoles.
Do you have any kind of ranking for your recent DLP review reviews as far as RBE effects? Or can you not see them so you don’t know?
Super deep and comprehensive review, I really like these excel based charts (brightness/contrast).
I need to mount the projector on the celling. Can this be done and what are the mounting holes/size/position?
Is the digital zoom capable of projecting to say a 40″screen? If not, what is the smallest screen it can use?
Hi, and thanks for the thorough review – mine is on the way now. I believe I read somewhere that every projector is slightly different, so that it would not be wise to use somebody elses settings – but I am still very curious about your preferred gamma og white balance settings are. Do you share them somewhere?
Cheers 🤙
On avsforum, some beta test users mentioned the new beta firmware brings major improvements to the dimming system, including a working Dynamic iris.
I assume you will be able to evaluate it, and update the review once possible?
Regards and thank you for the great work.
I am one of them, lol, I mean a beta tester for the X1 Pro. Yes, this Google TV 14 update comes with some serious new features. I think the owners of the X1 and X1 Pro will soon have one of the best projectors in terms of contrast and black levels in their hands, as a gift from Nebula.
Can you give an estimate when will you be able to publish an update with the evaluation of the new beta firmware? 🙂 Regards, and happy new year!
Regarding the new Beta firmware: Is it possible to select the HDMI output or activate 3D settings using the new shortcut key features? Additionally, are there any plans to implement automatic 3D detection in a future firmware update?
On a side note, thank you so much for your incredibly detailed reviews. Your passion for projectors and home cinema technology really shines through and makes your insights incredibly valuable!
New update is available so there is something to look into.
For me speaker connectivity is no longer a problem. Although it is a bit of a nuissance they they needed charging relatively often.
Very impressed by the prpjector just on a white wall.