

Many DLP projector owners (and not only) often densely ask me how to clean their projector to remove spots that appear on the screen usually more strongly on a black background.
So I decided to do this here article-guide explaining what exactly is going on with these stains and what exactly is the way we clean them, if it naturally catches our hand.
The guide is for W1110, W2000, w1090, w1210st and generally all BenQ W series headlamps with close chassis.
What exactly are these “spastic” spots that appear unannounced on our screen?
These stains are nothing other than dust particles that sit on the surface of the DMD chip inside the DLP optical machine. A single such speck is capable of giving us a spot of 5-6 cm of green hue in a projection dimension of 100 inches.
How does dust penetrate the inside of the optical machine?
Unfortunately, all the new DLP lights in the ~ 1000 Euro category do not have a sealed optical machine. The result is over time to penetrate dust and to the DMD chip, with the known results. The ingress of dust into the optical machine is accelerated if we make the mistake and “blow” our headlight so that we can clean it under maintenance, as many owners do, especially at the point where the projector lamp is.
How can I clean these stains and see a picture without them?
Unfortunately the way is only one and it concerns fully loosening of our projector and internal cleaning of the optical machine as described in detail by the following lines of the article.
Let’s go see how the stains are done on a w1210st.
(Be sure to disconnect the power cord and take all necessary precautions to remove the lamp before doing anything!)
Start by solving the two screws that hold the lamp cap

Open the lid and remove the lamp


After unscrewing the 5-6 screws at the bottom we can lift the top housing of the projector

And so it appears before us the inside of our projector…

We continue the loosening…


Then remove the metal protection of the mainboard

And then mainboard after we unplug everything from her. Beware of disconnecting the kalwdiotainias of the color wheel!
Then we must remove the metal “chassis” on which the mainboard sits.
After we get to the point of seeing the projector’s power supply (which includes the lamp power supply, within the economy and the cuts of cheap models)….
… We are ready to remove the optical machine as well.


The optic sits on these three bases..
Now let’s get to the bottom of this case. There’s a secret here. We’re not trying to unscrew the chip like it would make sense. Instead we go from the opposite side and unscrew the lens, believe me, this is the best and most harmless way to clean it..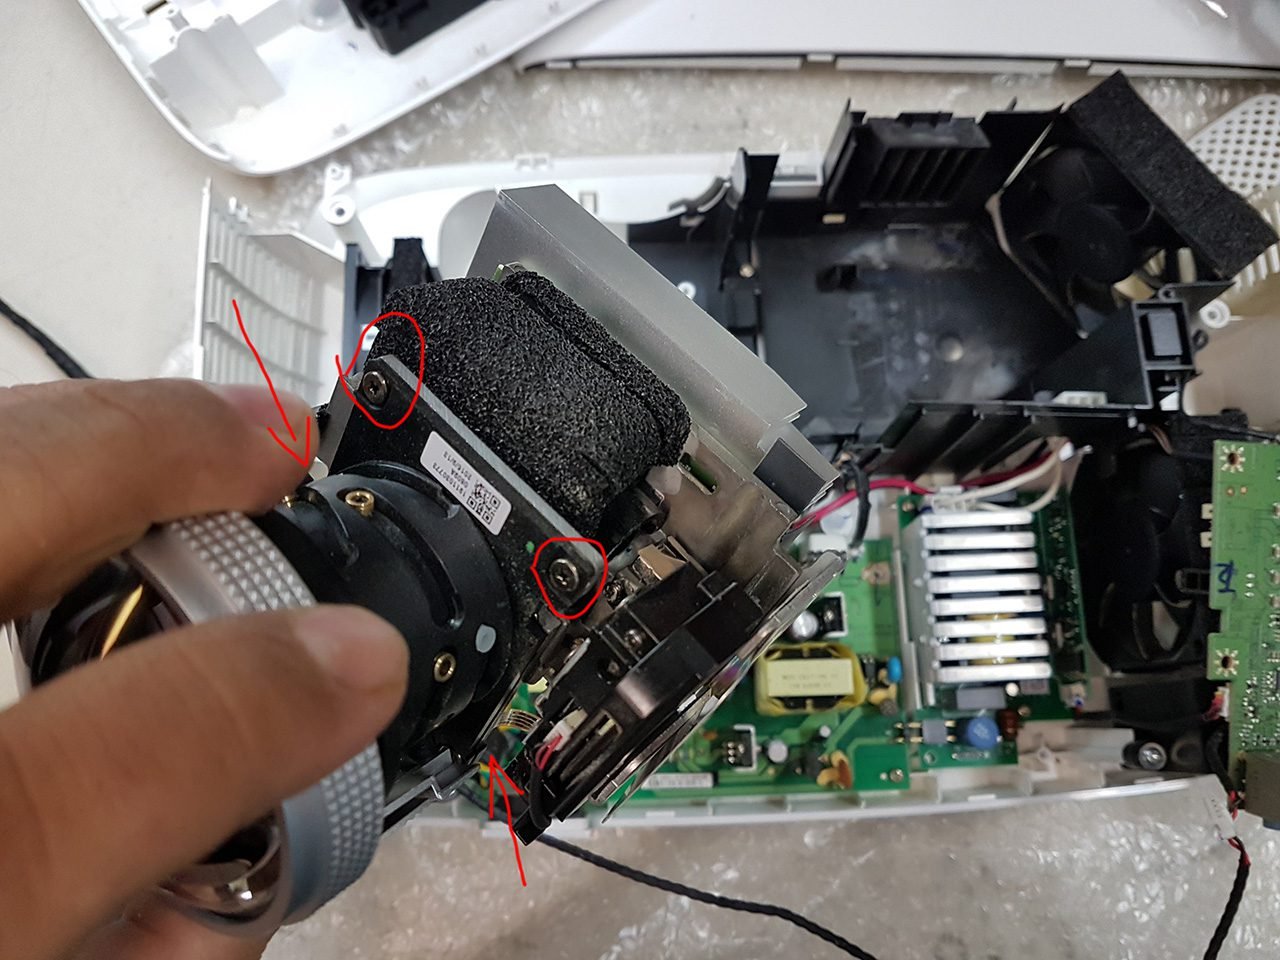
And this looks like the dust on the surface of the DMD chip…


Clean with air pressure (preferably using a jackhammer rather than spray), check if our optics are spotless and rescrew the lens carefully.
Since we arrived here of course it is advisable to clean the color wheel, two screws and it is revealed, we do not need to remove it completely above the optical


After cleaning carefully (very carefully!!) and the color wheel we begin by following the steps above to xanasynarmologoyme our projector with patience, patience and patience. Any hasty movement in such situations leads to destruction usually…. Empirically I assure you..
Finally, we place our projector opposite the screen and enjoy our movies again without a trace of these annoying spots! (and with an improved image I would say that the dust on the DMD and the wheel also influences the image while reducing the contrast!)
I hope some of you found this article useful!
Good views,
Nikos Tsοlas
11 Comments
Hi,
My Color wheel is making noise in my W1110.
I can’t find a replace wheel on the net but plenty for a W1070.
are those the same wheels?
If not, where can i find one for W1110?
Kind regards.
Hi, how to understand if the chip needs replacement because of sticking mirrors or to be cleaned because of dust?
Hi,
I managed to “de-dust” my W1070 with the help of your excellent article, thank you!
There were some minor differences in the component placement etc, but not too much.
I should’ve read your comments about patience more … patiently 🙂 ….
I managed to break a connector on the IR sensor board, thus losing the ability to use my RC 🙁
But that’s a minor problem, the main thing is that I got rid of those pesky dust particles !
Best regards
Thanks so much for the guide. I paid a company to do a clean of my projector, all I got back was a quote which was close to the cost of unit as they said there was scratches on the lens and it would need a main board and optical assembly in order to fix.
I’ve got it all back together and works as good as before. Next project is probably a dust filtered box to run the projector inside.
I have a W2000 model and pretty much the same internally, with a couple minor differences.
Thank you for great article.I have cleaned my W1110 with the help of your explanations.
It is cristal clear now, additionally I think there is an improvement on overall picture quality as well.
I have a Benq W2000 that was not cleaned for about 4 years. A lot of dust in there. Following your guide I was able to remove all the dust inside the projector and now it is spot free on the black background. This operation was not without some incidents, like the plastic base that holds the optics, it just crumbled when I touched it. Had to reinforce it with some epoxy. Also, the lid above the lamp, has a pin that pushes a sensor. That pin was not pushing all the way and my projector did not start. Had to add an extension to it.
But now I have a perfect image and dust free projector.
Thank you.
Thanks for the great tutorial. I just completed it, and now my projector won’t power on. I presumed it was a board connection, I checked all of them and still nothing. I had used some canned air on the exterior prior, but didn’t touch the power supply. It was very dusty… Do you have any suggestions as to what may have happened?
the lamp port does not fit well!
Thanks for share this good work ! I did that in a W1070 and works fine.
Hi, can someone tell me if the Benq TK800M series have a seal optical? I make this mistake to blow inside de headlight and got this round spots on a black backgound with my projector.
When i use the focus et zoom i can see a clear small dust on my screen.
I try this tutorial but i noticed that the optical of the TK800M is sealed. I can open the top cover and see a dust on the DMD chip too.
My question is can i use et lens optical brush to clean the surface of the DMD chip and blow with a manual air blower?
Thanks
This website is helpfull
Incredible tutorial on this. Thank you so much. I have a Benq HT3050. The old lamp actually exploded inside, and after fishing all the glass pieces out I kinda blew all the dust out of the inside, and then installed a new lamp. But after firing it back up, I had light colored spots all over during dark scenes, and after doing some researching found this article. I was intimidated at first, but this really covered everything perfectly. I ended up cleaning the surface of the dmd chip gently with a little rubbing alcohol. After putting everything back together I powered it on and the spots are gone.
Thank you again for this amazing step by step.